


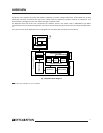
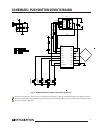
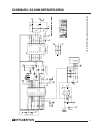

IA4320
LED1
LED2
LED3
LED4
LCD
uC
IA4420
S1
S3
S2
S4
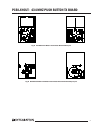
IA4220
IA4320
LED1
LED2
LED3
LED4
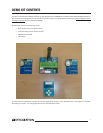
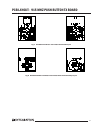
Push Button Demo receiver on F1
Push Button Demo receiver on F2
Push Button Demo transmitter on F1
Repeater Demo transmitter,
receives on F1, transmits on F2
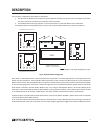
DESCRIPTION
The frequency configuration of this demo is as follows:
• One of the Push Button Demo receivers is set to a different frequency than that of the Push Button transmitter.
The other receiver is paired with the frequency of the transmitter.
• The Repeater demo receiving frequency is set to the frequency of the Push Button demo transmitter.
The Repeater demo transmitting frequency is set to the non-paired Push Button demo receiver’s frequency
.
4
Fig. 3 Repeater Demo Arrangement
After power on, the Repeater Demo continually looks for a valid packet on the receiving frequency. This happens when one
button has been pressed on the Push Button Demo transmitter. At this moment the LED will light up on the paired Push
Button receiver board. After the Repeater Demo (transceiver board) properly receives this packet, it will forward the packet
on its transmitting frequency. At that time, the LED will light up on the non-paired Push Button receiver board, if both of the
Push Button Transmitter and Push Button Receiver are in the range of the Repeater Demo. It should be noted that the
transceiver in this demo adds a small time delay between receiving and transmitting. This is done to prove the transmitter
is not talking directly to the receiver. Depending on the button pressed, a different time delay is implemented.
A packet is valid if it contains the preamble bytes (0xAA), the synchron pattern (0x2DD4), and the data, which corresponds
to the Push Button Demo data structure.
It can be shown that the paired Push Button demo is working alone, but if the Repeater demo is operating, then both the
Push Button Receivers will work, and the RF communication range is significantly bigger than without the Repeater Demo.
Note: Note:
Note: Note:
Note: Diagram may differ depending on type.