


21
Powering Up & Setting Up the DPC-7.5
Before connecting the power cord, connect all your AV com-
ponents (see page 16 to page 20).
Don’t forget to turn on your TV or projector and select the
video input to which the DPC-7.5 is connected.
If you’re using a hi-fi amp, AV receiver, or surround sound
decoder for audio playback, turn that on as well and select the
audio input to which the DPC-7.5 is connected.
The very first time you turn on your DPC-7.5, the Initial
Setup menu appears onscreen, as shown.
Here you need to specify the size of your TV (standard 4:3 or
widescreen 16:9), select a language for the onscreen setup
menus, and configure the digital audio output. You can
change these settings later by using the onscreen setup menus
(see page 39).
Your DPC-7.5 is now ready for use. See page 22 for informa-
tion on loading discs, and page 23 for information on select-
ing and playing discs.
Notes:
•You can change the language of the onscreen setup menus,
and your preferred languages for DVD menus, foreign lan-
guage soundtracks, and subtitles individually on the Lan-
guage page of the onscreen setup menus (see page 42).
• Not all DVD-Videos have multi-language menus, foreign
language soundtracks, and subtitles. In such cases, the
disc’s default language is used.
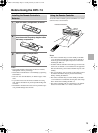
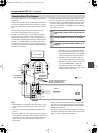
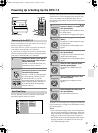
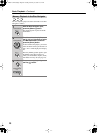
Powering Up the DPC-7.5
1
Connect the power cord to the AC
INLET. Connect the other end to a
suitable wall outlet.
The DPC-7.5 enters Standby mode, and
the Standby indicator comes on.
2
To turn on the DPC-7.5, press the
[Standby/On] button (or the remote
controller’s [On] button).
The DPC-7.5 comes on, the display lights
up, and the Standby indicator goes off.
To turn off the DPC-7.5, press the
[Standby/On] button (or the remote con-
troller’s [Standby] button). The DPC-7.5
enters Standby mode and the Standby
indicator comes on.
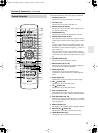
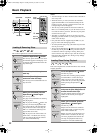
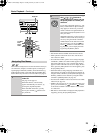
First Time Setup
+
10
Clear
123
645
Setup
Top Menu
Return
Audio
Stop
DownFFFR Up
Play Pause
Angle Subtitle
Open/
Close
On
Standby
Enter
7
8
9
0
Search Last M Memory
Chain Mode
Repeat
A
-
B
Random
Display
Menu
Last Memory
DimmerRepeat Display
Standby/On
Standby
Standby indicator
StandbyStandby/On
On
Enter
Standby/On
On
Standby
Remote controller
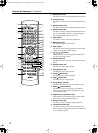
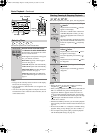
Initial Setup
TV Shape
Digital Out
On-Screen Language
4:3 Letter box
4:3 Normal
16:9 Widescreen
16:9 Compressed
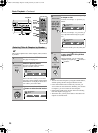
1
Use the remote controller’s [ ]/[ ]
buttons to select a TV shape, and
then press [Enter].
See page 40 for more information on the
TV Shape options.
The On-Screen Language menu appears.
2
Select a language, and then press
[Enter].
See page 42 for more information on the
language options.
The Digital Out–>Dolby Digital menu
appears.
3
Select a Dolby Digital option, and
then press [Enter].
See page 42 for more information on the
digital audio output options.
The Digital Out–>Linear PCM Out menu
appears.
4
Select a Linear PCM Out option,
and then press [Enter].
The Digital Out–>MPEG Out menu
appears.
5
Select an MPEG Out option, and
then press [Enter]
.
The Digital Out–>Digital Out menu
appears.
6
Select a Digital Out option, and
then press [Enter].
The Initial Setup menu closes.
Enter
Remote controller
Enter
Remote controller
Enter
Remote controller
Enter
Remote controller
Enter
Remote controller
Enter
Remote controller
✱✷✰-✪.★ ✱✽✱ ✰❉❂n❈❆❍ ✷❂❈❆ ✥✤ ✻❑❆■❅❂❖, ✳❆❃❍❑❂❍❖ ✤✣, ✥✣✣✧ ✤✣:✤✤ ✮M