


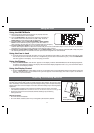

Optional: Connecting to a computer
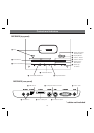
a) Use the USB cable included with your iPod to connect your docked iPod to a computer via the Sync Port on the rear of the
Receiver. This can be used to sync your iPod with iTunes. During sync operation, your iPod will not be controlled by the iH52.
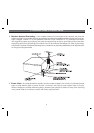
Optional: Connecting to an AV device (TV, VCR, etc.)
a)
The iH52 has 2 video out jacks, a standard yellow composite video jack and an S-video jack to output video signal from your 5G
iPod with Video or iPod Photo to a VCR, TV monitor or similar device. Video cables are not provided. The video jacks do not
output audio.
Using the iH52
10
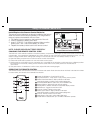
Using your iPod
Playing and charging your iPod
a)
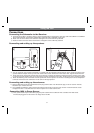
Insert proper dock insert for your iPod (see table on page 7), then gently dock iPod in µ Dock. When docked, iPod will
charge until fully charged when the iH52 is connected to an AC outlet. Unit will not overcharge iPod. If you dock an iPod
that is in play mode, the iH52 will automatically switch to iPod mode and play your music.
b)
If iPod is not playing when docked, press the Play/Pause Button to play the iPod, and again to pause.
c)
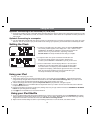
Press the ᕨ ¾ Volume UP or DOWN buttons to adjust iH52 volume up or down. Use the Sub Level Knob on the subwoofer
to adjust bass volume level.
d) Press the EQ button to access the five EQ (tone) settings: flat, rock, jazz pop and R & B. Press the FORWARD or REVERSE
buttons to cycle through the EQ settings.
e) Press
³ Power On/Off Button to turn the iH52 and iPod off.
Using your iPod Shuffle
a) To use your iPod shuffle, gently dock it in the Shuffle Dock. To listen to your iPod shuffle, press the iPod Button until “shuffle”
and the shuffle icon appear in the display, then use controls on your shuffle. When docked, the shuffle will charge until fully
charged when the iH52 is connected to an AC outlet. Unit will not overcharge shuffle.
b) Adjust Volume and EQ settings as above to your listening preferences. To turn off shuffle, use shuffle controls.
a) To adjust for Daylight Saving Time (DST), press and hold the dst/radio button.
The currently set time appears on the display with -1 and +1 below it. Press
FORWARD or REVERSE to highlight the desired setting (the time will
advance one hour or go back one hour, depending). Press the
dst/radio button.Two beeps will indicate DST setting is complete.
b) To adjust the time zone, press and hold the Clock Button until
the Time Zone display flashes. Unit is preset to Eastern Time;
if needed, press FORWARD or REVERSE to cycle to your time zone.
c) Press the Clock Button. The time display will flash. If the correct time
is displayed, press the Clock Button again to confirm the time setting.
If the correct time is not displayed, press FORWARD or REVERSE
to adjust the time display (a PM indicator appears when time is set to PM).
When the correct time is displayed, press the Clock Button again.
Two beeps will indicate clock setting is complete.
Setting the Clock