


7
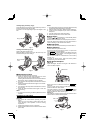
Positioning
Reception may be poor when the radio is used inside a
vehicle or building. When inside a building, place the radio
near the window to ensure better reception.
Noise may occur if the radio is placed near an appliance
that generates noise. Move the radio away from the source
of the
noise.
● Auto Power Off
The radio turns off automatically after 8 hours.
USING THE TIMER FUNCTION
○ The radio turns on/off at the preset time
○ Use the radio as an alarm clock
● Sleep Timer
Setting the sleep timer turns the radio off after the set time
has elapsed.
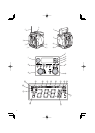
1. Pressing the sleep timer / clock button while the
power is turned on displays the
SLEEP
indicator.
The time (minutes) indicator changes in order of
[90→80→70→...→10→OFF] in 10-minute units each time
the button is pressed.
2. Press the button repeatedly until the desired time is
displayed.
3. The radio turns off when the set time has elapsed.
4. To cancel the timer,
press the sleep timer / clock button
until the indicator is set to OFF.
The
SLEEP
indicator goes off and the sleep timer is
cancelled.
To check the remaining time
The
SLEEP
indicator is displayed when the sleep timer
has been set.
Press the sleep timer / clock button to check the remaining
time on the timer.
● Buzzer Alarm / Radio Alarm
NOTE
○ The volume of the buzzer alarm cannot be adjusted.
○ If the rechargeable battery is running low, the radio
alarm timer may not work.
Charge the battery before setting the timer or use the
AC adapter.
○ The radio alarm turns on in the station and at the volume
selected
before the timer was set. Set the volume and
time to avoid creating a disturbance when the radio
turns on.
When the alarm time is set and the buzzer alarm is selected,
the buzzer sounds at the preset time.
When the radio alarm is selected, the radio turns on in the
selected radio station at the preset time.
1. Set the time with the radio turned off .
2. Press and hold the FM mode / alarm button for more
than 2 seconds to switch to alarm mode.
The
ALARM
indicator is displayed.
3. The “hour” indicator blinks. Tur n the select dial or press
the search button to select the desired “hour”.
Press the FM mode / alarm button to set the “hour”. The
“minutes” indicator blinks. Turn the select dial or press
the search button to select the desired
“minutes”.
4. Press the FM mode / alarm button to save the set time.
The
ALARM
indicator goes off .
5. The display changes in order of [buzzer alarm→radio
alarm→no display] each time the FM mode / alarm
button is pressed.
6. The power turns on and the buzzer sounds or the radio
plays when the preset time is reached.
Buzzer Alarm
To turn off the buzzer alarm, press the FM mode / alarm
button. If it is not turned off , the buzzer will continue to
sound for 1 minute and then stop.
Radio Alarm
To turn off the radio, press the power button. If it is not
turned o
ff , the radio will continue to play for 30 minutes.
To check the alarm
To check the time set on the alarm, press the band selector
button with the power turned off .
OTHER FUNCTIONS
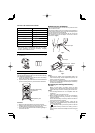
● Connecting an External Device
You can use the radio to listen to an MP3, MD or CD
player.
1. With the radio and the external device both turned
off , connect the audio cord (ø3.5 mm, available at an
electric store) of the external device to the external
input (AUX IN) terminal on the side
of the radio.
2. Turn on the radio and press the band select button to
display [AUX].
NOTE
○ The display changes in the order of [FM→AM→AUX→FM]
each time the band select button is pressed.
3. Turn on the external device to start listening.
4. Adjust the volume.
5. To disconnect
the external device, turn off the device
and the radio before removing the audio cord.
● Using Headphones
You can use headphones or earphones purchased from an
electric store to listen to the radio.
CAUTION
○ Be sure to turn the volume down before connecting the
headphones or earphones.
Failure to do so may result in sudden loud noise and
cause hearing impairment.
1. Connect the headphones or earphones to the
headphone jack on the side of the radio.
2. No sound is emitted from the radio speakers when
headphones or earphones are connected.
3. Adjust the volume.
● Charging a Cell Phone
NOTE
○ When using the rechargeable battery as the power
source, make sure that it is adequately charged. If the
battery power is low, it may not be possible to charge
the cell phone.
○ Disconnect the cell phone except when charging.
Do not make or receive calls on the cell phone
in the
vicinity of the radio as radio reception may be adversely
aff ected.
○ The charging time varies depends on the type of cell
phone.
○ Do not use the radio to charge devices other than a cell
phone.
1. Connect a USB charging cable suitable for your cell
phone
(purchased from an electric store) to the charging
jack on the side of the radio.
2. Turn on the radio and press the band select button to
display [AUX].
NOTE
○ The display changes in the order of [FM→AM→AUX→FM]
each time the band select button is pressed.
3. Select AUX
mode to start charging.