


MAS SYSTEM
15
Operation
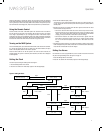
Use the numeric keys to directly access a track. If the disc is organized into folders,
press the Folder +/– buttons to open a folder. Additional presses skip to the next or pre-
vious folder. Within a folder you may search through the tracks more quickly by pressing
the +10 and –10 numeric keys.
USB
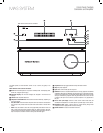
Your MAS system is equipped with two USB Ports, one on the rear panel of the controller,
and one on the right side panel, near the front of the controller. The front port is selected
as USB A, and the rear port is USB B. Each press of the USB Source Selector toggles
between the two ports.
The system is compatible with flash and hard-disk USB drives formatted in the FAT32 file
format. The system will recognize up to 9999 files in the MP3 or WMA formats, which
may be organized into folders.
NOTE: Although you can connect many different MP3 music players to the USB
port, you should not connect an iPod here. To enjoy audio content stored on an
iPod, use the included The Bridge IIIP docking station. Connect The Bridge IIIP
to its proprietary connector on the controller’s rear panel and dock the iPod in
The Bridge IIIP as shown on page 10. Do not connect a personal computer or any
peripherals to either of your MAS system’s USB ports.
When installing the system, make sure to leave sufficient room on the right side to safely
accommodate a USB device.
When the USB device is inserted, the total number of files will be displayed after a delay
to allow the device to be read.
Playback and navigation are the same as for an audio or data CD, as described above.
It is recommended that you stop playback before removing a USB device, although it is
not necessary to turn off the system.
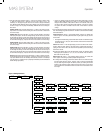
Programmed Play
Playlists of selected tracks may be programmed for the current audio or data CD or USB
device. Playlists are not available for other sources. To program a playlist, play must
be stopped.
s0RESSTHE0ROGRAMBUTTONTOBEGIN0ROGRAMMODE4OEXITWITHOUTPROGRAMMINGA
playlist, press the Stop button.
s!DDTRACKSTOTHEPLAYLISTBYUSINGTHE3KIP3CAN4RANSPORT#ONTROLSORTHENUMERIC
keys to select the track, then pressing the Program button to enter the selection. Add
up to 99 tracks.
s)FYOUMAKEAMISTAKEYOUMAYCLEARTHETRACKJUSTPROGRAMMEDBYPRESSINGTHE
Clear button.
s0RESS0LAYTOPLAYTHEPLAYLISTOR3TOPTOSAVETHEPLAYLISTWITHOUTPLAYINGIT4HESYSTEM
will remain in Program mode.
To delete the playlist and exit Program mode:
s)FTHEPLAYLISTISPLAYINGSIMPLYPRESSTHE0ROGRAMBUTTONTODELETETHEENTIREPLAYLIST
the current track will continue playing.
s)FTHEPLAYLISTISSTOPPEDPRESSTHE#LEARBUTTON
Playlists may be edited:
s4OADDATRACKTOTHEPLAYLISTPRESSTHE3TOPBUTTONTHENTHE0ROGRAMBUTTON0ROCEED
as described above.
s4OVIEWTHETRACKSINAPLAYLISTWITHOUTMAKINGCHANGESSTOPPLAYANDPRESSTHE#HECK
button. Each press advances to the next track in the playlist. To exit Check mode,
press the Play button.
s4ODELETEASINGLETRACKFROMTHEPLAYLISTSTOPPLAYANDPRESSTHE#HECKBUTTONREPEAT-
edly until the desired track appears. Press the Clear button.
Playlists are lost when the system is turned off or the disc or USB device is removed.
The playlist will also be lost when the source is changed.
The Bridge IIIP Dock for iPod
Press the Bridge Source Selector to select The Bridge IIIP as the source. When a compat-
ible iPod is docked (see page 4), a message will appear in the front-panel display that
The Bridge IIIP is connected.
The display will switch to the navigation menus, and the menu screen on the iPod
itself will be replaced by a “check mark” graphic and a message reading “OK to
Disconnect.”
When you see the “OK to Disconnect” message displayed, the iPod may be operated
using the MAS system’s front-panel or remote controls.
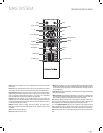
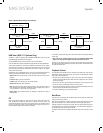
s4ONAVIGATETHEMENUSPRESSTHE7/3 buttons to scroll through a list. Press the Enter
button to select a menu item. Pressing the Enter button while an audio track is dis-
played will begin play. Press the Back button to return to the previous menu level.
The transport controls work as they do for CDs:
s4OPAUSEORRESTARTPLAYPRESSTHE0LAY0AUSEBUTTON
s4OSEARCHFORWARDORREVERSETHROUGHATRACKPRESSANDHOLDTHE3KIP3CAN&ORWARD
or Reverse button.
s4OSKIPFORWARDORREVERSETHROUGHTHETRACKSTAPTHE3KIP3CAN&ORWARDOR2EVERSE
button.
To play the tracks in the current playlist or category in random order (“Shuffle” mode),
press the Random button. Press it again to end random playback.
Any Repeat Play settings on the iPod will be indicated in the message display. To change
the settings, remove the iPod from The Bridge IIIP and use the controls on the iPod.
During normal play, select the Now Playing menu option to view the status. The upper
line of the message display will show the elapsed track time and remaining track time.
The song, artist and album information will scroll on the lower line, if available.
It is recommended that you stop playback before undocking the iPod, although it is not
necessary to turn off the system. However, the system should be turned off before con-
necting or disconnecting The Bridge IIIP.
Auxiliary Inputs
Your MAS system is equipped with three analog audio inputs, a phono input (MM type)
and four digital audio inputs. If you have connected a compatible device, such as a
portable audio player or a cassette deck, select the corresponding auxiliary input as the
source and use the device’s own controls.
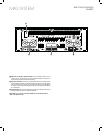
To select one of the analog audio inputs or the phono input, press the Line In button
repeatedly to toggle through the inputs. To select one of the coaxial or optical digital
audio inputs, press the Digital In button repeatedly.
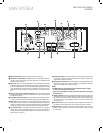
TV Input (Analog): Dual rear-panel RCA-type jacks
AUX Input (Analog): Dual rear-panel RCA-type jacks
Phono Input (Analog): Dual rear-panel RCA-type jacks
Line Input (Analog): Front 3.5mm jack
Coaxial 1 Input (Digital): Rear-panel RCA-type jack
Coaxial 2 Input (Digital): Rear-panel RCA-type jack
Optical 1 Input (Digital): Rear-panel TOSLINK
™
connector
Optical 2 Input (Digital): Rear-panel TOSLINK connector