


REMOTE CONTROL FUNCTIONS 11
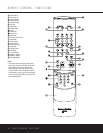
REMOTE CONTROL FUNCTIONS
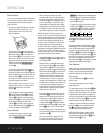
å Main Power On: When the HK 3380 is in the
Standby mode, as indicated by the
Power Indicator
2 glowing amber, press this button to turn the
HK 3380 on.
∫ Main Power Off: When the HK 3380 is turned
on, press this button to place it in the Standby mode.
In this condition, the unit is still connected to AC Power.
ç Source Selectors: Press these buttons to select an
input source for the HK 3380.
NOTE: The first press of the Video 3 Source Selector
ç will select the device connected to the rear-panel
Video 3 Audio/Video Inputs ª.Press the Video 3
Source Selector
ç again until the dot to the left of the
Video 3 Input Indicator D flashes to select the device
connected to the front-panel
Video 3 Audio/Video
Inputs
.Each additional press of the Video 3 Source
Selector
ç will toggle between the front- and rear-panel
Video 3 Audio/Video Inputs ª.
∂ Preset Up/Down: When the tuner is in use, these
buttons scroll through the stations that have been pro-
grammed into the HK 3380’s
memory.These buttons
also control the track Skip
Up/Down on compatible
Harman Kardon compact disc players/changers.
≠ Transport Controls: These buttons are used to
control the Play, Stop, Pause and Record functions on
compatible Harman Kardon CD/DVD players/changers
and CD recorders.
ƒ Disc Skip: These buttons do not have any func-
tions when controlling the HK 3380, but they operate
the Disc Skip functions of compatible Harman Kardon
CD/DVD changers.
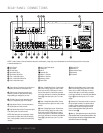
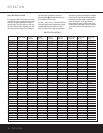
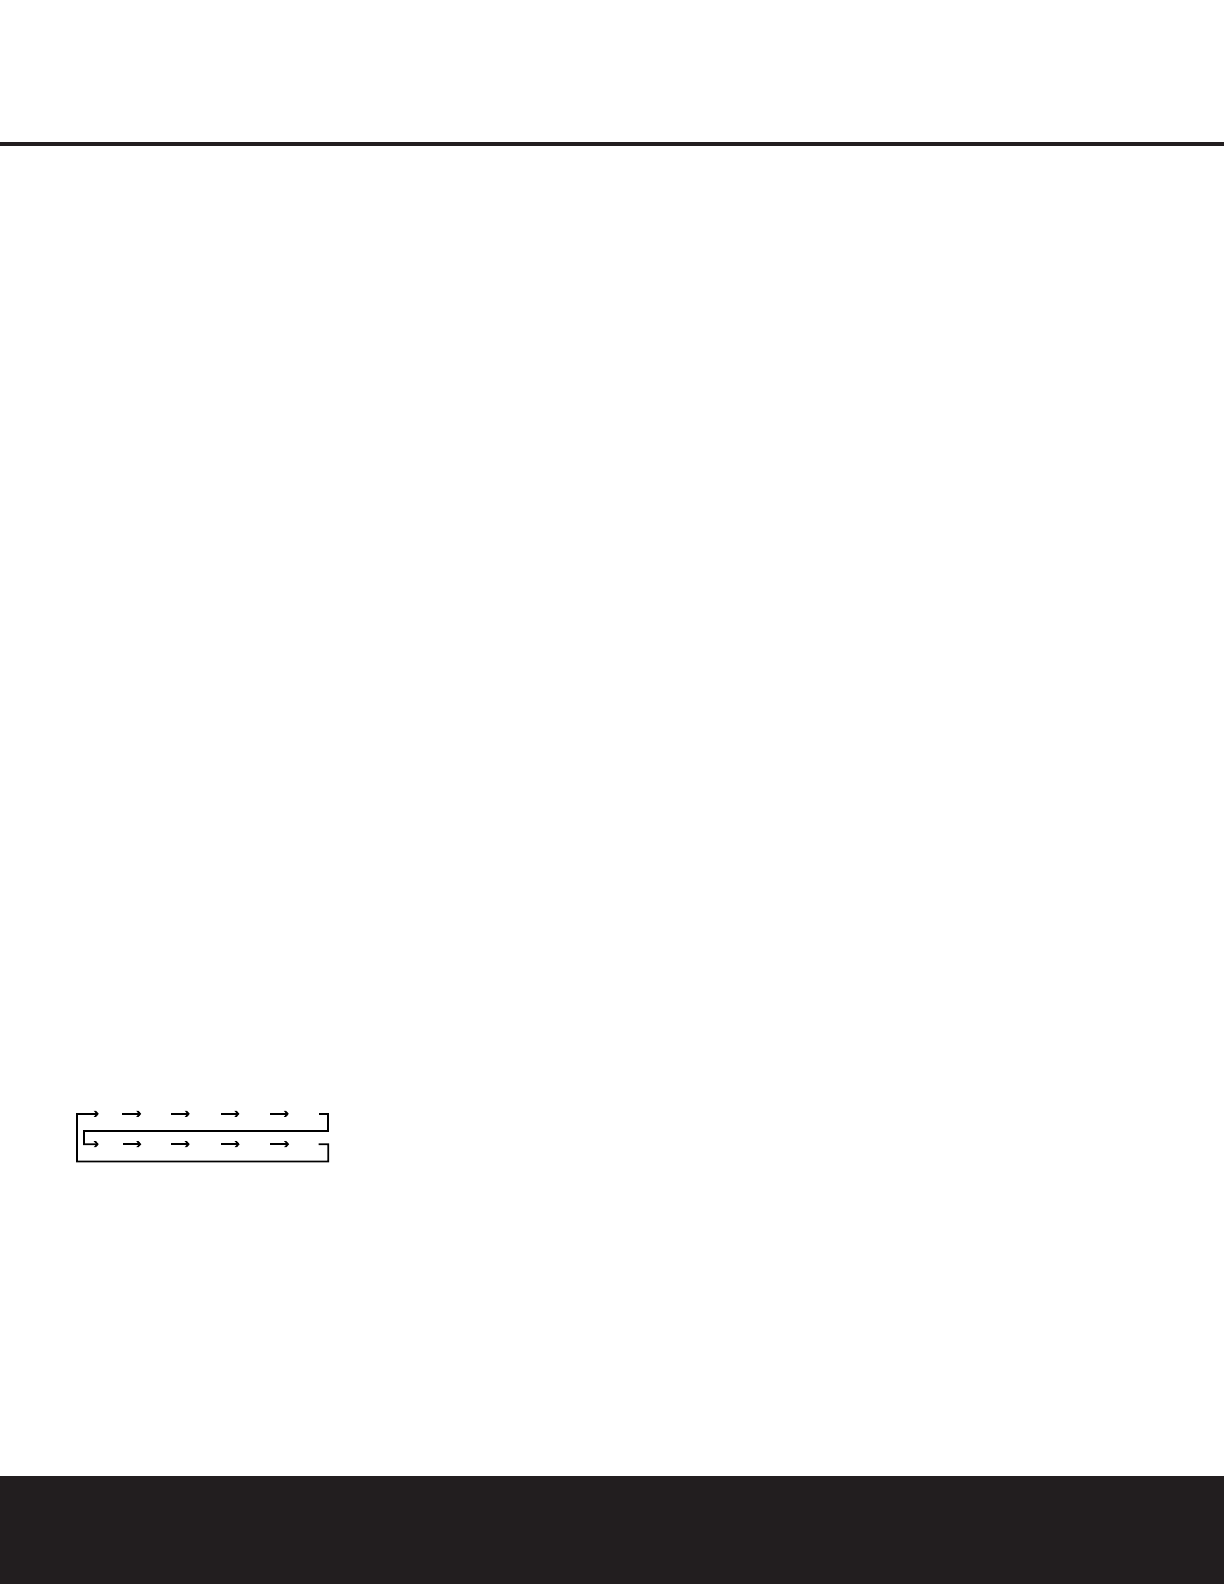
© Sleep Button: Press this button to place the unit
in the Sleep mode. Each press of the button selects
the amount of time that will remain before the unit will
automatically go into the Standby mode, as shown in
the
Sleep Timer C, in the following order:
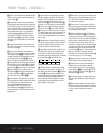
˙ Dimmer Button: Press this button to dim the
front-panel displays and indicators.The first press of
the button will dim the displays to one-half normal
brightness and turn off the blue light inside the
Volume Control Ú, but the Power Indicator 2
will remain lit.The next press of the Dimmer Button
^ will turn off all displays, including the light inside
the
Volume Control Ú, but the Power Indicator
2
will remain lit to remind you that the unit is turned
on. Press the button again to return the display to nor-
mal brightness.When the panel is dimmed, it will
return to normal brightness after the unit is turned off,
then on again.
î Tuning: Press these buttons to tune up or
down through a selected frequency band.A brief
(1/2-second) press of the button will manually tune
to the next frequency increment, while pressing and
holding the button for a longer period will automatically
tune to the next station with a signal strong enough
for acceptable reception.
∆ Direct Button: Press this button to select a radio
station by entering its frequency using the
Numeric
Keys
K. (See page14 for more information.)
˚ Numeric Keys: These buttons serve as a 10-
button numeric keypad to enter tuner preset positions
or to tune stations directly.
¬ Auto Preset: When the tuner and FM band have
been selected, this button may be used to automatically
program the tuner presets for all active stations.To start
the auto preset scan, press and hold the button. Note
that the
Memory G and Preset F indicators will
flash.After a few seconds, the tuner will start to “look”
for active stations, as shown by increasing frequency
numbers in the
Main Information Display B.
Release the button and note that the tuner will briefly
stop at each active station and add a preset number to
the memory. If the FM tuner finds fewer than 30 FM
stations with acceptable signal strength, the Auto Preset
tuning will scan two more cycles or until the remaining
vacant preset memory spaces have been filled with
those found in the first scan.The scan will stop when
all 30 preset memory spaces have been filled or when
three scans through the band have been completed.
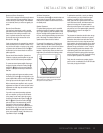
µ Secondary Control Cover: This sliding cover
normally is in the “up” position so that it hides the
secondary controls.To access these controls, place
your thumb on the small recessed area at the top
center of the control, and gently press the cover down
and toward you.
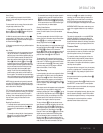
Ñ Clear Button: This button is used to clear preset
memory information for the HK 3380’s tuner. (See
page 15 for more information on tuner presets.)
ø Memory Button: Press this button to open a
memory position that stores a preset location for the
HK 3380’s tuner. (See page15 for more information
on tuner presets.)
π Master Volume: Press these buttons to raise or
lower the HK 3380’s volume.
œ Preset Scan Button: Press this button to auto-
matically scan through the list of stations that are
programmed into the HK 3380’s tuner memory. When
the button is pressed, each preset station will play
for five seconds before the next station is selected.
Press the button again when the desired station is
heard, to stop the preset scan.
® Mute Button: Press this button to momentarily
silence the HK 3380.
ß FM Mode Button: Press this button when the
tuner is in use in the FM band to switch to monaural
reception if the station is weak and noisy. (See page14
for more information.)
† Enter Button: This button has no function on the
HK 3380, but may be used as the Enter key for a
compatible Harman Kardon DVD Player or as the
Random Play button for a compatible CD Player. (See
page 16 for more information on using the remote to
control other devices.)
Ü Tuning Up/Down: When the tuner is in use, these
buttons will tune up or down through the selected fre-
quency band.A brief (1⁄2-second) press of the button
will manually tune to the next frequency increment, while
pressing and holding the button for a longer period will
automatically tune to the next station with a signal strong
enough for acceptable reception.These buttons will
also control Fast Forward and Fast Reverse (or Rewind)
for compatible Harman Kardon compact disc players/
changers.
√ Speaker 1 Selector: Press this button
to turn the
speakers connected to the
Speaker 1
Output
Terminals
‹ on or off.
∑ Speaker 2 Selector: Press this button
to turn the
speakers connected to the
Speaker 2
Output
Terminals
› on or off.
≈ Transmitter Window: Point this area of the
remote toward the receiver when using the remote.
90
min
80
min
70
min
60
min
50
min
40
min
30
min
20
min
10
min
OFF