


PLAYBACK BASICS 15
PLAYBACK BASICS
Playback of CDs on the CDR 26 resembles that on
traditional CD players with a few exceptions to accom-
modate the availability of two separate playback
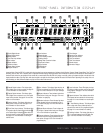
decks. Before using the CDR 26, power-up the unit
by pressing in the
Main Power Switch 1. The
Status Mode Indicator 2 will turn green, indicating
that the unit is on and functioning. At the same time,
the
Information Display ı will light and the leg-
ends behind the front-panel controls will also light up.
Once the
Main Power Switch 1 has been turned
on, the CDR 26 may be powered-on or -off using the
remote control. Pressing the
Power Off Button
on the remote will place the unit in a Standby mode,
as indicated by the amber color of the
Status Mode
Indicator
2.To turn the unit on using the remote,
simply press the
Power On Button a.
When the unit is in the Standby mode,
it still draws
power from the AC main outlets. To turn the unit
completely off, press the
Main Power Switch 1.
When the
Status Mode Indicator 2 goes out, the
CDR 26 is off and not drawing any power. When you
will not be using the unit for an extended period of
time, we recommend using the
Main Power Switch
1 to turn the unit completely off.
Although compact discs are very reliable, rough han-
dling may damage them. Avoid scratching the bottom
(nonprinted) side of the discs, as this will affect play-
back of standard CDs and interfere with the recording
of CD-R and CD-RW discs. It is also a good idea to
always handle discs by their edges to avoid finger-
prints which may also interfere with playback quality
and possibly cause damage to the laser and lens
assembly.
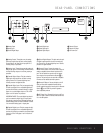
Loading and Unloading Discs
To load a disc, first open the desired CD deck by
pressing the appropriate
Open/Close Button 6$
c
. The word OPEN will appear in the
Information Display Y. Always make certain that
there is sufficient room in front of the unit for the disc
drawers to open. If either disc drawer is blocked, the
drawer will stop at the blocked position and an
ERROR message will appear. Press the appropriate
Open/Close Button 6$c to reopen the
drawer.
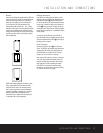
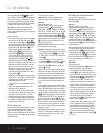
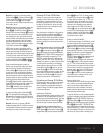
Load a disc in the tray with the printed (label) side fac-
ing up. Once the disc is seated, make certain that it is
properly centered within the tray. When using 3" discs,
take extra care to make certain that the disc is care-
fully centered within the smaller ridges in the disc tray.
To close the drawer, press the appropriate
Open/
Close Button
6$c or gently press on the
outside of the front cover of the disc tray. When the
drawer is closed the word
CLOSE will appear
momentarily in the
Information Display Y, and the
letters
TOC will begin to flash in the display once the
drawer is completely closed.
If the disc is a standard CD or a finalized CD-R or
CD-RW disc,
TOC will flash while the unit reads the
disc’s Table of Contents information. Once that data is
read, the
Information Display Y will show the total
number of tracks and the total time of all tracks on the
disc. The
CD Indicator R will also light to indicate
that a standard CD is in use.
When an unfinalized CD-R or CD-RW disc is placed in
the
Record Deck %, the letters OPC will flash
once the Table of Contents has been read. This indi-
cates that the unit is optimizing its circuits for maxi-
mum compatibility with the specific recordable disc in
use. The number and total running time of any tracks
that have already been recorded will appear in the
Information Display Y, and the appropriate indica-
tor
Q will light to tell you whether a CD-R or CD-RW
disc is in use.
If a computer data disc is placed in the CDR 26, a
DATA DISC or DISC ERROR message
will appear, depending on whether the data disc is
finalized or not. Data discs will not play and may not
be recorded or dubbed in the CDR 26.
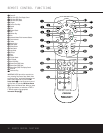
Using the Remote
The CDR 26’s infrared remote control is designed to
operate both CD decks, as well as control the play-
back programming and record functions. To allow for
efficient use of the remote, its operation is different
from standard CD players. Some buttons are dedicated
to one specific CD deck, while others are shared
between the two decks.
No matter which deck is playing, the
Play Deck
(CDP)
and Record Deck (CDR) Time Display
Control
b and Open/Close Buttons
c will always send a command to their
respective deck. The other transport and programming
functions, however, are shared. To use any of the
transport controls, such as
Play j, Stop v,
Pause w or the Search and Skip Buttons f
ixz
, the Numeric Keys p or the
Programming Keys eghky, first
press either the
CDP Button d to command the
Play Deck 3 or the CDR Button ` to command
the
Record Deck %. When the button is pressed, a
message reading
CDP or CDR will appear in the
appropriate
Information Display Y to confirm the
selection.
To switch the remote from controlling one deck to
controlling the other, simply press the
Select Button
d` for the deck you wish to control at any time.
Features relating to the recording process, such as
Speed q and the double row of record-function
buttons in the center of the remote
lmno
rstu
, are dedicated feature buttons that
do not require any special selection.
28
29
28
Labeled
Surface
28
28
30