


11 REMOTE CONTROL FUNCTIONS
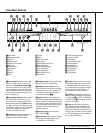
Remote Control Functions
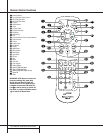
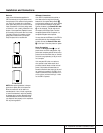
a Power-On Button: Press this button to
turn the CDR 2 on. Note that in order for this
control to function, the Front-Panel Power
Switch 1 must first be pressed so that the
unit is in the Standby mode.
b Play (CDP)-Deck Display Control: Press
this button to cycle through the various time
display options for the disc in the Play Deck
3. See page 17 for more information on time-
display options.
c Play (CDP)-Deck Open: Press this button
to open the Play Deck 3.
d Play (CDP)-Deck Select: Press this but-
ton to control or program the functions of the
disc in the Play Deck 3.
e Program: Press this button to begin the
programming sequence for one of the CD
decks. See page 18 for more information on
programming the CDR 2.
f Reverse Search: Press this button to play
the selected disc in reverse to locate a desired
passage.
g Single: When this button is pressed, the
CDR 2 will function as a two-disc CD player/
changer. In the Single mode, the audio output
will be routed to all output jacks ¡™¢∞
•ª regardless of which CD deck is actually
playing. See page 17 for more information on
the Single-Play mode.
h Program Check: Press this button to
check or edit a programmed playback sequence.
See page 18 for more information on pro-
grammed
playback.
i Previous-Track Skip: Press this button to
skip backwards to the beginning of the track
currently being played. Press it a second time to
move back to the beginning of each previous
track.
j Play/Select: This button has two func-
tions. It will most often be used as a standard
play button, but when setting up certain record
functions, it is also used as an Enter or Select
button.
k Random Play: When the CD Deck is
stopped, press this button to begin random play
of all tracks on a disc.
l Dub: Press this button to begin a dub. See
page 20 for more information on dubbing.
m Automatic/Manual Track Increment
Selector: Press this button to select between
automatic and manual track increments during
a recording session. See page 20 for more infor-
mation on track increments.
n Track Increment: When the Manual
mode for track increments is selected during
recording, press this button to increase the
track number. NOTE: This function does not
operate during CD Sync or dub recording.
o Finalize: Press this button when a record-
ing is complete to initiate the finalization
process.The Play/Select button *j must
be pressed within three seconds to activate
finalization. Until this button is pressed and the
finalization process is complete, CD-R discs
may not be played on conventional CD
machines. See page 22 for more information
on Finalization.
p Numeric Keys: Press these buttons to
access a specific track for playback or during
the programming process. See page18 for more
information on programmed playback.
q A-B Repeat: Press this button to specify a
segment of a disc for repeat play. See page 18
for more information on repeat play.
r Repeat: Press this button once to repeat
the current track.To repeat an entire disc, press
the button twice.
s Speed Select: Press this button to select
the recording speed for internal dubs. See page
20 for more information on selecting the proper
speed.
t Record Button: Press this button to
begin a manual recording.
u Erase Button: Press this button to initiate
the erasure of a track or of an entire CD-RW
disc or to Unfinalize a disc. Note that erasure is
only possible on CD-RW discs. See page 22 for
more information on erasing discs.
v Input Select: Press this button to select
the input source (analog, digital-coax or digital-
optical) for recording. See page 20 for more
information on input selection.
w CD Sync: Press this button once to begin
an automated recording of a single track from
an external CD player when a digital connection
is used. Press it twice to begin automated
recording of an entire disc. See page 21 for
more information on CD Sync recording.
x Stop: Press this button to stop playback or
recording.
y Pause: Press this button to momentarily
pause playback. Press it again to resume
playback.
z Next Track: Press this button to skip
forward to the next track on a disc.
` Dual Playback: Press this button to
enable both CD Decks to play back at the same
time and function as separate, independent CD
units. In this mode it is also possible to record
from an external source while the Play Deck is
functioning as a standard CD player. See page
17 for more information on dual-play capability.
Forward Search: Press this button to
play a disc in a fast-forward mode.
Record (CDR)-Deck Select: Press this
button to control or program the functions of
the disc in the Record Deck %.
Record (CDR)-Deck Open: Press this
button to open the Record Deck %.
Record (CDR)-Deck Display Control:
Press this button to cycle through the various
time-display options for the disc in the Record
Deck %. See page 17 for more information on
time-display options.
Power-Off: Press this button to place the
unit in a Standby mode.
Clear: Press this button to clear an item
in a program sequence. See page18 for more
information..
33
32
31
30
29
28