


In case of a Steady Red LED
1. Ensure you are using a supported iPod model.
2. Ensure the iPod is fully charged.
3. Ensure the iPod is turned on.
4. Disconnect & reconnect the connector cable.
In case of a Flashing Red LED
1. Batteries of the iDive300 case are running low – change or recharge them soon.
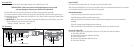
Mode Button
For touch-screen iPod models it’s necessary to use the mode button to cycle between the various iPod
menus/modes (i.e. Photo menu (not currently supported), Video menu, Audio menu, etc.). The mode button
does not function with scroll-wheel controlled iPod models.
1. Starting from the Audio menu, press the “Mode” button - this will transfer the user to the “Photo”
menu (not currently supported).
2. Press the “Mode” button again to transfer to the “Video” menu.
3. Press the “Mode” button again to transfer to the “Photo” menu (not currently supported).
4. To return to the “Audio” menu, press the “Mode” button one additional time.
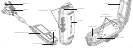
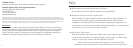
VIII. Speakers
iDive300 speakers feature specially designed clips for attachment to mask straps. The mask clips are
removable for users who wish to put the speakers inside a diving hood or under their mask strap.
IX. General Storage Procedures
For long-term storage, store in a cool dry place out of direct sunlight.
CAUTION: The life of a O-ring is typically one (1) year. Contact H2O Audio for spare O-rings and silicone
grease. Always remember to reinstall the O-ring before next use. Do not expose the case to extreme heat,
such as the inside of a hot car, or in direct sunlight, such as on a beach, or boat deck. Doing so may cause
damage and subsequent fl ooding.
CAUTION: The case is susceptible to internal condensation with extreme temperature fl uctuations. Use
above 105°F (40C) can result in internal condensation. When used in temperatures below freezing, frost
will appear on the interior of the case.
Note: The current fi rmware release does not support the “Photo” mode on iPod
models with a touch-screen interface
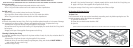
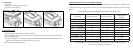
Feed mask strap
through the slits in
each slot of the clip.
For Mask Strap Mounting: To Remove Mask Clip:
13
14