


TROUBLE SHOOTING
Contact Grundig if none of the suggestions below restore normal operation.
SHUTS OFF ABRUPTLY WHILE PLAYING
Dead batteries. Replace them with new, fresh AA alkaline batteries.
WILL NOT TURN ON AND LCD IS ACTIVE
Dead batteries - as above.
WILL NOT TURN ON AND LCD IS BLANK
Probably dead batteries. If not, a 'reset' may be needed. To perform a 'reset',
remove the batteries or unplug AC adaptor for about one minute. Then, reapply
power. The display should become active and the radio should turn on.
WILL NOT TURN ON USING THE 'POWER/STANDBY' BUTTON
The clock must be set to turn the radio on/off with this method. - : - - must not
appear in the clock display.
CLOCK DISPLAY READS - : - - AND MEMORIES ARE LOST
The radio was turned on when batteries were replaced or when an AC adaptor
was plugged in or out.
THE ALARM FEATURE DID NOT WORK
After setting the ALARM-ON time, 'STANDBY' was not activated to appear in
the LCD. See the instructions for SETTING THE ALARM-ON TIME.
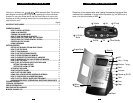
FREQUENCY RANGE: FM 87.5-108 MHz; MW (AM) 530-1710 KHz; SW 2-30 MHz.
TUNING CONTROLS: Up/Down tuning buttons. Autoscan and manual tuning.
30 Memories with memory scan, 10 each, AM, FM, SW.
ADDITIONAL FEATURES: Dual conversion superheterodyne AM and SW cir-
cuitry. Liquid Crystal Display - 2.2 x 3.5 cm. Clock. Alarm - wake to radio. Sleep
Timer.
SPEAKER: 57 mm (2-1/4 inch); 16 ohm; .25 watt.
EARPHONE SOCKET: 3.5 MM (1/8 inch)
POWER SUPPLY: Two AA batteries. 3 VDC AC adaptor (not supplied).
AC ADAPTOR SPECIFICATIONS: (adaptor is not included with purchase)
Output, 3 VDC, negative polarity, 250 milliamperes or greater; Plug tip diameter
dimensions, 3.4 mm outer, 1.3 mm inner.
ANTENNA: Telescopic for FM, SW. Ferrite Bar (internal) for AM.
DIMENSIONS: 11.5 x 6.5 x 2.4 cm. 4 1/2 x 2 9/16 x 7/8 inch.
WEIGHT: 165 g.
CABINET COLOR: Titanium Silver
13
OPERATION GUIDE
The traditional 31 meter band is considered a night band, covering the frequency
range 9.5-9.9 MHz. In practice, broadcasts may be found starting at 9.2 MHz
and extending all the way up to, but not including 10 MHz.
Step 1. Turn on the radio.
Step 2. Tune to the frequency at the beginning of the band, in this case,
9.5 MHz.
Step 3. Now tune manually, using quick, short over-and-over presses on
the + tuning button. Each press advances the frequency by 5 KHz.
Shortwave broadcast stations are spaced in these 5 KHz steps.
Now, tune through the band, listening to any stations that you
find interesting. You can move around in the band, going up or
down frequency, by pressing the + or - tuning buttons.
Step 4. Alternatively, use the AUTO SCAN feature. The tuner will automati-
cally stop when it encounters a station strong enough to stop the
scanner. Weaker stations may be missed when using this method
in shortwave. If you are looking for stations that may be weak,
use the manual tuning method outlined in step 3 above.
HOW TO GO TO A SPECIFIC SHORTWAVE FREQUENCY
Press-and-hold the + or - button until the tuner gets into the general frequency
range of where the specific desired frequency is located. Then, release-press-
release the button to stop the scan. Then, use individual, quick, short presses of
the + or - buttons to get to the exact frequency that you are selecting.
LEARNING MORE ABOUT INTERNATIONAL SHORTWAVE BROADCASTS
Refer to the GRUNDIG SHORTWAVE LISTENING GUIDE that came with your
radio, contact us by phone or
visit our web site.
12
TECHNICAL INFORMATION