


Features Dened
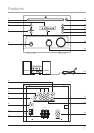
1 Drawer Loading CD/DVD Drive Plays DVD, DVD+R/RW, DVD-R/RW, CD, CD-R/RW, and JPEG
discs.
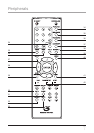
2 LCD Dislpay The Backlit LCD displays the time, functions, radio frequency, and output mode.
3 STOP Press the STOP button to stop a CD, or DVD while playing.
4 SKIP/SEARCH/TUNING Press the SKIP/SEARCH/TUNING buttons to skip forwards and back-
wards through CD tracks, DVD chapters, JPEG CD images, or AM and FM radio frequencies. Press
and hold the SKIP/SEARCH buttons to search forwards and backwards through individual CD tracks or
DVD chapters.
5 STANDBY Press the STANDBY button to turn the player off, and display the clock.
6 Video Output Use the Video Output connection to send a composite video signal from the unit to a
TV. (RCA cable required, included)
7 Component Outputs Use the Component Outputs to send a video and audio signal from the unit to a
TV and/or a home theater system.
• The Component Outputs must be connected to activate the progressive scan feature.
8 Subwoofer Output Use the Subwoofer output to connect the unit to an external Subwoofer.
9 RESET Using a paperclip or like object, press the RESET button to restore the unit to the factory’s
default setting.
10 FM ANT. Connection for the FM detachable antenna (included) to receive FM radio reception.
11 AM ANT. Connection for the AM detachable antenna (included) to receive AM radio reception.
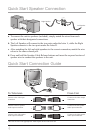
12 Speaker Outputs Use the Speaker Outputs to connect the included external speakers.
13 EJECT Press the EJECT button to open the Drawer Loading CD/DVD drive.
14 BAND Press the BAND button to switch between AM and FM radio frequencies.
15 PLAY/PAUSE Press the PLAY/PAUSE button to play or pause a CD, DVD, or JPEG CD.
16 MODE Press the MODE button to switch between CD/DVD/JPEG, Tuner, and Aux.
17 Infrared Receiver The Infrared Receiver acts as a receiver for the remote control.
18 VOLUME With the power on, turn the VOLUME dial to increase or decrease the volume.
19 BASS LEVEL With the power on, turn the BASS LEVEL dial to increase or decrease the bass.
20 AC Cord Plug the attached AC Cord into a standard outlet to power the unit.
21 S-Video Output Use the S-Video Output connection to send a higher quality video signal to the TV.
(requires an S-Video cable, not included)
22 Digital Audio Output Connect the Digital Audio Output connections to an external surround sound
receiver to get true digital surround sound. (requires a coaxial cable, not included)
23 Auxiliary Inputs (L/R) Connect the Auxiliary Input connections to an external audio device to send
an audio signal from the device to the unit’s speakers. (RCA cable required, included)
6