


Congratulations on purchasing the Gemini TT-1000/TT-1100USB high
torqe belt driven turntable. This unit is backed by a 1 year warranty*.
Prior to use, we suggest that you carefully read all the instructions.
TT-1000/TT-1100USB
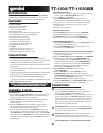
- Fully manual belt drive turntable
- Battle and club style design
- +/-10% Variable pitch slider
- Solid aluminum platter
- Fully adjustable counter weight & anti-skating controls
- 33, 45 and 78 RPM, reverse playback capability
- Dual soft touch start/stop buttons
- Motor Off button for slower braking
- Removable target light (not included)
- Headshell and 45 adapter included
- CN-15 cartridge & felt slipmat included
- Detachable RCA & ground cables
TT-1100USB
- USB computer connectivity for PC and Mac
- Audacity recording software included
- Line level RCA outputs (with built–in pre–amp)
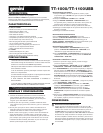
INTRODUCTION:
4
FEATURES:
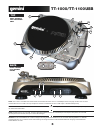
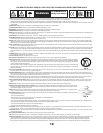
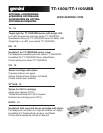
CONNECTIONS:
1
MAIN POWER RECEPTACLE:
Connect the detachable linecord (included in the box
with your TT-1000/TT-1100USB) to the power receptacle, and
plug the other end of the linecord into an AC outlet.
The TT-1000/TT-1100USB has a universal power supply that can
accept any AC voltage from 100 VAC to 240 VAC. No need for
voltage select switches. It will work virtually anywhere in the world.
It is less susceptable to voltage sags or spikes than conventional
power supplies, providing greater electro magnetic isolation and
better protection against AC line noise
GROUNDING SCREW: You will need to ground the RCA cable(s)
by screwing in the grounding fork(s) to the GROUNDING SCREW
located on the rear panel of the mixer.
PHONO RCA OUTPUTS: This set of outputs carries the audio
signal from the turntable portion of the unit and should be
connected to an appropriate phono-level input on your audio mixer.
ALSO SEE ADDITIONAL TT-1100USB INFO SECTION BELOW.
2
3
TT-1000/TT-1100USB
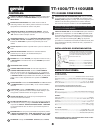
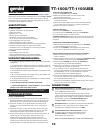
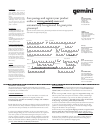
ASSEMBLY & SETUP:
MOTOR DRIVE BELT
1. Start by placing the rubber DRIVE BELT around the inner bottom ring
of the turntable PLATTER. This should come preinstalled, but check
to make sure that it is not twisted or damaged.
2. Install the PLATTER on the center spindle and press it down firmly.
Check to make sure that it rotates uniformly and does not
wobble excessively.
3. Rotate the PLATTER so that one of the holes is aligned with the
Start Stop button on the front corner of the turntable. The brass
motor spindle should be visible through this hole.
4. Reach into the hole and pull the rubber DRIVE BELT off of the inner
ring, and install it over the motor spindle. Be careful not to twist the
rubber DRIVE BELT during this step. Check to make sure the PLATTER
rotates uniformly. If the DRIVE BELT is properly installed, there should
be a slight amount of tension that brings the PLATTER to a stop after
spinning it freely.
TURNTABLE INSTALLATION:
1. Make sure you have placed the platter securely on the spindle and
made sure that the MOTOR DRIVE BELT is in place.
2. Put the SLIPMAT on the PLATTER.
3. Set the TURNTABLE BASE on a flat, level surface free of
vibration. Use the turntable feet to stabilize the unit horizontally.
4. Try to place the unit as far away from the speakers as possible.
5. Keep the unit away from direct exposure to the sun, heat,
moisture or dirt.
6. Keep the unit well ventilated.
HEADSHELL INSTALLATION:
Insert the HEADSHELL into the front of the tubular TONE ARM.
While holding the HEADSHELL firmly in a horizontal position, turn
the LOCKING NUT counter clockwise until the HEADSHELL is
locked in place. Be sure not to over tighten the LOCKING NUT.
COUNTERWEIGHT INSTALLATION:
1. Slide the COUNTERWEIGHT onto the rear of the TONE ARM with the
numbered stylus gauge facing forward.
2. Twist the COUNTERWEIGHT counter clockwise lightly, to screw
it onto the rear of the TONE ARM.
ADJUSTING HORIZONTAL ZERO BALANCE AND STYLUS PRESSURE:
1. Without touching the stylus tip, remove the stylus protector (if your
cartridge has a detachable one.
2. Release the ARM CLAMP and lift the TONE ARM off the ARM REST.
3. Counter clockwise advancement of the
COUNTERWEIGHT will
cause the cartridge side of the TONE ARM to be lowered, turning
it clockwise will cause the opposite. Turn the COUNTERWEIGHT
clockwise or counter clockwise as needed until the TONE ARM is
balanced horizontally. You can easily tell this by watching for
the point where the TONE ARM "floats" freely.
4. Place TONE ARM on ARM REST and lock it in place
with the ARM CLAMP.
5. With the TONE ARM locked on the ARM REST, hold the
COUNTERWEIGHT steady with one hand while rotating the
STYLUS PRESSURE RING until the numeral "0" on the ring aligns with
the center line on the TONE ARM rear shaft. The
HORIZONTAL ZERO (0) balance should be completed.
6. Re-float the TONE ARM to ensure HORIZONTAL ZERO (0) balance.
If zero balance has not been maintained, repeat steps 3 - 5.
PRECAUTIONS:
1. All instructions should be read before using this equipment.
2. To reduce the risk of electrical shock, do not open the unit. Please refer
all servicing needs to a Gemini-qualified service technician.
3. Do not expose this unit to direct sunlight or a heat source such as a ra-
diator or stove.
4. This unit should be cleaned only with a damp cloth. Avoid solvents or
other cleaning detergents.
5. When moving this equipment it should be placed in its original carton
and packaging. This will reduce the risk of damage during transit.
6. DO NOT EXPOSE THIS UNIT TO RAIN OR MOISTURE.
7. DO NOT USE SPRAY CLEANERS OR LUBRICANTS ON CON-
TROLS, SURFACES OR SWITCHES.
IN THE USA ~ IF YOU EXPERIENCE PROBLEMS WITH THIS UNIT CALL GEMINI CUSTOMER SERVICE AT:
1 (732) 346-0061. DO NOT ATTEMPT TO RETURN THIS EQUIPMENT TO YOUR DEALER.