


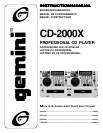


Page 4
beginning of every track). Pressing the SINGLE-AUTO CUE/CONTINU-
OUS BUTTON (3) a second time activates the CONTINUOUS function
causing the unit to play continuously (after the last track, the unit will
return to the first track of the disc and continue to play). Pressing the
SINGLE-AUTO CUE/CONTINUOUS BUTTON (3) a third time deactivates
the CONTINUOUS function.
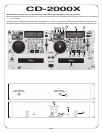
ROBO START: Press the ROBO START BUTTON (1) to activate ROBO
START function (the button will blink). Use ROBO START in SINGLE-
AUTO CUE MODE to alternate play between the two sides of the CD
player (one track from one side, then one track from the other side).
See the Robo Start Instructions section for further instructions.
4%, 12% and 24% BUTTONS: Use the 4%, 12% and 24% BUTTONS (14)
to assign the percent the pitch control slide will have. The 4% BUTTON
will assign +/-4% to the pitch control slide. The 12% BUTTON will assign
+/-12% to the pitch control slide. The 24% BUTTON will assign +/-24%
to the pitch control slide. The PITCH (18) must be ON for the 4%, 12%
and 24% BUTTONS (14) to work.
PITCH: Pushing the PITCH BUTTON (18) activates the PITCH CONTROL
(15). The pitch of the CD will change according to the position of the
PITCH CONTROL (15).
PITCH BEND BUTTONS : Pushing the PITCH BEND BUTTONS (29)
will automatically raise the pitch up to +4% or lower the pitch down to
-4% from the existing pitch setting. Releasing the buttons will return the
pitch to the original pitch setting. You can use this function to match the
pitch bend when mixing from one song to another.
DIGITAL OUTPUT JACK: Connecting any type of DAT, MD, HARD
DRIVE, or other such items which accept digital signals to the BNC
OUTPUT CONNECTOR (34) on the rear panel of the transports allows
you to record a digital signal. from CD.
EFFECT ON/OFF BUTTON: The EFFECT ON/OFF BUTTON (19) turns all
effects on and off.
EFFECT SELECT BUTTON: The EFFECT SELECT BUTTON (20) allows
you to select one of five different effects:
The SCRATCH effect makes it possible for the jog wheel to “scratch”
the music as it plays. If you move the wheel back and forth the music
will stop and play slowly as the wheel is moved, similar to scratching a
record. When the wheel stops moving the music will continue.
The ZOOM effect changes the delay time by rotating the jog wheel, mixing a
short delay with the playback sound. This function allows you to produce the
sound of a jet engine (flanger effect) using a single CD player.
The FILTER effect allows you to change the cutoff frequency of the
playback sound when the jog wheel is rotated. This allows the DJ to
extract and play back specific parts from the playback sound.
The ECHO effect adds echo to the music. The delay time can be
adjusted by turning the jog wheel to the left or right.
The REVERSE effect plays your musical selection backwards. When
the effect is activated the music will play backwards until it is released.
Effect parameters can be adjusted by: 1. Holding down the EFFECT ON/
OFF BUTTON (19) for 3 seconds (the LCD display will indicate the
parameter), 2. Using the JOG WHEEL (9) to change the parameter and
3. Pressing the ON/OFF BUTTON (19 to return to normal mode.
As you press the EFFECT SELECT BUTTON (20) the EFFECT LED (21)
for that particular effect will light (Scratch = 1, Zoom = 2, Filter = 3, Echo
= 4, Reverse = 5). If you hold down the EFFECT SELECT BUTTON (20)
continuously for 3 seconds or more, it will HOLD the effect parameters
until you press the button again to release the effect.
BRAKE BUTTON: The BRAKE BUTTON (22) simulates the effect of a
turntable slowing down to a stop. The brake parameters can be
adjusted by pressing and holding the BRAKE BUTTON (22) for 3
seconds and using the JOG WHEEL (9) to adjust.
MASTER TEMPO BUTTON: The MASTER TEMPO BUTTON (23) control
locks in the music’s pitch even when the tempo changes. You can vary
the beat with no change in vocal or instrument tone.
SAMPLER: You can create a sample by first creating a loop. Set the starting
cue point using either the JOG WHEEL (9) or FLY CUE BUTTON (10). Then
set your end loop point by using the B/EXIT BUTTON (11). Now that you
have created your loop, press the SAMPLER BUTTON (24). Now you have
created your sample. To play your sample during your performance press the
SAMPLER BUTTON (24). Press again to stop playing sample. To clear your
sample simply hold the STOP BUTTON (4) down for 3 seconds or more.
*NOTE: your sample will remain in the memory until you either clear it
or create a new sample. You may change CDs and still use the
sample you created previously.
RELOOP/STUTTER (12): Used for repeated play (stutter) from the cue
point, repeating a previously set loop. The reloop function automatically
returns the music to the cue point and will play the loop until it is
released with the CUE B/EXIT BUTTON (11). CD starts instant play
from the previously set cue points.
CUE BUTTONS: The CD-2000X allows you to set up to 5 different cue
points using the CUE BUTTONS (25). To set each individual cue point,
press the MEMO BUTTON (26) and then a cue button (Cue 1-5). You
can keep setting cue points up to 5. As your music is playing, if you
would like it to jump to one of your set cue points, simply press that
individual cue button (Cue 1-5) and the music will jump to that point.
BOP BUTTON: When you set a cue point using the CUE BUTTON (16) or
FLY CUE BUTTON (10A) you can return to that cue point at any time
during the musical performance simply by pressing the BOP BUTTON
(7). The music will immediately return to that point.
BPM/PITCH BUTTON: The BPM/PITCH BUTTON (37) enables you to
adjust the beats per minute of the music either automatically or
manually. Press the BPM/PITCH BUTTON (37) to activate the
automatic BPM control. To switch to manual operation, press and hold
the BPM/PITCH BUTTON (37) for 3 seconds. Then tap the button in
the tempo of your choice and the music will set itself to that tempo.
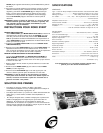
OPERATING INSTRUCTIONS
1. Make sure that the VOLTAGE SELECTOR switch (30), found on the
rear panel, is set for the proper voltage. Plug the unit in and press the
POWER BUTTON (21). The unit will turn on. Pushing the POWER
BUTTON (21) a second time will turn the unit off.
2. Press the OPEN/CLOSE BUTTON (27), place a CD in the DISC TRAY
(20) and press the OPEN/CLOSE BUTTON (27) again. The tray will
close into the unit.
3. Push the TRACK SKIP +10 BUTTONS (13) to select the track
you want to play.
4. Press the PLAY/PAUSE BUTTON (17) and the unit will instantly play.
CUE INSTRUCTIONS
To use FLY CUE (10A) to set a cue point, follow these instructions:
1. With the unit in the play mode (play/pause LED glows green), press
FLY CUE (10A) at the point where you want the cue point to be (the
unit will continue to play). The cue point is now memorized. Press the
CUE BUTTON (16) to return to the memorized cue point. Push the
PLAY/PAUSE BUTTON (17), and the unit will instantly play from the
spot selected.
2. Press FLY CUE (10B) to memorize a cue point as music is playing. You
can use FLY CUE (10B) to create a loop using FLY CUE (10B) and the
B/EXIT BUTTON (11).
AND/OR
1. To memorize the spot at which you want play to start, select the proper
track, and then push the PLAY/PAUSE BUTTON (17) so the unit goes
into the play mode (play/pause LED will glow green). Listen to the CD
and when the CD gets to the approximate spot, push PLAY/PAUSE (17)
so the unit goes into pause mode (play/pause LED will blink green).
Move the JOG WHEEL (9) to the precise spot you want play to begin
and push the PLAY/PAUSE BUTTON (17) to memorize the cue point.
Press the CUE BUTTON (16) to return to the memorized cue point. Push
the PLAY/PAUSE BUTTON (17), and the unit will instantly play from the
spot selected.
2. To fine tune a cue point, pause play at the memorized cue point (the
cue LED will glow and the play/pause LED will blink), then use the JOG
WHEEL (9) to scan frame by frame (1/75th of a second) to where you
want play to begin (the cue LED will blink while you scan). Press
PLAY/PAUSE (17) to save the new cue point.
NOTE: During fine tuning there will be a stutter effect (to help you find
the beat). The stuttering effect will end when you press the PLAY/
PAUSE (17) to save the cue point.