


5
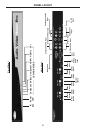
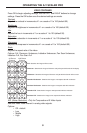
1. Connect the HDMI output on the A/V Scaler Pro to the display using the
supplied HDMI cable.
2. Connect either the digital SPDIF or digital Optical audio output to the display or
an external audio processor using user supplied digital audio cables.
3. Connect the sources to the A/V Scaler Pro using user supplied cables.
• Connect up to two HDMI sources with optional digital SPDIF/Optical
audio using HDMI cables and digital audio cables.
• Connect one Component source with analog audio using a 3 RCA
Component video cable and a 2 RCA analog audio cable.
• Connect one S-Video source with analog audio using a S-Video cable
and a 2 RCA analog audio cable.
• Connect one Composite source with analog audio using a 1 RCA
Composite video cable and a 2 RCA analog audio cable.
• Connect one DVI-I source with analog audio using a 1 RCA Composite
video cable and a stereo mini-jack analog audio cable.
4. Plug the 5V DC power supply into the A/V Scaler Pro.
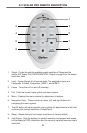
5. Press the POWER button on the RMT-SR-IR remote to begin operation of
the A/V Scaler Pro.
6. Power on the display.
7. Power on the source(s).
NOTE: When initially powering on HDMI or DVI sources, it is important to have
the A/V Scaler Pro’s input selected to that source to ensure that the EDID is
relayed properly.
OPERATING THE AUDIO/VIDEO SCALER PRO
The A/V Scaler Pro has a built in GUI for navigating the various functions. The
GUI is navigated by the included IR remote control. Please see the RMT-SR-IR
Remote Description on the next page for functional information.
CONNECTING THE A/V SCALER PRO