


Electro-Voice
®
Installation Procedure
Step 1: Selection and Preparation of the
Mounting Surface
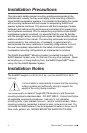
Surface must be clean and smooth. It must also be a material that is not
easily crushed. While the SuperSAM
TM
distributes weight evenly over a
relatively large area, strong winds against the side of the Sx600 will exert
significant crowbar-like leverage between the bolts and the side corner
edges of the bracket. For this reason, surfaces of plaster, drywall, soft
wood, cinder block, ceramic, glass or other brittle, crushable materials
must have a large heavy backing plate to prevent the Sx600 from
loosening itself by crushing its mounting surface.
Step 2: Mounting the SuperSAM Bracket
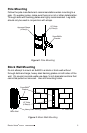
If bolts are to be used, determine the exact location desired for the holes
on the mounting surface. Use a center punch to mark the center of each
hole to be drilled and minimize hole drift. Drill holes and DE-BURR. The
bracket MUST sit perfectly flat against the mounting surface. Mount the
bracket using ½ bolts, washers, lock washers and nuts, and tighten
securely. Stainless Steel hardware is recommended.
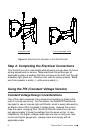
Step 3: Mounting the Speaker and Aligning
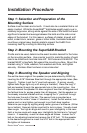
Pre-set the down angle of the speaker (as pre-determined by EASE) by
inserting the 5/16" Stainless Steel bolt through the appropriate holes (See
Figure 5). Tighten it and the ½ pivot bolt securely. (If aiming visually,
tighten bolts finger-tight only until aiming is finalized.) Place the long ½
bolt and washer through the appropriate hole in the mounting bar. Use
the hole nearest the speaker for down-angles of less than 40 degrees and
the farthest hole for angles greater than 40 degrees. Set the speaker on
the already mounted bracket end bar, dropping the ½ pivot bolt through
the hole near the end of the bar. (The second hole is provided as a
convenience for certain close in situations.) Install the flat washer, lock
washer and nut and tighten just enough to pull both bars together.
Determine pan angle by sighting along center groove of enclosure. (Either
top or bottom) Securely tighten pivot bolt to lock in place. Visually check
down angle. Too high an angle will result in poor intelligibility in the near-
field; a too-low angle will cause poor intelligibility far-field and a hot spot
close in. If necessary, re-set the down-angle as follows: Loosen the ½
bolt on the adjusting bracket and remove the 5/16" bolt. Tilt the speaker
to the desired angle and re-insert the 5/16" bolt in the appropriate hole.
Re-tighten all hardware.
7