


4 – CIS Series
CIS Series – 5
3. INSTALLATION
The metal redome provided with each loudspeaker offers quick installation into ceilings.
WARNING: Make sure that the loudspeaker is installed in a stable and secure
way in order to avoid any conditions that may be dangerous for persons or structures:
• Check to make sure that the ceiling has the necessary mechanical characteristics to
support the weight of the loudspeaker without the danger of it falling.
• Before suspending the loudspeaker, carefully check all the components to be used to
make sure there is no damage, deformation, corrosion and/or missing or damaged
parts that could reduce the safety of the installation.
Installation precautions
• Use speaker cables with an adequate cross-section (gauge). The greater the distance
between the amplier and loudspeaker, the larger the connection cable cross-section
should be.
• To prevent inductive phenomena causing humming or distortion, the speaker cables
should not be run together with electrical energy conductors, microphone cables,
or line-level audio lines. Use speaker cables that have markings to distinguish the
polarity, such as insulation or conductors of different colors.
Installation procedure
1. Cut a hole in the ceiling, using all safety precautions to avoid cutting power lines,
water lines etc. Use the following table as a guide:
Loudspeaker Diameter
CIS50 160 mm
CIS65 200 mm
CIS80 230 mm
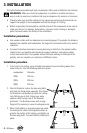
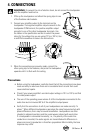
2. Take the redome, loosen the two wing bolts,
and slide the xing plates upwards. This allows
the redome to be pushed up inside the ceiling
hole. Before you do that, thread your audio
speaker cable through one of the redome
grommets . The redome comes with a large
xing bolt for securing in case of earthquakes etc.
3. When the redome is securely pushed up inside
the ceiling hole, slide the xing plates down to
grip the top surface of the ceiling, and tighten up
the two wing bolts. This will hold the redome in
place.