


Sirius Powered Subwoofer User Guide—© Directed Electronics, Inc. all rights reserved
5
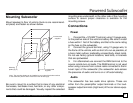
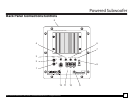
Mounting Subwoofer
Mount speaker to floor of vehicle (trunk is one recommend-
ed place) and fasten as shown below.
Be sure to mount to a surface that is clear of any electrical
harnesses, fuel/brake lines, fuel tank, or any other compo-
nents that could be damaged. Visually inspect the selected
4 screws total
supplied
4 screws total
supplied
Mounting
plates (qty 2)
Note: The mounting plates can be installed on any edge of the bottom surface
of the subwoofer (shown above mounted on the left and right).
mounting area underneath or the other side of the mounting
surface to assure proper clearance is available for the
mounting screws.
Connections
Power
1. Connect the +12V BATT terminal, using 12 gauge wire,
to the positive side of the vehicle’s battery. Be sure to install
a fuse within 1 foot of the battery and that is the same rating
as the fuse on the subwoofer.
2. Connect the ground terminal, using 12 gauge wire, to
the frame of the vehicle, with as short of a run as possible, at
a bare metal surface; preferably scraped body sheet metal.
Do not use factory ground locations, seat bolts, or brackets
that are spotwelded.
3. For aftermarket use connect the REM terminal to the
source remote turn-on leads. The REM terminal is not used
when using a source from a stock radio connected to the Hi
Level input of the subwoofer (the subwoofer auto-senses
the presence of audio and turns on or off automatically).
Audio
The subwoofer has two audio drive options. These are
either from the preamplifier output terminals or the loud-
speaker output terminals (high level) of the car stereo equip-
ment.
Powered Subwoofe
r