


NOTE: Use caution when adjusting or unlocking gain as restricting the range or unlock-
ing the range can result in sudden increases in gain.
The Valet Monitoring and Anti Theft options (below) require the ESP2 alarm to be
“learned” into the amplifier. Prior to setting the valet or anti theft to Enable or On, execute
the TXID routine. The ESP2 alarm must be the one installed in the vehicle.
Valet Monitoring - Disable, Enable. Used in conjunction with an ESP
®
-2 security system to
prevent operation of the amplifier when the security system is in Valet mode. When Valet
mode is Enabled, and the valet code is received from the alarm system, the amplifier will
not power up the next time it goes through a remote line On cycle (using the head unit or
other device that turns the amplifier on).
Anti Theft - Off, Reserved, On. When set to “On”, and when the ESP
®
-2 security system is
armed, the amplifier will not operate until the security system is disarmed (the remotes used
by the security system must be learned by the amplifier—see “Learn TX IDs” below). If the
security system is armed and then the amplifier is disconnected from 12V DC, the amplifier
will be locked out from operation. You can reset the amplifier by disarming the security sys-
tem (it must be one of the transmitter learned by the system), then cycling the remote
power on/off.
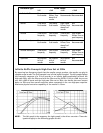
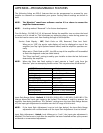
Top Light Options - Light Off W/Service Code, Light On W/Service Code, Light Off W/O
Service Code, Light On W/O Service Code. This feature allows the toplight to duplicate the
function of the ESP status indicator. This is set by the W/Service Code. The toplight may also
be turned off if desired (Light On/Light Off) independent of the Service Code (see table
below).
Learn TX IDs - Off, On. When On learns the amplifier learns the remotes (press arm and then
disarm on just one of the remotes) used by a Directed Electronics ESP
®
-2 security system. If
any remotes are added or replaced in the system your vehicle must be returned to the deal-
er to have the amplifier learn the new/replaced remotes. The installer uses the following
procedure to learn the security system’s remotes:
1. Unplug the amplifier ESP
®
-2 port from the security system.
2. Connect the Bitwriter
®
to the amplifier ESP
®
-2 port using the cable that came with
the Bitwriter
®
.
3. Turn on the Bitwriter
®
and read the file from the amplifier.
4. Scroll down to Learn TX IDs and select the On setting.
5. Unplug the Bitwriter
®
and reconnect the ESP
®
-2 cable from the security system.
6. Arm the security system (the amplifier ESP
®
LED will flash), then disarm the secu-
rity system. The remotes used with the security system are now learned into the
amplifier. After a short time frame (approximately 20-seconds) the Learn TX IDs
feature will automatically revert back to the default Off setting.
NOTE: The next three features are read only. The amplifier will not permit them to be
changed. If a change is attempted, an “Unable to Verify” error message will appear on the
Bitwriter
®
.
1. Light Off W/Service Code Top light is off, but service codes will be shown.
2. Light On W/Service Code Top light is on, and service codes will be shown.
3. Light Off W/O Service Code Top light is off, but service codes will not be shown.
4. Light On W/O Service Code Top light is on, but service codes will not be shown.
21
© 2006 Directed Electronics, all rights reserved