


8
ENGLISH
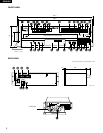
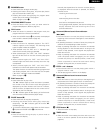
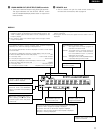
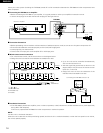
NAMES OF PARTS AND THEIR FUNCTIONS
(Refer to page 4.)
q
POWER switch
• Press this button to switch on the power.
w
Loading drawer
• Discs can be loaded and unloaded when this drawer is
open.
Do not force the drawer closed by hand.
e
Preset channel button (1 to 5)
• Use these when presetting and recalling stations. Also
use these with the SHIFT/PTY button to use a total of 30
preset channels, A (1 to 5), B (1 to 5), … F (1 to 5).
r
SHIFT/PTY button
• Use this button to select the memory blocks, A (1 to 5), B
(1 to 5), C (1 to 5), D (1 to 5), E (1 to 5), or F (1 to 5).
• For PTY search use this button to select the program
type. When writing station names, use this button to set
the writing position.
t
BAND button
• Selects FM or MW (AM).
y
Tuning mode button (AUTO/MANU)
• This switches between auto and manual tuning.
Auto tuning: (The “AUTO” indicator lights.)
When TUNING UP and DOWN buttons is pressed in this
mode, auto tuning starts and tuning stops automatically
when a broadcast station is found. Auto tuning is used to
receive FM broadcasts in stereo. Depending on the mode
of the broadcast and the strength of the signal, auto
tuning will automatically switch the receiving mode to
stereo or monaural. During tuning, the frequency is
automatically tuned up or down.
Manual tuning:
When TUNING UP and DOWN buttons is pressed in this
mode, manual tuning is performed until the control is
released. The broadcast is received in monaural
regardless of the mode of the FM broadcast. The
reception mode should be set to manual when there is
noisy reception of stereo broadcasts (which are indicated
by the lighting of “AUTO”) and also when the signal is
weak. During tuning, the reception frequency is tuned up
or down only when the tuning buttons is operated.
u
MEMORY button
• Frequencies and station names can be stored in the
memory. When this button is pressed, the “MEMO”
indicator on the display flashes for 10 seconds. Use the
SHIFT/PTY button and the preset channel buttons during
this time to designate the desired preset channel.
i
TUNING UP and DOWN buttons
• These buttons are used to select AM and FM stations.
o
Display mode selector button (DISPLAY)
• This button is used to select the display mode.
• The mode changes as follows each time the button is
pressed:
Tuning frequency
Input character
Programme service name (PS)
Programme type (PTY)
Clock Time (CT)
• The following may be displayed if the signals are weak or
no RDS service is available. This is not a malfunction.
“NO PS”
“NO PTY”
“NO CT”
NOTE:
The programme type, programme service name and
clock time are not displayed in the MW (AM) band.
“NO CT” may be displayed within the first minute after a
station is tuned in, but this is not a malfunction. If time
data is being broadcast, the time can be displayed after
one minute has passed.
!0
Search/Character mode button
(SEARCH/CHA)
• This button is used for the RDS search (Refer to page 20,
21), PTY search (Refer to page 21) and TP search (Refer
to page 21) operations, and to input the station name
(Refer to page 20).
!1
TUNER ON/OFF button
• This button turns the tuner output on and off.
• When off, the sound of the tuner is not output from any
output. If any tuner-related button is pressed when the
tuner is turned off, the tuner turns on and the indicator
lights.
!2
DISC SELECT button (1 to 5)
• Press this button to select the disc number.
!3
Number buttons
(1, 2, 3, 4, 5, 6, 7, 8, 9, 0/CLEAR and +10)
• Use these buttons for the direct search and program
memory functions. For direct search, press for example
button if you want to hear track number 3. For track
number 12, press then . For track number 33,
press three times, then press . To program
tracks, press the PROGRAM/DIRECT button
!7 to set to
the program mode.
!4
SKIP button
• Each time this button is pressed, the carousel will rotate
in a clockwise direction to the next tray position. This
allows for loading or unloading of discs.
This button is also used to select the next disc, in the
normal play continuously.
!5
OPEN/CLOSE button (5)
• Press this button when opening.
• The drawer is opened toward the front.
• Press the button again to close the drawer.
3
+
10
2
+
10
3
FRONT PANEL