


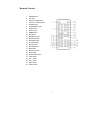
5
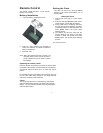
Remote Control
The remote control requires 2 x AAA Lithium
Battery (not included).
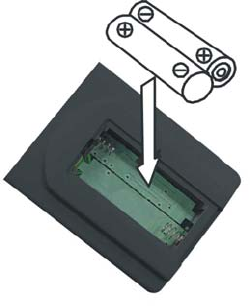
Battery Installation
1. Open the battery compartment cover.
Setting the Clock
The clock can be set by using the MEMO
buttons on the remote control.When it is on
standby Mode.
Setting the Clock
1. Connect the main plug to a main supply
scoket.
2. Press and hold the MEMORY button on the
remote control, until the digit is Flashing.
3. Press TONE button, the display will show
the time with the hours flashing, use either
of the SKIP buttons to select the hours and
press MEMO button, the hours stops
flashing and set.
4. The display will show the time with the
minutes flashing, Use either of the SKIP
buttons to select the minutes and press
MEMO button, the minutes stops flashing
and set.
The clock is now set.
2. Insert two “AAA” batteries (not included) to
match the polarities as indicated inside the
battery compartment.
3. Close the cover.
Note: When the batteries become too weak ,the
operating distance of the remote controller is
greatly reduced and you will need to replace
the batteries.
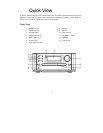
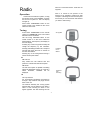
Operating the remote control
Point the remote control at the front of the CD micro system,
to operate. The IR sensor is located below the LCD display.
The remote control will work up to 7m away from the IR
sensor.
Do not block the path of the beam from the remote control to
the unit. Dark walls, direct sunlight or very bright light will
reduce the sensitivity of the IR sensor.
Colour
You can change the colour on the display by pressing the
COLOUR button (Blue/ Green/ Cyan/ Red/ Yellow/ Purple/
White). You may change to another colour by pressing the
COLOUR button again.