4
Getting Started
Unpacking your
RCD719 MP3 Micro System
Carefully remove your CD micro system from its
packaging. You may wish to store the
packaging for future use.
Box Contents:
- CD/MP3 micro system
- 2 speakers (speaker cables attached)
- Remote control
- AM Loop Antenna
- User Guide
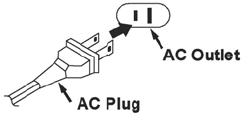
AC CONNECTION
Plug the power cord into an AC outlet having
120v,60Hz only. Connecting this unit to other
power sources may damage the unit.
NOTES:
*The AC polarized plug helps to minimize
the possibility of electric shock. If the
polarized plug does not fit into a
nonpolarized AC outlet, do not file or cut
the wide blade; it is the user`s
responsibility to have an electrician
replace the obsolete outlet.
*The power cord should be unplugged
from the outlet when the unit is not going
to be used for a long period of time.
Installation
Speaker Connection
1. Unwind the cable from each speaker.
2. At the rear of the CD micro system there
are two speaker sockets.
3. Plug the speaker located on the left into the
socket marked ‘L’ and coloured white.
4. Plug the speaker located on the right into
the socket marked ‘R’ and coloured red.
5. For optimal stereo effect, place the
speakers approximately 1.5m apart.
AC Power Connection
1. Connect the mains plug to a mains supply
socket and switch on the supply.
2. At the front of the CD micro system unit,
press the STANDBY button.
3. The LCD display will light up.
Antenna
The FM antenna is attached to the back of the
unit. Unwind the wire. Positioning is described
in the Radio section.
The AM
antenna is a separate loop aerial that
plugs into the back of the unit at the socket
marked
‘AM ANT.’. Its assembly is described in
the Radio section.
