Amplificadores de potencia
page 8
Leistungsendstufen
Amplificateurs de puissance
XLS Series Power Amplifiers
Operation Manual Mode d'emploi Bedienungsanleitung Manual de Operación
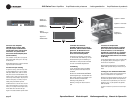
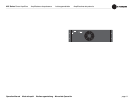
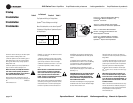
Figure 2.2 Airflow
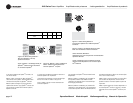
Figure 2.1
Dimensions
2.2 Install Your Amplifier
CAUTION: Before you begin, make
sure your amplifier is disconnected
from the power source, with the power
switch in the “off” position and all
level controls turned completely down
(counterclockwise).
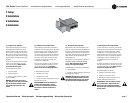
Use a standard 19-inch (48.3 cm) equipment
rack (EIA RS-310B). See Figure 2.1 for ampli-
fier dimensions.
NOTE: When transporting, amplifiers should be
supported at both front and back.
2.3 Ensure Proper Cooling
For optimum cooling, rack Crown amps with-
out spaces between them. If amps are racked
with spaces between them, solid non-vented
rack panels are recommended between amps.
Crown K series, D series, and CCA convection-
cooled amps are the exception: they require at
least one rack space (1.75 inches) of open or
vented panel space between amplifiers.
DO NOT block front or rear air vents. The side
walls of the rack should be a minimum of two
inches (5.1 cm) away from the amplifier sides,
and the back of the rack should be open.
Figure 2.2 illustrates standard amplifier airflow.
Figure 2.1
Dimensions
Abb 2.1
Abmessungen
Figura 2.1
Dimensiones
Figure 2.2 Flux d’air
Abb 2.2 Luftstrom
Figura 2.2
Flujo de Aire
2.2 Einbau der Endstufe
ACHTUNG: Vergewissern Sie sich vor
dem Einbau, daß Ihre Endstufe vom Netz
getrennt ist, der Netzschalter in der
"OFF"-Position steht und alle Pegel-
steller auf Linksanschlag stehen.
Verwenden Sie ein Standard 19"-Rack (48,3
cm; EIA RS-310B). siehe Abbildung 2.1 Zu den
Endstufenabmessungen siehe Abbildung 2.1.
ACHTUNG: Zum Transport sollte die Endstufe
an Vorder- und Rückseite abgestützt sein.
2.3 Kühlung
Im rack: kein Abstand zwischen Verstärkern.
Oder keine gelüfteten rack Platten zwischen
Verstärkern.
Blockieren Sie UNTER KEINEN UMSTÄNDEN
die Belüftungsöffnungen. Die Seitenwände des
Racks sollten mindestens 5cm Abstand zu den
Seiten der Endstufe, die Rückseite der
Zahnstange sollte geöffnet sein.
Abbildung 2.2 zeigt den Luftstrom der End-
stufe.
2.2 Instale Su Amplificador
PRECAUCION: Antes de empezar, asegúrese
que su amplificador esté desconectado del
suministro eléctrico, con el interruptor de
encendido en la posición de "off " (apagado) y
todos los controles de nivel completamente
cerrados (en dirección contraria a las manecil-
las del reloj).
Use un gabinete estándar para equipo (EIA RS-310B)
de 19 pulgadas (48.3cm). Véase figura 2.1 para las
dimensiones del amplificador.
NOTA: Durante la transportación, los amplificadores
deberán estar soportados tanto por el frente como por
detrás.
2.3 Asegure una Ventilación Adecuada
En el rack, ningún espacio entre los amplificadores. O
paneles no ventilados entre los amplificadores.
NO bloquee la ventilación delantera o trasera. Las pare-
des laterales del gabinete deberán estar separadas de
los costados de los amplificadores por lo menos dos
pulgadas (5.1cm), y a parte posteriora del gabinete
debe estar abierta.
La figura 2.2 ilustra el flujo de aire normal del amplifi-
cador.


