Basic Operation
9
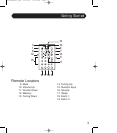
15. Enter – Use to select stations and menu functions.
16. Number Keys – Use to enter in stations or presets.
17. Snooze – The Snooze Button on the remote works slightly different than
the one on the radio.
1. Pressing when the alarm is activated puts the unit into Snooze mode.
2. Pressing the Snooze Button while the unit is on accesses the Snooze
Setup section of the menu.
3. Pressing with the power off will temporarily light the display so the
time and date can be seen.
18. Sleep – Accesses the Snooze Setup section of the menu.
19. Alarm 1 – Turns Alarm 1 on/off.
20. Alarm 2 – Turns Alarm 2 on/off.
Clock Setup
To set the clock, follow the steps below.
1. With the power turned on, press the Menu Button.
2. Rotate the Tuning Knob to highlight Clock Setup.
3. Press the Tuning Knob to select Clock Setup.
4. Time will be automatically highlighted. Press the Tuning Knob to select.
5. Rotate the Tuning Knob to select correct hour.
Note: Make sure to select the hour with correct AM or PM.
6. Press the Tuning Knob to select minutes.
7. Rotate the Tuning Knob to set the correct minutes.
8. Press the Tuning Knob to set the time and close the menu.
9. Rotate the Tuning Knob to highlight hour and press to select.
10. Choose between 12 hour and 24 hour format. Press the Tuning Knob
to select.
11. Rotate the Tuning Knob to select date and press to select.
12. Set the date by rotating the Tuning Knob. Press select to enter the date.
13. You can change the date format by choosing Format. Select your
preference and press the Tuning Knob to enter.
14. Once finished, the radio will automatically exit the menu setup after
a few seconds.
cr224Manual.qxd 9/22/06 11:35 AM Page 11


