


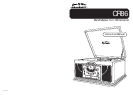

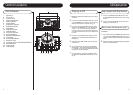

Turntable Features
Turntable Instructions
AC
Polarized Plug
1
Unwind the AC POWER CORD (32) at the back
of the unit and connect it to a power outlet.
2 Plug A/C cord into appropriate outlet.
3 This product is equipped with a polarized
alternating current line plug (a plug having one
blade wider than the other). This plug will fit into
the power outlet only one way. This is a safety
feature, If you are unable to insert the plug fully
into the outlet, try reversing the plug. If the plug
should still fail to fit, contact you electrician to
replace your obsolete outlet. Do not defeat the
purpose of the polarized plug.
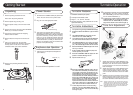
Getting Started
Unpacking
6
Power Source
1 Remove packing materials from unit.
Note: Save all packing materials.
2 Remove plastic bag covering unit.
3 Remove plastic safety cover form A/C PLUG
(32)
4 Remove tie from A/C Cord and untie ANTENNA
WIRE (31) on the back of Radio.
5 Open lid and remove styrofoam shipping
material from turntable.
6 Remove black tie-wrap from under the tone
arm.
7 Using your Fingers,Turn the Turntable
Suspension Screw (22) clockwise until it is all
the way down. Do not force it. This allows
turntable to float on its shock absorbers.
8 Remove the protecting Rubbers form the
turntable.
7
Earphones Jack Operation
1 Listening through Earphones/Headphones
(not included)
The sound from all speakers is cut off.
Earphone (17)
1 Selectable 33/45/78 rpm speeds.
2 Load up to 6 records at a time.
3 Plays 7”, 10”, and 12” records.
4 Record changer is fully automatic or can be
operated manually.
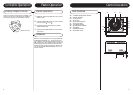
Turntable Operation
12 To stop playback manually, move the TURNTABLE
SWITCH (8) to the “OFF” position. Gently lift
the TONE ARM (5) from the record and return
it to the TONE ARM REST (7).
13 To remove the records from the turntable, lift the
TENSION ARM (24) up and rotate it counter-
clockwise over the TONE ARM (25). Grab the
edges of the bottom record and lift straight up.
1 Turn power on by pressing POWER BUTTON(6).
2 Rotate the FUNCTION SWITCH (18) to PHONO
mode.
3 Lift TENSION ARM (24) and rotate counter-
clockwise over the TONE ARM (25).
4 Load desired records on the CENTER SPINDLE
(23). Records should be loaded one at a time.
5 Lift TENSION ARM (24) and rotate it clockwise
over the records and release. TENSION ARM
(24) will automatically pull down onto the records.
6 Set the SIZE SELECT SWITCH (26) to the correct
size of your records.
7 Set the SPEED SELECT SWITCH (29) to the
correct speed of your records.
8 Move the TURNTABLE SWITCH (28) to the “ON”
position. Turntable will begin to turn.
9 Flip the needle cover up.
10 Move the TURNTABLE SWITCH (28) to “AUTO”.
The switch will automatically return back to the
“ON” position and the first record will drop. The
TONE ARM (25) will automatically lift and move
to the beginning of the record. Once the first
record is finished, the TONE ARM (25) will move
back to the TONE ARM REST (27) and the next
record will drop. The TONE ARM (25) will move
back to the beginning of the record. This will
repeat until the last record is finished. When the
last record is finished, the TONE ARM (25) will
return to its rest and the turntable will shut off.
11 To manually switch to the next record during
playback, move the TURNTABLE SWITCH (8)
to the “AUTO” position. The next record will drop
and begin to play.
1 Adjust this screw if the TONE ARM(25) is not
raising high enough to clear to the TONE ARM
REST(27). Turn the screw counter-clockwise
to raise the height. Turn the screw clockwise to
lower the height.
2 Adjust this screw if the TONE ARM(25) drops
on the record too early or too late. Turn the
screw counter-clockwise to start at a later point.
Turn the screw clockwise to start at an earlier
point.
3 Adjust the screw if you feel there is not enough
tone arm pressure on the record. Turn the screw
counter-clockwise to increase pressure. Turn
the screw clockwise to descrease the pressure.
Note : To play a single record, you do not have to place the
Tension Arm over top of the record. If you do position
the Tension Arm over the record, the record will not
automatically start when you move the switch to auto.
Note : Adjust the screws one turn at a time and check the
adjustment after each turn.
1
2
3
Do not turn
Tone Arm Adjustment