


APPLICATIONS:
SOME METHODS OF CONNECTION (Continued):
APPLICATIONS:
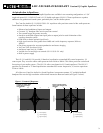
ROOM EQUALIZATION:
Any sound system, whether it is a home stereo, a large sound reinforcement system, or recording studio moni-
tors, will vary in its perceived reproduction depending on its environment; its room. When sound is produced, some
frequencies are reflected and some are absorbed. This results in an uneven sound field. If speakers are placed in
room corners or against walls, a large increase in the lower frequencies will occur. Some speakers are designed to
use this increase to flatten their response. Other speakers, such as near field monitors and P.A. speakers, are designed
to be flat in a free air environment (that is, having no external boundaries). These speakers, when placed in the
wrong environment, will produce an increased low frequency response. An equalizer may be used to compensate
for this condition.
By using a spectrum analyzer or Real Time Analyzer (RTA) and any of the Crate Pro Audio Live Sound equaliz-
ers, a flat response can be obtained with precision and accuracy. This also may be achieved by ear, though not with
the same accuracy, by using a favorite recording with which you are familiar.
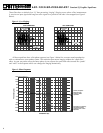
Another means of achieving a flat response with your system is called “Feedback Tuning” or “Ringing the
Room”. This method requires an omni-directional microphone with a very flat response to be placed in the listening
area and connected to your system in an unequalized channel of your mixer. With your graphic EQ set flat, slowly
turn the gain of your microphone up until a frequency starts to ring (WARNING! Be careful not the let this ring
excessively or speaker damage may occur.) Pull down on the EQ slider that makes the ringing stop. Pull only a few
dB, not all the way. Increase the system gain again, and another frequency will begin to feed back. Pull down on
the corresponding slider again. Repeat this procedure three or four times only. After that, go to the sliders you have
not yet moved and bring up their level until that frequency begins to feedback, then pull the slider down until the
feedback just stops. Continue this procedure with each slider. This method takes a lot of practice and patience but it
will adjust the response of your system to electronically compensate for the room. Additional equalization may be
required at this point; the next section will explain.
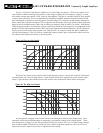
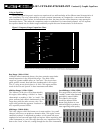
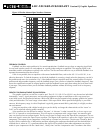
FLETCHER-MUNSON EQUAL LOUDNESS CONTOURS:
The human ear does not hear all frequencies equally. For example, the ear is less sensitive to bass notes at
lower levels than at higher levels. To compensate for this, additional equalization may be necessary to create a pleas-
ing overall sound, even after a room has been EQ’d. A “preferred curve” is actually a series of boosting and cutting
at various frequencies, depending on the overall performance level, so the ear perceives all frequencies at the same
level. These curves are known as the Fletcher-Munson Equal Loudness Contours (see figure 9 on the following page).
Notice that the amount of boosting changes with overall listening levels, since the ear hears lower frequencies better
as the volume level increases.
After achieving an electronically flat response from your speakers in the room, use the Fletcher-Munson chart to
adjust the contour according to the sound pressure level of the performance. These curves are intended to be used as
guidelines only. Experimentation is always necessary to find your own “preferred” sound.
10
LS1-131/LS2-215/LS3-231
Constant Q Graphic Equalizers
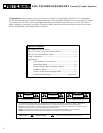
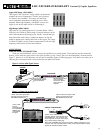
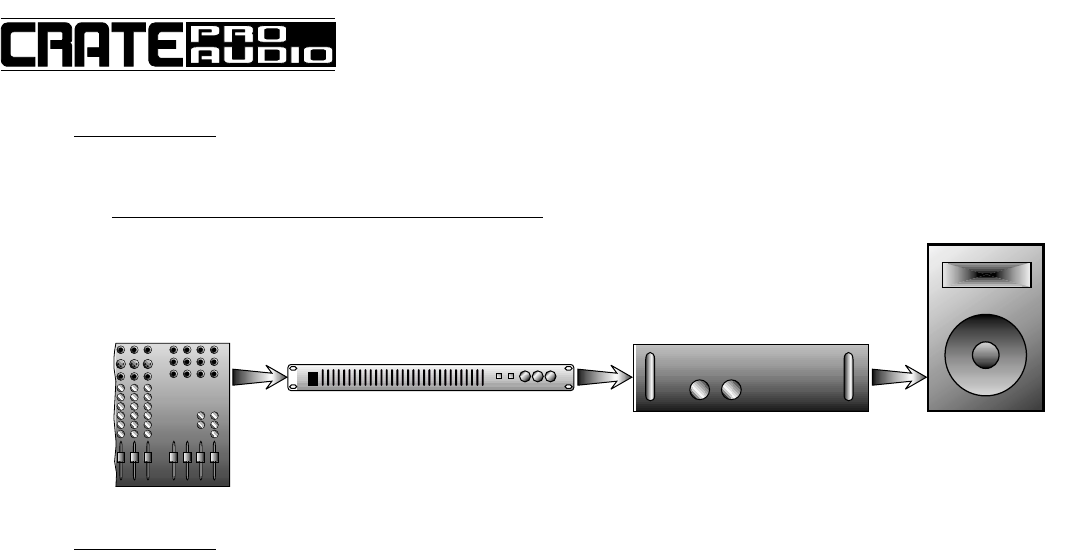
Figure 8: In-Line Between a Mixer and Amplifier:
EQUALIZER
POWER AMPLIFIER
Output signal from
mixer/preamp
connects to
BALANCED INPUT
jack of equalizer
BALANCED OUTPUT
jack of equalizer
connects to INPUT
jack of power amplifier
MIXER
(OR PREAMP)
SPEAKER OUTPUT
jack of power amplifier
connects to INPUT
jack of speaker