


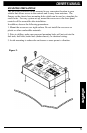
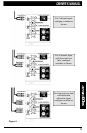
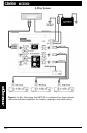


2-Way System Application Notes
After all the wiring connections are made and before the system is turned on
for the first time, you need to make some basic adjustments. It is important that
the High-Pass and Low-Pass Frequency Controls are set correctly before
turning on the system for the first time.
Setting the Crossover Frequency Controls
1. Set the crossover frequency controls to the frequency recommended by the
speaker manufacturer. The following are some guidelines if this information
is not available:
• Most 6” speakers will operate down to 80 - 100Hz.
• Most 5” or 4” speakers will operate down to 100 - 150Hz.
• Most 3” speakers will not operate below 300Hz.
• Most subwoofers have decreased sound quality when operated above
150Hz.
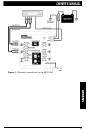
Depending upon the size of the front and rear speakers and the type of
subwoofer system, fine tuning these adjustments may be required after the
initial system set-up. Study the system design pages of this manual to
determine the proper settings for these controls. Speakers are easily
damaged if they are crossed over at a frequency below their usable range.
2. When making the high frequency adjustments, adjust the Low-Pass
frequency control and the low frequency amplifier gain. Usually, the Low-
Pass frequency should be set the same as the High-Pass frequency.
NOTE: An exception will be when the front/rearspeakeris too small to play down to a very low
frequency and the subwoofersounds distorted trying to “play up” to meet the front/rearspeaker. This
may require a gap ordifference between the high and low settings. Although not ideal, this is
sometimes necessary to make the system work as well as possible.
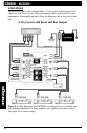
Setting the Front Output Level
Before setting front level controls, disconnect both the rear output and the
subwoofer output and follow the directions below.
1. Turn the output control level to the minimum setting.
2. Turn the amplifier gain controls to the minimum setting.
3. Turn the source unit on and increase the volume until distortion is heard,
then reduce volume to just below this point.
NOTE: This is the maximum usable musical signal forthis source unit. turning the volume beyond
this point will increase noise and distortion without an increase in musical signal. If you can increase
the source unit volume to maximum without audible disortion, raise the output level controls slightly
and begin again.
4. With the amplifier gains still at minimum and the source unit set at
maximum volume without distortion, raise the front output level control
until distortion is heard, then reduce gain to just below this point. This is the
maximum output level for this system. For best performance do not
increase beyond this point.
10