


DRX9675z 1312 DRX9675z
Radio Operations CD Operations
Auto store
Auto store is a function for storing up to 6 stations
that are automatically tuned in sequentially. If 6
receivable stations cannot be received, a
previously stored station remains unoverwritten
at the memory position.
1. Press BAND button 8 and select the desired
band. (FM or AM)
2. Press the Shift button ! to display the
subdisplay.
3. Press and hold the AS button
"
for 2 seconds
or longer. The stations with good reception
are stored automatically to the preset
channels.
∗ If auto store is performed in the FM bands, the
stations are stored in FM3 even if FM1 or FM2
was chosen for storing stations.
Preset scan
Preset scan receives the stations stored in pre-
set memory in order. This function is useful when
searching for desired station in memory.
1. Press the Shift button ! to display the
subdisplay.
2. Press the PS button
"
.
3. When the desired station is tuned in, press
the PS button
"
again to continue receiving
that station.
Radio Operations
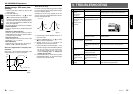
FM Reception
For enhanced FM performance the
®
tuner includes signal actuated stereo control,
Enhanced Multi AGC, Impulse noise reduction
curcuits and Multipath noise reduction circuits.
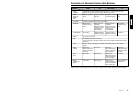
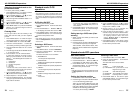
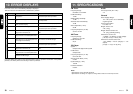
Changing the reception area
This unit is initially set to USA frequency intervals
of 10 kHz for AM and 200 kHz for FM. When using
it outside the USA, the frequency reception range
can be switched to the intervals below.
● Setting the reception area
1. Press BND button 8 and select the desired
radio band (FM or AM).
2. While pressing DISP button 3, each time you
press and hold the number “6” of the Preset
buttons
"
for 2 seconds or longer, the recep-
tion area switches from inside the USA to
outside the USA or from outside the USA to
inside the USA.
∗ Any station preset memories are lost when the
reception area is changed.
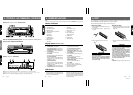
Listening to the radio
1. Press FUNCTION button 7 and select the
radio mode. The frequency is displayed.
2. Press BAND button 8 and select the radio
band. Each time the button is pressed, the radio
reception band changes in the following order:
FM1 ➜ FM2 ➜ FM3 ➜ AM ➜ FM1...
3. Press the right or left side of SEARCH button
4 to tune in the desired station.
Tuning
There are 3 types of tuning mode available, seek
tuning, manual tuning and preset tuning.
Seek tuning
1. Press BAND button 8 and select the desired
band. (FM or AM)
∗ If “MANU” is lit in the display, press and hold
BAND button 8 for 1 second or longer.
“MANU” in the display goes off and seek tuning
is now available.
2. Press the right or left side of SEARCH button
4 to automatically seek a station.
When the right side of SEARCH button 4 is
pressed, the station is sought in the direction
of higher frequencies; if the left side of
SEARCH button 4 is pressed, the station is
sought in the direction of lower frequencies.
Manual tuning
There are 2 ways available: Quick tuning and step
tuning.
When you are in the step tuning mode, the frequency
changes one step at a time. In quick tuning mode, you
can quickly tune the desired frequency.
1. Press BAND button 8 and select the desired
band. (FM or AM)
∗ If “MANU” is not lit in the display, press and
hold BAND button 8 for 1 second or longer.
“MANU” is lit in the display and manual tuning
is now available.
2. Tune into a station.
● Quick tuning:
Press and hold the right or left side of
SEARCH button 4 for 1 second or longer to
tune in a station.
● Step tuning:
Press the right or left side of SEARCH button
4 to manually tune in a station.
Recalling a preset station
A total of 24 preset positions (6-FM1, 6-FM2, 6-
FM3, 6-AM) exist to store individual radio stations
in memory. Pressing the corresponding preset
button recalls the stored radio frequency
automatically.
1. Press BAND button 8 and select the desired
band. (FM or AM)
2. Press the Shift button ! to display the preset
channel display.
3. Press the corresponding Preset button
"
to
recall the stored station.
∗ Press and hold one of Preset buttons
"
for 2
seconds or longer to store that station into
preset memory.
Manual memory
1. Press BAND button 8 and select the desired
band. (FM or AM)
2. Press the Shift button ! to display the preset
channel display.
3. Select the desired station with seek tuning,
manual tuning, or preset tuning.
4. Press and hold one of Preset buttons
"
for 2
seconds or longer to store the current station
into preset memory.
Loading a CD
1. Press OPEN button 6. The SLOPING
CONSOLE opens.
CAUTION
.
Be careful not to get your fingers caught when
opening and closing the SLOPING CONSOLE.
2. Insert a CD into the center of the insertion
slot with the label side facing up. The CD plays
automatically after loading.
Notes:
• Never insert foreign objects into the CD insertion
slot.
• If the CD is not inserted easily, there may be
another CD in the mechanism or the unit may
require service.
• Discs not bearing the
mark and CD-ROMs
cannot be played by this unit.
Loading 3
"
(8 cm) compact discs
∗ No adapter is required to play a 3
"
CD.
∗ Insert the 3
"
CD into the center of the insertion slot.
3. After loading a CD, the SLOPING CONSOLE
closes automatically.
Notes:
• Note that SLOPING CONSOLE close immediately
after a CD is inserted into CD insertion slot.
• If no CD is loaded in the SLOPING CONSOLE, it
closes after 30 seconds.
Listening to a CD already inserted
Press FUNCTION button 7 to select the CD
mode. Play starts automatically. If no CD is
loaded in the unit, “NO DISC” appears in the
display.
Pausing play
1. Press Play/pause button $ to pause play.
“PAUSE” appears in the display.
2. To resume CD play, press Play/pause button
$ again.