


DRX9675z 1110 DRX9675z
∗ Once selected, the preferred display becomes
the display default. When a function adjustment
such as volume is made, the screen will
momentarily switch to that function’s display,
then revert back to the preferred display sev-
eral seconds after the adjustment.
∗ If a title has been input, it is displayed in the main
display. If no title has been input, “------------”
appears in the display. To input a title, refer to
the subsection in “Entering titles” in “Other
Handy Functions” section.
Changing the angle of the SLOPING
CONSOLE
If the installation position or display angle makes
the display hard to see, change the angle of the
SLOPING CONSOLE.
1. Press and hold OPEN (ANGLE) button 6 for
2 seconds or longer.
2. Each time this button is pressed, the
SLOPING CONSOLE switches to the tilted or
closed state.
CAUTION
When not using this unit for a long time and
when turning OFF the ignition key for the car,
close the SLOPING CONSOLE for safety’s sake.
Switching the screen saver
You can switch between 3 screen savers.
1. Press DISP button 3 and select the screen
saver display.
2. Each time you press and hold DISP button
3 for 1 second or longer, the screen saver
changes between 3 screen savers.
Adjusting the EXTRA output volume
You can adjust the volume output from the unit’s
non-fader output terminal.
1.
Press MODE button
&
three times and select
“EXTRA VOL” while in Audio Mode.
2.
Press the right side of SEARCH button
4
to
select “0”.
3.
Pressing VOLUME button 2 up (w) increases
the output volume; pressing it down (z)
decreases the output volume.
∗ The factory default setting is “0”. (Setting range:
–5 to +5)
4. When the adjustment is complete, press MODE
button & several times or press and hold ENT
button $ for 1 second or longer until the function
mode is reached.
Basic Operations
Adjusting the balance
1. Press MODE button & three times and select
“BAL DETAIL”.
2. Press the right side of SEARCH button 4 to
select “0”.
3. Pressing VOLUME button 2 up (w) empha-
sizes the sound from the right speaker;
pressing it down (z) emphasizes the sound
from the left speaker.
∗ The factory default setting is “0”. (Adjustment
range: LEFT13 to RIGHT13)
4. When the adjustment is complete, press
MODE button & several times or press and
hold ENT button $ for 1 second or longer until
the function mode is reached.
Adjusting the fader
1. Press MODE button & three times and select
“FAD DETAIL”.
2. Press the right side of SEARCH button 4 to
select “0”
3. Pressing VOLUME button 2 up (w) empha-
sizes the sound from the front speakers;
pressing it down (z) emphasizes the sound
from the rear speakers.
∗ The factory default setting is “0”. (Adjustment
range: FRONT12 to REAR12)
4. When the adjustment is complete, press
MODE button & several times or press and
hold ENT button $ for 1 second or longer until
the function mode is reached.
7. OPERATIONS
Basic Operations
Note: Be sure to read this chapter referring to the front diagrams of
chapter “3. CONTROLS” on page 5 (unfold).
CAUTION
Be sure to lower the volume before switch-
ing off the unit power or the ignition key. The
unit remembers its last volume setting. If you
switch the power off with the volume up, when
you switch the power back on, the sudden
loud volume may hurt your hearing and dam-
age the unit.
The clock is displayed when the ignition key
is turned to the ACC (accessory) or IGN (igni-
tion-on) position even when the unit power
is off. In some cars, the clock may momen-
tarily disappear when the ignition key is
turned to the START position. The clock will
reappear after the engine has started and the
ignition key is released to the IGN (ignition-
on) position.
Turning on/off the power
Note:
• Be careful about using this unit for a long time with-
out running the engine. If you drain the car’s bat-
tery too far, you may not be able to start the en-
gine and this can reduce the service life of the
battery.
1. Press POWER button 7.
2. The illumination and display on the unit light
up. The unit automatically remembers its last
operation mode and will automatically switch
to display that mode.
3. Press and hold POWER button 7 for 1 sec-
ond or longer to turn off the power for the unit
or press POWER OFF button 9.
Note:
• About the system check
The confirmation of connected equipments must
be performed for this unit only when the wiring
connection is complete and power is turned on to
the unit first. When the power is supplied,
“SYSTEM CHECK” appears in the display. Press
POWER button
7
. The system check starts inside
the unit. The equipments connected to this unit
appears in the display. Press POWER button
7
again.
Selecting a mode
1. Press FUNCTION button 7 to change the
mode of operation.
2. Each time you press FUNCTION button 7,
the mode of operation changes in the following
order:
Radio (TUNER) mode ➜ CD mode ➜ CD
changer mode ➜ MD changer mode ➜ TV
mode ➜ Radio (TUNER) mode...
∗ External equipment not connected with CeNET
is not selected.
Adjusting the volume
Pressing VOLUME button 2 up (w) increases
the volume; pressing it down (z) decreases the
volume.
∗ The volume level is from 0 (minimum) to 33 (maxi-
mum).
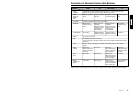
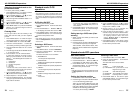
Switching the display
Press DISP button 3 to select the desired display.
Each time you press DISP button 3, the display
switches in the following order:
Main display
Clock display
Spectrum analyzer
display
Screen saver display
Main display...
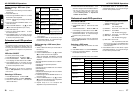
MANU
1 3456
P.ch
2
FM1 BBC
F
M
1 80. 0
MANU
1 3456
P.ch
2
FM1 BBC
F
M
1 PM 7 : 50