CDC1235
12 DISC CD CHANGER - “TWIN SIX” Owner's guide
CHARGEUR DE CD 12 DISQUES - “Double Six” Munuel de l'utilisateur
CAMBIADOR DE CD 12 DISCOS - “Doble Seis” Guía del Propietario
Thank you for purchasing the CDC1235 system. The CDC1235 is designed incorporating the latest
digital technologies, while featuring a newly developed CD mechanism to achieve excellent
performance and good reliability.
Please read this owner's guide entirely before proceeding with installation.
Nous vous remercions d'avoir acheté un changeur CDC1235. Le CDC1235 tire parti des dernières
technologies numériques et cornporte un nouveau mecanisme de lecture des CD, ce qui lui permet
d'offrir d'excellentes performances et une très bonne fiabilité.
Veuillez ilre intégralement ce mode d'ernploi avant de passer à l'installation.
Gracias por comprar el sistema CDC1235. El diseño del CDC1235 incorpora la última tecnología
digital así como el recientemente desarrollado mecanismo CD para ofrecer unas excelentes
prestaciones y fiabilidad.
Lea esta guía del usuario en su totalidad antes de proceder a la instalación.
● 12-Disc Capability (Two 6-Pack™ Magazines)
● 8-Times Oversampling Digital Filter
● Dual 1-Bit D/A Converters
● Zero-Bit Detector™ Mute Circuit
● Recessed Sliding Magazine Door
● Low Vibration Suspension System
● Eject Capability with Key-Off
● 120° Mounting Capability
● Quick Disc-to-Disc Load Time
● Fiber-Optic Digital Output
● Audio Navigation Compatible (IVS)
● Dimensions: 268 mm (W) ✕ 98 mm (H) ✕ 170 mm (D)
● Capacité de 12 disques (deux magasins 6-Pack™)
● Filtre numérique à suréchantillonnage octuple
● Doubles convertisseurs N/A à 1 bit
● Circuit de mise en sourdine Zero-Bit Detector™
● Porte de magasin coulissante en retrait
● Système de suspension à faibles vibrations
● Éjection possible avec le contact coupé
● Possibilité de montage sur 120°
● Temps de chargement disque-à-disque rapide
● Sortie numérique à fibre optique
● Compatible avec les systèmes de navigation audio (IVS)
● Dimensions : 268 mm (L) ✕ 98 mm (H) ✕ 170 mm (P)
● Capacidad para 12 discos (dos magazines de 6-Pack™)
● Filtro digital de sobremuestreo óctuple
● Convertidores D/A dobles de 1 bit
● Circuito de silenciamiento con Zero-Bit Detector™
● Puerta del cargador empotrada y deslizante
● Sistema de suspensión que reduce las vibraciones
● Capacidad de expulsión con la llave de contacto desconectada
● Capacidad de montaje dentro de un ángulo de 120°
● Carga rápida de discos
● Salida digital de fibra óptica
● Compatible con navegación mediante voz (IVS)
● Dimensiones: 268 (Ancho) ✕ 98 (Alto) ✕ 170 (Prof.) mm
FEATURES / CARACTÉRISTIQUES / CARACTERÍSTICAS PRINCIPALS
1.
Français EspañolEnglish
1. Please read this manual carefully before installing the unit.
2. Make sure all of the mounting hardware is complete before you install the CDC1235.
3. It is recommended that you remove the negative (-) terminal from the car battery before you install
the CDC1235. This will prevent accidental short circuiting installation.
4. Do not open CDC1235 cases. There are no user serviceable parts inside. If you drop anything into
the unit during installation, consult your nearest CLARION dealer or an authorized CLARION
service center.
5. Never clean the surface of your CDC1235 with chemical solvents, as they could damage the finish.
Use a clean dry cloth.
6. If the car is parked for a long time in the sun during summer or in a cold location during winter, the
temperature inside the car will reach extreme levels. As the unit may not function properly in such a
case, use it only after the ambient temperature has returned to normal.
1. Veuillez lire avec attention ce mode d'emploi avant d'installer l’appareil.
2. Assurez-vous que tous les accessoires d’installation sont bien présents avant d’instaaler votre
CDC1235.
3. Nous vous recommendons de débrancher la borne moins (-) de la batterie avant d'installer le
CDC1235. Vous éviterez ainsi tout court-circuit accidentel pendant l'installation.
4. N’essayez pas de démonter le CDC1235. L'utilisateur n'a en aucun cas besoin d'accéder à
l'intérieur de l'appareil. Si vous faites tomber quelque chose dans l'appareil au cours de
l’installation, adressez-vous à votre revendeur CLARION ou à un centre de SAV CLARION.
5. Ne nettoyez jamais l'extérieur du CDC1235 avec un solvant chimique. Vous risqueriez
d'endommager la finition. Utilisez un chiffon propre et sec.
6. Si le véhicule reste stationné longtemps au soleil en été ou dans un endroit trés froid en hiver, la
température intérieure du véhicule peut atteindre des niveaux extrêmes. L'appareil ne pouvant
obligatoirement fonctionner dans un cas semblable, ne l'utilisez qu’une fois la température
ambiante revenue à un niveau normal.
1. Lea este manual atentamente antes de instalar la unidad.
2. Asegúrese de que el hardware de montaje esté completo antes de instalar el CDC1235.
3. Se recomienda retirar el terminal negativo (–) de la batería del coche antes de instalar el CDC1235.
Esto evitará el peligro de que se produzcan cortocircuitos accidentales durante la instalación.
4. No abra la caja CDC1235. Su interior no contiene piezas que el usuario pueda reparar. Si durante
la instalación cae algún objeto en el interior de la unidad, consulte al distribuidor CLARION más
cercano o a un centro de servicio autorizado CLARION.
5. No limpie nunca la superficie del CDC1235 con disolventes químicos, ya que podrían dañar el
acabado. Utilice un paño limpio y seco.
6. Si el automóvil permanece aparcado durante un período prolongado al sol durante el verano o en
un lugar frío durante el invierno, la temperatura del interior del vehículo alcanzará niveles extremos.
Ya que en estos casos es posible que la unidad no funcione correctamente, utilice el aparato
únicamente cuando la temperatura ambiente haya vuelto a su estado normal.
PRECAUTIONS / PRECAUTIONS / PRECAUCIONES
2.
Français EspañolEnglish
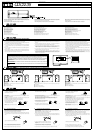
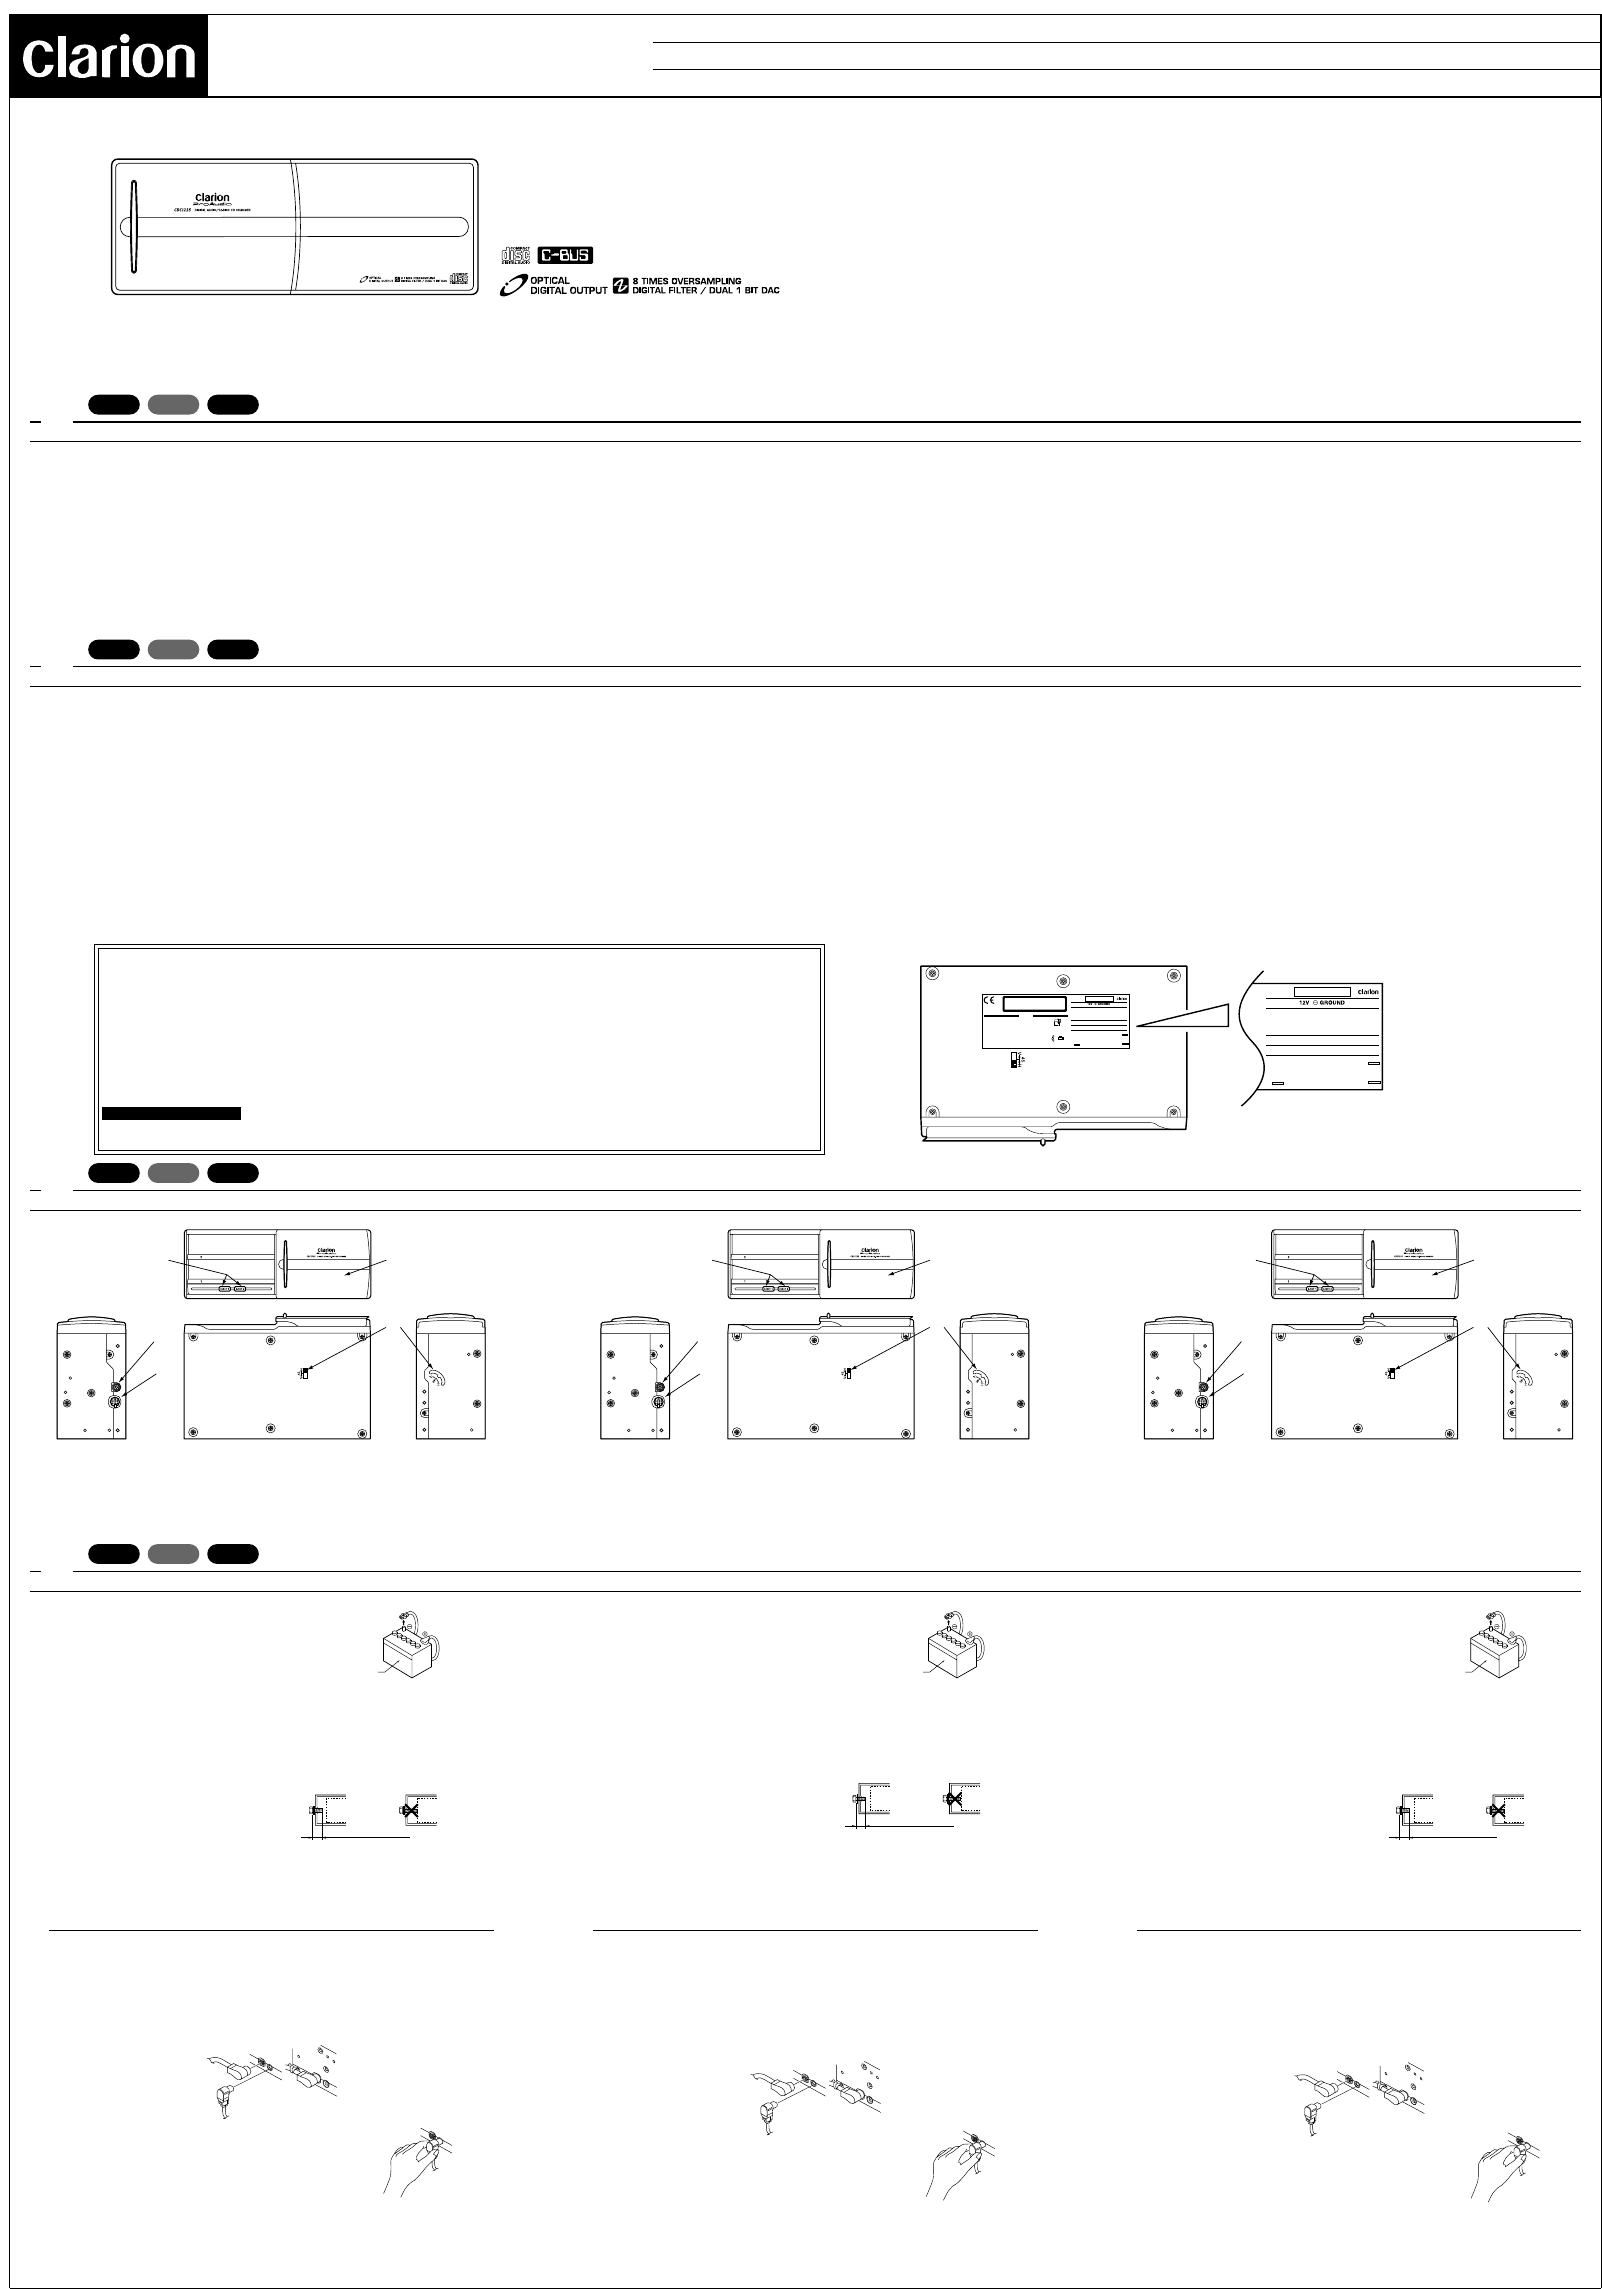
¡Installation selector levers
™Eject Button
Press the eject button 1 for ejecting the magazine 1 and the eject button 2 for the magazine 2.
£Sliding Door
¢C-BUS Terminal (13 pin)
∞Optical Digital Output Terminal
¡Leviers de réglage de a position physique
™Bouton d'éjection
Appuyez sur le bouton d'éjection 1 pour ejecter le magasin 1, et sur les boutton d’éjection 2 pour éjecter le magasin
2.
£Volet coulissant
¢Connecteur C-BUS (13 broches)
∞Connecteur de sortie opto-numérique
¡Palanca de selector de instalación
™Botón de expulsión
Pulse el botón de expulsión 1 para expulsar el cambiador 1 y el botón de expulsión 2 para el cambiador 2.
£Puerta corredera
¢Terminal Bus-C (13 clavijas)
∞Terminal de salida digital óptocas
IDENTIFICATION OF PARTS / PRINCIPALES PIECES / IDENTIFICACIÓN DE LOS COMPONENTES
3.
Français EspañolEnglish
INSTALLATION / INSTALLATION / INSTALACIÓN
4.
Français EspañolEnglish
Installation of connectors
4 - 1.
1. In order to prevent short circuits during installation,
the negative (-) terminal of the battery must be
disconnected prior to installation.
2. Give consideration to safety and easy handling when deciding on the installation place. Avoid the
following places:
●A place which hampers driving.
●A place where the safety of the passengers is compromised during an emergency brake
situation.
●A place which is exposed to direct sunlight or the hot air from the heater.
●A place which is exposed to rain or which comes into contact with water.
3. Only the provided screws and brackets should be
used during installation. Using screws other than
those specified will cause damage.
4. Before installation, check that there is no harness hidden behind any panels before drilling any
holes.
1. When handling the cord, take the following precautionary measures:
●Avoid places that heat up such as the engine, the exhaust pipe and the heater vent.
●Keep it separate from the car's own coiled and connected cords.
●Take care not to place it across the burr edge of the metal sheet.
2. When connecting the 13 pin C-BUS extension cable or the optical fibre digital cable, ensure that it is
fully inserted so as to make a secure connection. After connecting, secure the cable with the lead
clamp.
3. When removing the optical fibre digital cable, grip the slide cap
(grey colour part of the unit) and then pull gently.
4. Do not coil up the optical fibre digital cable with a radius of less than 1" (3cm). With a radius of less
than 1 ", the performance of the cable will be greatly impaired.
5. After connecting, use the lead clamp or tape to secure the cable.
Installation des câbles et connecteurs
4 - 1.
1. Prenez les précautions suivantes lors du passage du câble d'alimentation:
●Evitez de passer aux endroits qui chauffent, comme le moteur, le tuyau d'échappement et le
système de chauffage.
●Ne le regroupez pas avec les faisceaux électriques du véhicule.
●Veillez à ce qu'il ne frotte pas contre un bord métallique.
2. Lors du branchement du câble d'extension C-BUS ou du câble à fibre optique numérique, assurez-
vous que le connecteur est bien enfoncé dans sa prise et que la connexion est solide. Après le
branchement, fixez le câble à l'aide du collier de fixation.
3. Si vous devez débrancher le câble à fibre optique numérique,
attrapez le capuchon du connecteur (de couleur grise) et tirez
délicatement.
4. Ne courbez pas le câble à fibre optique numérique en boucles de moins de 3 cm de rayon. Lorsque
le rayon d'une courbure est inférieur à 3 cm, les performances du câble sont largement abaissées.
5. Après connexion, servez-vous du collier de serrage ou de ruban adhésif pour fixer le câble.
Instalación de los conectores
4 - 1.
1. Al manipular el cable tome las siguientes precauciones:
●Evite los lugares en los que se produzca calor tales como el motor, el tubo de escape y el
conducto de calefacción.
●Manténgalo separado de los cables enrollados y conectados del propio automóvil.
●Tenga cuidado de no colocarlo contra los bordes cortantes de la plancha metálica.
2. Al conectar el cable de extensión del BUS-C de 13 clavijas o el cable digital de fibra ópticas,
asegúrese de que queda completamente insertado y de que la conexión es firme. Una vez
conectado, asegure el cable con la mordaza.
3.Para extraer el cable digital de fibra ópticas, sujete la tapa
deslizante (pieza gris de la unidad) y tire con suavidad.
4. No enrolle el cable digital de fibra ópticas con un radio menor de 3 cm. Con un radio menor de 3
cm el rendimiento del cable resultará considerablemente mermado.
5. Una vez efectuada la conexión, utilice la mordaza o cinta para fijar el cable.
MODEL
THIS DEVICE COMPLIES WITH PART 15 OF THE FCC RULES.
OPERATION IS SUBJECT TO THE FOLLOWING TWO CONDIT-
IONS: (1) THIS DEVICE MAY NOT CAUSE HARMFUL INTERFER-
ENCE, AND (2) THIS DEVICE MUST ACCEPT ANY INTERFERENCE
RECEIVED, INCLUDING INTERFERENCE THAT MAY CAUSE
UNDESIRED OPERATION.
THIS PRODUCTION COMPLIES WITH DHHS RULES 21 CFR
SUB-CHAPTER J APPLICABLE AT DATE OF MANUFACTURE.
CLARION CO.,LTD.
50 KAMITODA, TODA-SHI, SAITAMA-KEN, JAPAN.
MANUFACTURED:
SERIAL No.
PE-
Clarion Co.,Ltd.
MADE IN
286-
CLASS 1 LASER PRODUCT
(
EN-60825. 1991
)
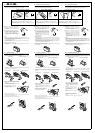
1.
2.
Be sure to use the screws, etc., included in the package for
installation. Using other screws could damage the set.
Set the selectors on the side and bottom panels to the “H” side when
installing the set horizontally, to the “V” side when installing the set
vertically. When installing at the angle of 45°, set the selectors to the
center click position.
The set may be damaged if the selectors are not set to the proper
positions.
Screws
M5 x 8 W-SEMS
•
ISO
8
V
H
45
VH
45
CAUTION
MODEL
THIS DEVICE COMPLIES WITH PART 15 OF THE FCC RULES.
OPERATION IS SUBJECT TO THE FOLLOWING TWO CONDIT-
IONS: (1) THIS DEVICE MAY NOT CAUSE HARMFUL INTERFER-
ENCE, AND (2) THIS DEVICE MUST ACCEPT ANY INTERFERENCE
RECEIVED, INCLUDING INTERFERENCE THAT MAY CAUSE
UNDESIRED OPERATION.
THIS PRODUCTION COMPLIES WITH DHHS RULES 21 CFR
SUB-CHAPTER J APPLICABLE AT DATE OF MANUFACTURE.
CLARION CO.,LTD.
50 KAMITODA, TODA-SHI, SAITAMA-KEN, JAPAN.
MANUFACTURED:
SERIAL No.
PE-
Clarion Co.,Ltd.
MADE IN
286-