


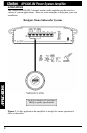


INSTALLATION
This section lists Mounting and Wiring Precautions for installing a Clarion
APX400.2M marine amplifier. Combined with the experience of a professional
installer, these safeguards provide enough detail to successfully complete an
installation. If you do not have the necessary skills, do not install the amplifier
yourself. Instead, see your authorized Clarion dealer for installation
recommendations.
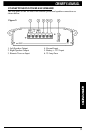
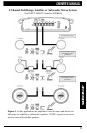
MOUNTING PRECAUTIONS
Although the Clarion APX400.2M incorporates heat sinks and protection
circuits, mounting the amplifier in a tight space without any air movement can
still damage internal circuitry over time. Choose a site that provides adequate
ventilation and is isolated from the marine environment. For easy system set-
up, mount the amplifier so the front panel controls will be accessible after
installation.
In addition, observe the following precautions:
1. For the most efficient cooling, mount the amplifier so cool air runs along the
length of the fins rather than across them. Remember, any moving air will
dissipate heat.
2. Mount the amplifier on a rigid surface. Avoid mounting to subwoofer
enclosures or areas prone to vibration.
3. Prior to drilling, make sure proposed mounting holes will not cut into the
fuel tank, fuel lines, or electrical wiring.
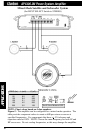
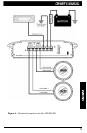
WIRING PRECAUTIONS
Read all wiring precautions. If you are not sure of the connections, contact
your authorized Clarion dealer.
1. Before installation, make sure the source unit Power switch is in the OFF
position.
2. Disconnect the negative (-) lead of the battery before making any power
connections.
3. When making connections, be sure that each connection is clean and secure.
Insulate final connections with electrical tape or shrink tubing. Failure to do so
may damage your equipment.
4. A secure clean ground connection is critical to the performance of your
Clarion amplifier. Use the shortest ground wire possible and securely connect
to the vessel battery to minimize resistance and avoid noise problems.
7