


SETTING THE GAIN
After completing the installation, follow these steps to set the Gain Control and
then perform the Final System Checks.
1. Turn the Gain Control all the way counter-clockwise.
2. Turn the vessel’s Ignition Switch to the ON position. Then turn the ON/OFF
Switch on the source units to the ON position. Set all Tone or Equalization
Controls to “flat” positions and turn Loudness off.
3. Play a CD or Tape and set the Volume Control at 75% of full level.
NOTE: If the system uses an equalizer, set its frequency controls to “flat”
positions.
4. Slowly increase the Gain Control. Stop when you hear a slight distortion of
audio.
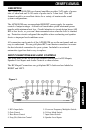
SETTING THE CROSSOVER
The Clarion APX400.2M features a fully adjustable crossover. To set the
crossover, follow these steps.
1. Using the X-Over Mode Switch, select the desired mode - LP for Low Pass,
HP for High Pass and OFF for Full Range.
2. Using the Freq (Hz) Control, select the desired frequency. If the desired
frequency exceeds the range of the Freq (Hz) Control, press the Crossover
Frequency Multiplier Switch to increase the value by a multiplier of 10.
•For example, 55Hz x 10 = 550Hz or 550Hz x 10 = 5.5kHz.
SETTING THE BASS BOOST
1. Initially set the Bass Boost control to its full left position (i.e. 0dB).
2. Listen to a variety of music styles (e.g. Rock, Rap, etc.) and slowly increase
the Bass Boost control until a noticeable increase in low bass response is
perceived.
3. Slowly adjust the Bass Boost control (up or down) to realize the best bass
response.
CAUTION: If you hear a “pop” (due to speaker over-excursion), lower the
Bass Boost to prevent speaker damage. If the system sounds muddy and
distorted (due to amplifier clipping), lower Bass Boost to avoid shutdown from
overheating.
10