CERWIN-VEGA! PROFESSIONAL
27
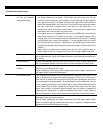
Troubleshooting (continued)
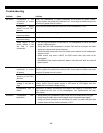
Bad Sound
Equipment settings
are not set properly
causing distortion
Check the meters on the external mixing console to ensure that the signal is
not being clipped by the mixer, if the levels from the mixer are too hot
correct the gain structure of the console; first by lowering the pre-amplifier
trim (input sensitivity), if this does not lower the signal level sufficiently then
lower the channel fader, and if the level is still too hot then lower the master
bus (but most likely a clipped input is the source of the distortion). It is
important to check every active input channel on the console to ensure that
each input trim is set correctly for each source.
If the signal sources are plugged directly into the P1500X make sure that the
input level knobs are not turned up too high. If the signal indicator LED is
turning RED on any channel that means the input on that channel is clipping
and the input level needs to be lowered. It is also possible that the source
level will need to be lowered. If distortion is still audible after lowering the
source level and input level knob then lower the master volume knob on the
P1500X.
Check that the audio source and/or mixer do not have excessive bass or
treble added to the mix, overdriven EQ’s can clip causing audible distortion.
Bad cable connections
Verify that all connections are good. Verify the connectors are clean and free of
any residue build-up. Verify the insulation jacket on all cables has not been torn
or crushed.
Rattling Sounds
Be sure the rattling sounds do not come from the caster wheels (subwoofer
only), loudspeaker stands or any furniture or fixtures located near the system.
Bad AC mains cable
location
Avoid using an AC power source that is connected to a light dimmer. Use an AC
filter box or use a different AC circuit.
Avoid routing the audio signal cables along other power cables, transformers
and signal cables to prevent interference.
Ground loop ‘hum’
Turn all volume and input levels to the minimum setting to verify there is no
‘hum’ coming from the connected audio equipment. If the ‘hum’ is still present,
than remove all audio cable connections and if the ‘hum’ disappears than there
is a potential ground loop problem. Ground lifting the signal cable (with a direct
box or coupling transformer) is the safest way to eliminate ground loops within
sound setups. Plug all audio equipment AC power connections into the same
outlet which shares a common ground (make sure the outlet is capable of
supporting the equipment to avoid overloading the circuit). Verify that the
distance between AC power source and common ground is as short as possible.
Equipment ‘hiss’
Use a balanced connection (instead of an unbalanced connection) to take
advantage of the best noise rejection.
Plug all audio equipment AC power connections into the same outlet which
shares a common ground (make sure the outlet is capable of supporting the
equipment to avoid overloading the circuit).


