


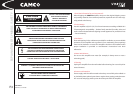
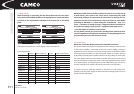


MODEL:
OUTPUT PWR PER CH/IMP:
MADE IN GERMANY
SER. NO.:
VORTEX-200V
230 V ~ 50/60 Hz 12 A 1700W
3200 W/4Ohm
xxxxxxx
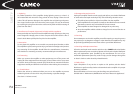
MODEL:
OUTPUT PWR PER CH/IMP:
MADE IN GERMANY
SER. NO.:
VORTEX-2.6
230 V ~ 50/60 Hz 7,2 A 1005W
1500 W / 1,8 Ohm
xxxxxxx
MODEL:
OUTPUT PWR PER CH/IMP:
MADE IN GERMANY
SER. NO.:
VORTEX-4
230 V ~ 50/60 Hz 10 A 1450W
2000 W/2Ohm
xxxxxxx
MODEL:
OUTPUT PWR PER CH/IMP:
MADE IN GERMANY
SER. NO.:
VORTEX-6
230 V ~ 50/60 Hz 12 A 1800W
3000 W/2Ohm
xxxxxxx
3 INSTALLATION
USER MANUAL
VORTEX 6, 4, 2.6 and 200V
P.11
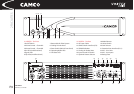
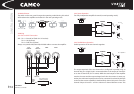
3.1 Mains supply
When mounting or connecting the amp always disconnect it from mains.
Only connect the VORTEX amplifi er to an appropriate AC circuit and outlet,
according to the requirements indicated in the second line on the rating
plate.
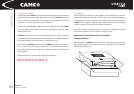
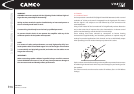
Exemplary rating plates for a mains supply of 230 V AC 50/60 Hz.
Power Supply Data:
Voltage Mains Frequency Current Power Consumption
VORTEX-200V 120 V 50/60 Hz 24 A 1700 W
VORTEX-200V 220 V 60 Hz 12 A 1700 W
VORTEX-200V 230 V 50/60 Hz 12 A 1700 W
VORTEX-6 100 V 50/60 Hz 28 A 1800 W
VORTEX-6 120 V 50/60 Hz 24 A 1800 W
VORTEX-6 220 V 60 Hz 12 A 1800 W
VORTEX-6 230 V 50/60 Hz 12 A 1800 W
VORTEX-4 100 V 50/60 Hz 24 A 1450 W
VORTEX-4 120 V 50/60 Hz 20 A 1450 W
VORTEX-4 220 V 60 Hz 10 A 1450 W
VORTEX-4 230 V 50/60 Hz 10 A 1450 W
VORTEX-2.6 120 V 50/60 Hz 14,4 A 1005 W
VORTEX-2.6 220 V 60 Hz 7,2 A 1005 W
VORTEX-2.6 230 V 50/60 Hz 7,2 A 1005 W
NOTE: Even under normal conditions the mains current can reach levels up
to 60 A (230 V), 120 A (120 V) and 140 A (100 V), respectively; this could
cause lamps to fl icker if connected to the same mains as the amp. The im-
pedance of the AC circuit should be less than 0,157 Ohms to avoid fl icker
according to EN61000-3-11 “Electromagnetic compatibility – Part 3-11:
Limits – Limitation of voltage changes, voltage fl uctuations and fl icker in
the public low-voltage supply systems – Equipment with rated current
≤ 75 A and subject to conditional connection”.
If in any doubt, consult your local power provider. Never attempt to mea-
sure this impedance level with your ohmmeter. This may damage your me-
ter and expose you to the risk of electric shock!
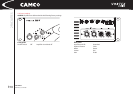
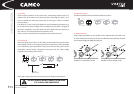
3.2 On/Off Switch
NOTE: This switch does NOT disconnect the amplifi er from mains.
The switch initiates start-up by activating the current limiting function. As soon
as the power amplifi er is connected to the mains power supply, a voltage is
supplied to both the line-fi lter and the fused input of the controllable rectifi er.
Disconnecting the amplifi er from the main power supply can only be achieved
by physically separating the amplifi er from the mains by pulling the mains plug.
The mains plug therefore has to be freely accessible. Disconnect the mains plug
from the mains during a lightning storm or when the amplifi er remains unused
or un-supervised for a prolonged period of time. Alternatively, you can discon-
nect the amplifi er via an external all-pole disconnection from the mains.
If a power cut occurs while the amplifi er is switched on, it will restart auto-
matically once the power supply has been restored. All settings prior to the loss
of power will be maintained.