


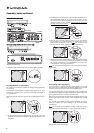


4. Now turn the platter by hand and place the stylus tip at position B.
Again look directly from above to see if the cartridge body sides are
parallel to the lines on the protractor.
5. If the cartridge body sides are not parallel to the lines on the
protractor, move the cartridge body back in the headshell a little (a
millimetre or so).
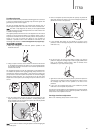
6. Lift the tone arm up and turn the platter by hand to go back to
position A, realign the cartridge body so that it is again parallel to the
lines on the protractor without moving it back or forwards in the
headshell (i.e. try to rotate the body only).
7. Again lift the tone arm and turn the platter by hand then place the
stylus tip back at position B. Again look directly from above to see if
the cartridge body sides are now parallel to the lines on the
protractor.
8. If not, move the cartridge body back in the headshell by another
millimetre or so and repeat the procedure.
The idea is to find the position in the headshell front to back that allows
adjustment of the cartridge so that its sides are parallel to the lines on
the protractor at both positions A and B.
Cartridge downforce adjustment
Refer to the 'Assembly/setup' section of this manual.
9
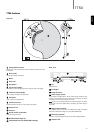
T T50
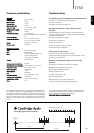
Cartridge alignment
Because a normal tonearm pivots about its bearing point as it traverses
a record, the angle between the cartridge body and record groove will
gradually vary as the record is played.
The idea of cartridge alignment is to minimise this inherent error. A
simple alignment protractor is included in this manual to facilitate this.
Note: The TT50 is fully aligned at the factory for the supplied AT95E
cartridge and does not require this adjustment to be made unless a new
or different cartridge is fitted.
The supplied protractor allows the error to be adjusted out at two critical
positions on the record surface (63mm and 120mm radius) in such a
way that then minimises the error at all other positions. The protractor is
simply cut out from the manual and placed on the turntable as
described, a printable version is also available for download on the
Cambridge Audio website at: www.cambridgeaudio.com/support.php
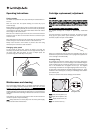
The procedure is as follows:
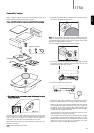
1. Move your cartridge to the front-most position possible in the
headshell as shown.
2. Using a scalpel or similar, cut the dotted line where the hole shown
on the Alignment Protractor and place it over the turntable spindle.
The Alignment Protractor is located in the ‘Technical specifications’
section of this manual.
The cartridge protractor can also be photocopied or downloaded from
our website and printed. After copying/printing always check the mm
measurement reference scale against a ruler which then makes sure
your protractor is accurate. Copiers and printers can sometimes slightly
distort the images they print, so if you find this to be the case make
adjustments to the copier or print scaling and reprint until the scale is
correct.
3. Turn the platter gently by hand so that you can carefully rest the
stylus tip exactly on the cross at position A. Looking directly from
above carefully rotate the cartridge body so that its sides are parallel
to the protractor lines as shown.
Note: Lift the tone arm before turning the platter to avoid damaging the
the needle/stylus.
ENGLISH