9
651Aazur
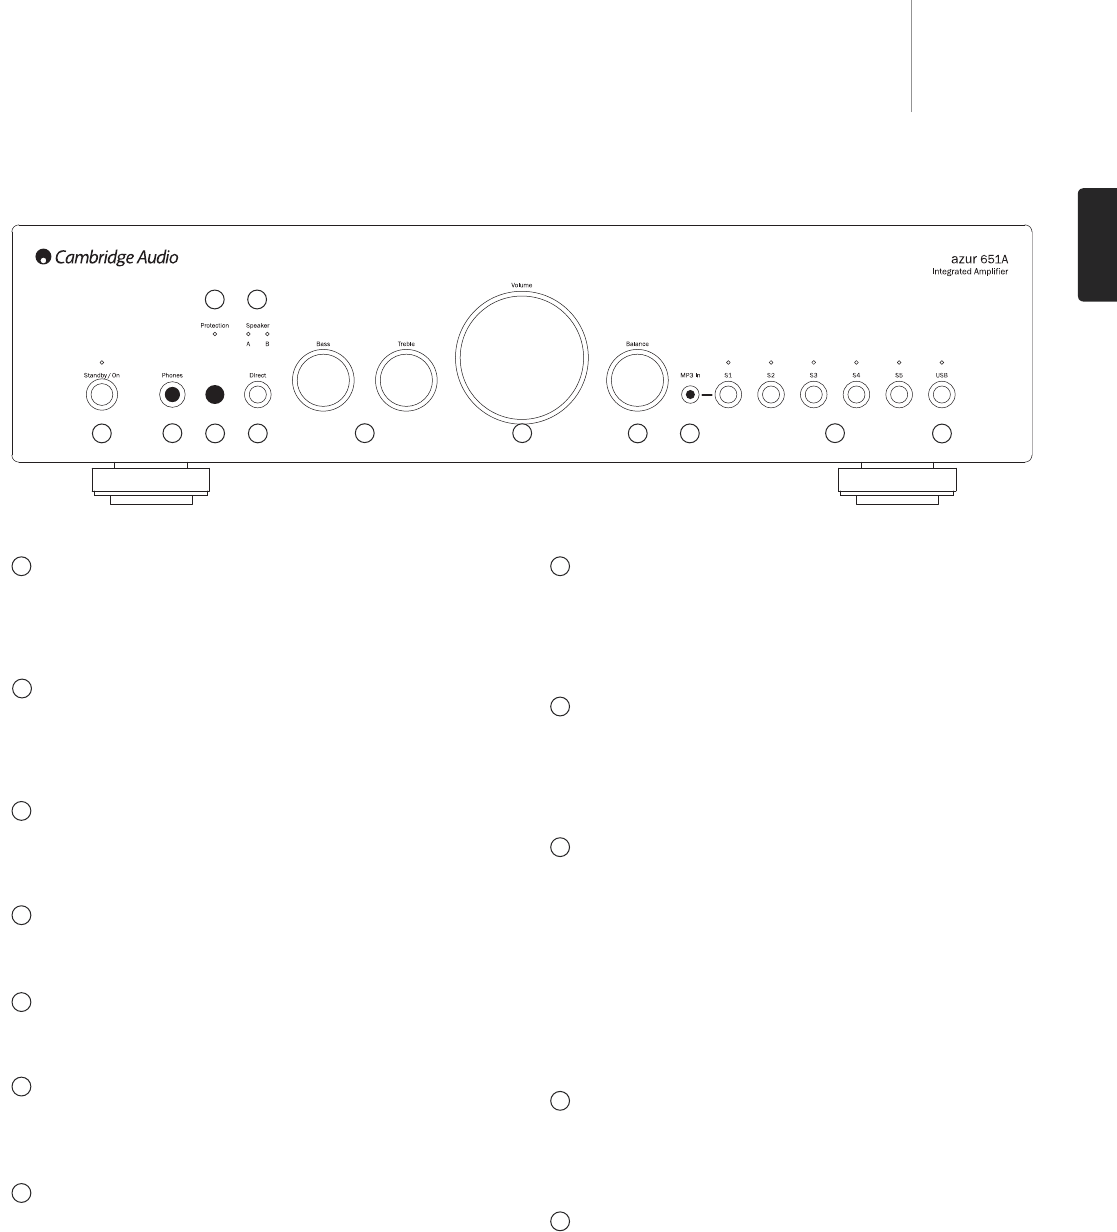
Front panel controls
Standby/On
Switches the unit between Standby mode (indicated by dim power LED)
and On (indicated by bright power LED). Standby is an eco power mode
where the power consumption is less than one watt. The unit is designed
so that it can be left safely in Standby mode when not in use.
Phones
Allows for the connection of headphones with a ¼" jack plug connector.
Headphones with an impedance of between 32 and 600 ohms are
recommended. When the headphones are connected, the output to the
loudspeakers is switched off (both speakers A and B).
Infrared sensor
Receives IR commands from the supplied Azur remote control. A clear,
unobstructed line of sight between the remote control and the sensor is
required.
Protection
LED flashes to indicate activation of CAP5 protection system. Refer to the
CAP5 section of this manual for more information.
Speaker LEDs
Indicator shows the speaker terminals that are selected. The speaker
terminals selected are changed with the remote control.
Direct
This control gives the audio signal a more direct path to the power
amplifier stage of your amplifier, bypassing the bass and treble control
circuits for the purest possible sound quality.
Bass and Treble
These controls allow subtle adjustments to the tonal balance of the
sound. In the central position these controls have no effect. They only
modify the sound through your loudspeakers and the Pre-Out sockets,
and do not affect the signals sent through the Rec Out connections.
With well-produced source material and a good system, the tone controls
are unnecessary and can be switched out by the ‘Direct’ switch. If the
musical recording is of poor quality or other factors are affecting the
sound quality, it may be necessary to adjust the tone controls to
compensate.
Volume
Use to increase or decrease the level of the sound from the outputs of the
amplifier. This control affects the level of the loudspeaker output, the pre-
amp output and the headphone output. It does not affect the Rec Out
connections. It is advisable to turn the Volume control fully anti-clockwise
before switching the amplifier on.
Balance
This control allows you to adjust the relative output levels of the left and
right channels. In the central position the output from each channel is
equal. This control only modifies the sound through your loudspeakers
and the Pre-Out sockets – it does not affect the signals sent through the
Rec Out connections.
S1/MP3 input
This source input allows you to connect a portable audio device such as
an MP3 player, plugged into either the rear panel ‘S1’ Phono/RCA input
pair or the front panel 3.5mm stereo-jack input (labelled ‘MP3 In’).
Press the S1 button on the front panel to select the input, or insert a
device into the front panel socket which automatically selects the input
and overrides the rear Phono/RCA sockets.
Note: Whilst plugging a device into the front panel automatically selects
the MP3 input, any other input can still be selected once this has been
done. As a result you may, if desired, leave a device permanently plugged
into the front panel.
S2-S5 Source inputs
Push the appropriate input selection button to select the source
component that you wish to listen to. The signal selected is also fed to the
Rec Out sockets so that it may be recorded. The input should not be
changed whilst recording.
USB
This source input allows connection of a personal computer via USB.
1
8
9
10
11
12
2
3
4
5
6
7
1
2
3
4
5
6
7 8
9 10
11
12
ENGLISH


