Set the FUNCTION Selector to:
TAPE (4) to record from microphone. Plug mic into jack (29) or (30)
AM/FM (5) to record from radio
CD (6) to record from CD
1. Insert a blank tape into cassette Deck A.
2. Press the PAUSE button then the RECORD button on Deck A to prepare for recording. As the
RECORD button is pressed the PLAY button will follow.
3. Press PAUSE again to start recording.
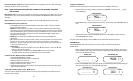
Dubbing (Recording from Tape B to Tape A)
1. Insert a blank tape into cassette Deck A, and the source or prerecorded tape into Deck B.
2. Press the PAUSE button then the RECORD button on Deck A to prepare for recording. As the
RECORD key is pressed the PLAY button will follow.
3. Press the PLAY button on Deck B, the PAUSE button on Deck A will release automatically and
recording will begin.
Note: Every new cassette tape has erase prevention tabs. Commercially
prerecorded tapes have the tabs removed to prevent recording over
the original material or accidental erasure. Cover the openings with
adhesive tape if you wish to record over such cassette tape.
To Stop Recording
Press the STOP/EJECT button on Deck B or press the PAUSE key on Deck A to momentarily stop recording.
Cueing with the Tape A Counter (46)
Rewind the tape to the beginning. Press the RESET button to reset the counter to (000). Use the Tape A
Counter Display to note precise points on an audio tape during playback and to cue the tape to those precise
points using the Fast-Forward/Cue or Rewind/Review buttons.
Compact Disc Player Operation
The 2385AV-02 and the 2395AV-02 Programmable Compact Disc Player plays both 12cm and 8cm CDs, CD-R,
CD-RW without requiring an adapter. Up to 20 tracks can be programmed for play.
Loading a Compact Disc
1. Lift to open the CD door and see “OPEN” on the LCD display.
2. Place a CD in compartment with label side up.
3. Press the CD door down to close.
Compact Disc Play
To play a loaded CD:
1. Turn power ON.
2. Set the FUNCTION Selector to CD.
3. The LCD will show the number of tracks and playing time.
4. Press the PLAY/PAUSE button.
The CD Display will show the current track and playing time.
6 11
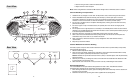
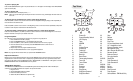
GETTING STARTED
When the ‘Power’ button (1) is depressed the LED (2) to the left of the LCD display (3) will be red for standby
mode. Pushing the LED will cause the LED to be green indicating the unit is fully powered up.
• Depressing the ‘Tape’ (4) button will cause the LCD display to show ‘Tape’.
• Depressing the ‘AM/FM’ (5) button will cause the LCD display to show ‘AM’ or ‘FM’.
• Depressing the ‘CD’ (6) button will cause the LCD display to show ‘Disc’.
DIGITAL VOLUME CONTROL
• Press ‘VOL ▼’ (7) to reduce the volume, the level will be shown in the LCD panel. Minimum volume
will show ‘00’ on the LCD display.
Press ‘VOL ▲’ (8) to increase the volume. Maximum volume is ‘40’ on the LCD display.
TREBLE AND BASS CONTROLS
‘TREBLE ▲’ (9) and ‘TREBLE ▼’ (10) can be used to adjust the Treble up and down respectively, while ‘BASS
▲’ (11) and ‘BASS ▼’ (12) can be used to adjust the Bass up and down respectively. Both Treble and Bass
can be adjusted in the range of +5 to –5.
PLL RADIO FUNCTION
• Press ‘AM/FM’ (5) to select the desired reception band. Extend the telescoping antenna (13) for
FM. There is a built-in antenna for AM reception. For FM stereo reception the ‘stereo’ will show on
the LCD display.
• Press the ‘TUNER ▲’ (14) or ‘TUNER ▼’ (15) button repeatedly until the desired station shows on
the LCD display.
•To automatically scan through the frequency bands, hold the ‘TUNER’ button down until you see
the speed of the LCD display increase. Scanning will stop when a strong signal is detected.
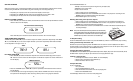
Electronic Volume Control Display
VOL 04
Treble
tre+2
Bass
ba-1
AM Band Selection
AM
520KHz