BP16 PREAMPLIFIER
3
selected the 12Vdc control voltage will be removed
from these pins. Please note that C means “com-
mon” here and both C pins are electrically con-
nected and identical.
PROGRAMMING the “T2” 12v
TRIGGER OUTPUT:
By default the T2 triggered output is inactive. To pro-
gram this output to become active , whereupon a
control voltage of 12Vdc will appear across T2 & C
terminals whenever a specific source is selected, use
the handheld remote control as follows:
• Select the source that you want to coincide with
T2 going active.
• While pointing the remote control at the BP16,
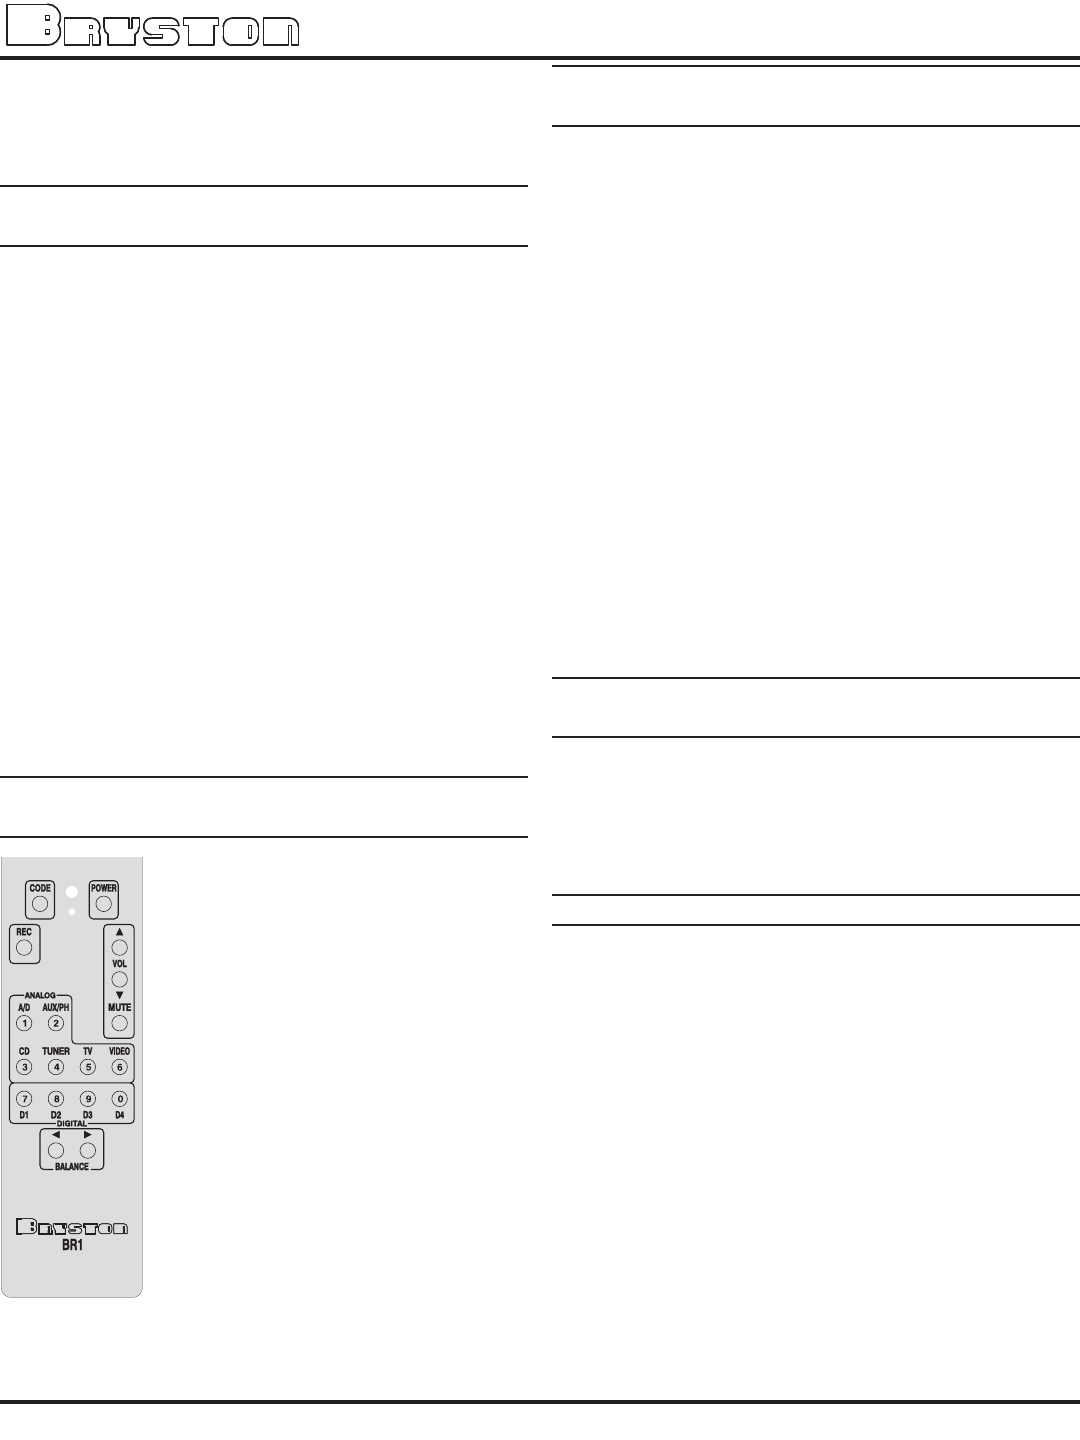
press the CODE button, followed by the three digit
code “247” using the keys numbered 1 through 0
in the illustration at the left. On your remote con-
trol these keys, or buttons, are labeled AUX/PH (2),
TUNER (4), D1 (7).
• The three digit code should be entered within a
few seconds of pressing CODE button or the unit
will automatically return to normal operation.
• To clear the T2 trigger output, press the CODE but-
ton followed by the 3 digit code “248”: AUX/PH (2),
TUNER (4), D2 (8).
HAND-HELD INFRA-RED REMOTE
CONTROL:
The Bryston model BP16 comes stan-
dard with a full function hand-held remote
control unit. The hand held remote unit
is powered by two “AAA” batteries. To
change the battery remove the bottom
cover plate by removing the four Philips
screws on the rear of the remote unit.
Ensure that the batteries are correctly
oriented and properly seated in the bat-
tery holder.
The BP16 remote is a full function
remote. It allows selection of all sourc-
es, volume up or down (the volume
control is a motor-driven design), mute
,left/right balance, power on/off and
discrete code entry.
We recommend maintaining a direct line-
of-sight between the hand held remote
unit and the front of the BP16 to ensure the most efficient
operation of the remote features.
PROGRAMMING the HANDHELD
REMOTE CONTROL:
The automatic motion-sensing backlight function in the
handheld infra-red remote control unit can be disabled by
entering the 3 digit code “792” as follows:
1) Press and hold the CODE button for 5 seconds.
Release when the LED flashes red.
2) After the LED stops flashing, enter the 3 digit code
“792” by pressing the buttons D1, D3 then AUX/PH
(see illustration on page 3)
3) To re-enable the motion-sensing backlight function,
repeat steps 1 and 2 above
To completely disable the backlight, enter the 3 digit
code “797” as follows:
1) Press and hold the CODE button for 5 seconds.
Release when the LED flashes red.
2) After the LED stops flashing, enter the 3 digit code
“797” by pressing the buttons D1, D3 then D1 (see
illustration on page 3)
3) To re-enable the backlight repeat steps 1 and 2
above
SENDING CODES to the BP16 via the IR
HANDHELD REMOTE CONTROL:
Press the CODE button on the remote control (the red
LED will light) and then enter the 3 digt code, as listed in
the “Wired RS-232 Remote Control” section” below. The
LED will flash to confirm transmission and then extin-
guish.
WIRED RS-232 REMOTE CONTROL:
Using the DB9 female connector at the rear of the unit,
the BP16 can receive commands via a null modem
cable at 9600 baud, 8 data bits, no parity and 1 stop bit
(9600,8,N,1). Valid commands will return the “>” charac-
ter indicating that the unit is ready to receive a new com-
mand. An invalid command will return the “!” character.
These serial data commands are as follows:
000 - power off
001 - select analog source 1 (A/D)
002 - select analog source 2 (AUX/PH)
003 - select analog source 3 (CD)
004 - select analog source 4 (TUNER)
005 - select analog source 5 (TV)
006 - select analog source 6 (VIDEO)
007 - volume up
008 - volume down
015 - power on/off toggle
019 - balance left
020 - balance right


