


4
Connections
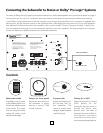
NOTE: Power is always supplied to the subwoofer electronics unless it is unplugged or switched to the off position using
the power toggle switch located in the lower left corner of the rear panel. The auto-on circuitry only activates or
deactivates the power amplifier. Make sure your subwoofer and receiver are unplugged when making the connection.
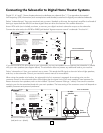
Line level: Use one of the “line level in” jacks with most systems. These inputs accept the line-level signal from your
receiver’s subwoofer output. When using the “use crossover control” input, the subwoofer’s circuitry filters out the high
frequencies and sends the remaining low frequencies to the subwoofer power amplifier.
Speaker level: Use these high-level terminals with receivers that do not have subwoofer output. The speaker inputs
accept both left and right channel speaker signals from your receiver. N
OTE: Certain receivers use speaker grounding
circuits that may be incompatible with external powered audio products, such as powered subwoofers. When speaker
wire is used instead of line level cables, this incompatibility can sometimes result in an audible hum when the receiver is
turned off or switched to a different speaker channel. See page 8 for more information.
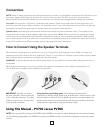
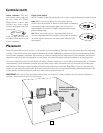
How to Connect Using the Speaker Terminals
We recommend 18-gauge wire or thicker for runs up to 15 feet (4.5m), and 16-gauge wire or thicker for longer runs.
Separate the first few inches of the wire conductors. Strip off
1
⁄
2
-inch (12mm) of insulation from the ends of each speaker
wire to expose the two conductors and tightly twist the wire strands.
WARNING: To prevent electrical shock hazard, always switch off the amplifier or receiver when making connections to
the speaker.
When making all connections, be sure to connect the + (red) on the speaker to the + (red) on the amplifier, and
the – (black) on the speaker to the – (black) on the amplifier.
IMPORTANT: Typically, one side of
the wire is smooth. Connect this side
to the – (black) connection. The other
side has a rib or stripe. Connect this
to the + (red) connection.
–
+
Using This Manual – PV700 versus PV900
NOTE: The rear amplifier panels of the PV700 and the PV900 are virtually the same. Although the instructional images
on the following pages depict the PV700’s rear panel, the PV900 connects, functions and operates in exactly the same
manner.
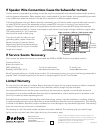
Using the five-way binding posts: The binding posts permit easy
connection to banana plugs, spade lugs, and bare wire. Insert the wire in the
hole (as shown on left) or a
3
/8-inch spade lug over the post and tighten. For
banana plugs, remove the red and black caps from the end-holes and insert
either dual or single banana plugs (as shown on right).