


Retrofit Installations
1
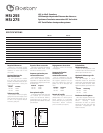
. Mark the outline of the installa-
tion hole using the supplied
template. Make a small hole at
the center of the speaker loca-
tion. Insert a long, bent piece of
wire and rotate to confirm that
there are no obstructions
b
ehind the chosen location.
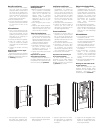
2. Cut the installation hole.
3. Run the wire from the amplifier
location to the cutout. Allow for
an extra foot of wire at the
cutout.
All Installations
1
. Strip
1
⁄2-
inch (13mm) of insula-
tion from the wire, and twist the
wire strands together. The HSi
speaker jack will accept either
bare wire up to 14-gauge, or
single banana plugs.
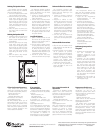
2. Connect the wire to the speaker.
3. Slide the speaker into the
cutout as shown.The speaker
must slide into the wall woofer
side first.
4. Tighten the Phillips mounting
screws.
Important: Do not over tight-
en the screws.
If you wish to paint your speakers
or grilles it should be done prior to
installation of the grille. Please see
the
Painting instructions.
Instalaciones para el
montaje trasero
1. Marque el contorno del agujero
con la plantilla suministrada.
Haga un pequeño agujero en el
centro de la ubicación del
altavoz. Meta un alambre
d
oblado y déle vueltas para
asegurarse de que no hay
obstáculos traseros en la posi-
ción elegida.
2. Corte el agujero para la insta-
lación.
3. Tienda el cable desde el amplifi-
cador hasta el hueco donde se
u
bicará al altavoz. Corte unos
30 cm más de lo necesario.
Todas las instalaciones
1. Pele 13mm del aislante del cable
y retuerza el extremo para agru-
par los hilos. El conector del
altavoz HSi aceptará tanto cable
desnudo de calibre 14 como con
clavijas sencillas tipo banana.
2. Conecte el cable al altavoz.
3. Introduzca el altavoz en el agu-
jero como se indica. Deben
introducirse primero en la
pared del “lado del woofer”.
4. Apriete los tornillos tipo estrella
de montaje.
Importante: no apriete
demasiado los tornillos.
Si quiere pintar los altavoces o
las rejillas deberá hacerlo antes de
la instalación de la rejilla. Consulte
las instrucciones para
pintarlos.
nstallations améliorées
1
. Tracez le contour de l’orifice
d’installation en utilisant le
gabarit fourni. Faites un petit
trou au centre de l’endroit où
sera placée l’enceinte. Insérez-y
un grand morceau de câble
replié, et faites tourner celui-ci
a
fin de vous assurer qu’il n’ex-
iste aucun obstacle derrière
l’endroit choisi.
2. Découpez l’orifice d’installation.
3. Amenez le câble de l’ampli à
l’orifice que vous venez de
découper, en prévoyant 30 cm
de câble supplémentaire.
Toutes installations
1. Dénudez 13 mm de câble, et
torsadez les fils souples ensem-
ble. La fiche de l’enceinte HSi
accepte les câbles dénudés d’un
diamètre maximum de 14, ou les
fiches bananes simples.
2. Connectez le câble à l’enceinte.
3. Introduisez l’enceinte dans
l’orifice découpé comme illus-
tré ci-dessous. Les enceintes
doivent être introduites dans le
mur « côté woofer » en premier.
4. Revissez les vis de fixation.
Important : Ne resserrez pas
les vis excessivement.
Si vous voulez peindre les
enceintes ou les grilles, faites-le
avant l’installation des grilles.
Veuillez consulter les instructions
de
peinture qui suivent.
Einbau in eine fertige Fläche
1
. Den Umriss des
Installationslochs mit der mit-
gelieferten Maske anzeichnen.
In der Mitte der aus-zuschnei-
denden Fläche ein kleines Loch
erzeugen. Ein langes Stück
gebogenen Drahts in das Loch
e
inschieben, um zu prüfen,
dass hinter der gewählten
Stelle keine Hindernisse
vorhanden sind.
2. Das Montageloch schneiden.
3. Das Kabel vom Verstärker zum
eben erzeugten Ausschnitt ver-
legen. An der Ausschnittstelle
e
twa 30 cm extra Kabellänge
vorsehen.
Alle Installationen
1. 13 mm Isolierung vom Kabel
entmanteln, und die
Drahtlitzen zusammendrehen.
Der HSi-Lautsprecheranschluss
nimmt entweder blanken
Draht bis zu AWG 14 oder ein-
fache Gabelschuhstecker auf.
2. Das Kabel an den Lautsprecher
anschließen.
3. Den Lautsprecher - wie abge-
bildet - in den Ausschnitt
schieben. Den Lautsprecher
müssen mit der „Woofer“-Seite
zuerst in die Wand geschoben
werden.
4. Die Kreuzschlitz-Befestigungs-
schrauben festziehen.
Wichtig: Die Schrauben nicht
zu fest anziehen.
Wenn die Lautsprecher oder
Ziergitter lackiert werden sollen,
muss dies vor der Installation des
Ziergitters geschehen (siehe
Anweisungen zum
Lackieren).
5.
I
nser
t the g
r
ille into the slots in
the baffle
.
T
he mag
nets will
secur
ely hold the g
r
ille in place
.
5. I
nser
t
e la r
ejilla en las ranuras del
bafle pr
esionando ligerament
e
en los ex
tr
emos
.
5. I
nsér
ez la g
r
ille dans les f
entes
du haut
-par
leur à membrane
en appuyant légèr
ement sur
ses bor
ds
.
5.
F
ügen Sie das Zier
g
itt
er in die
S
chlitz
e in der S
challwand ein,
indem Sie entlang der K
ant
e
v
orsichtig andrück
en.