


Retrot Installations
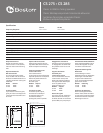
1. Mark the outline of the installation
hole using the supplied template.
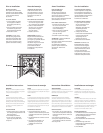
Make a small hole at the center
of the speaker location. Insert a
long, bent piece of wire and
rotate to conrm that there
are no obstructions behind the
chosen location.
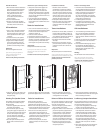
2. Cut the installation hole.
3. Run the wire from the amplier
location to the cutout. Allow for an
extra foot of wire at the cutout.
All Installations
1. Strip ½-inch (13mm) of insulation
from the wire, and twist the wire
strands together. The speaker jack
will accept either bare wire up to
14-gauge.
2. Connect the wire to the speaker.
3. Slide the speaker into the cutout.
4. Tighten the 4 Phillips mounting
screws. The mounting arms will
pivot into position and clamp the
speaker to the mounting surface.
Important:
Do not overtighten the screws.
If you wish to paint your speakers or
grilles, it should be done prior to
installation of the grille.
Please see the painting instructions.
Instalaciones para el montaje trasero
1. Marque el contorno del agujero con
la plantilla suministrada. Haga un
pequeño agujero en el centro de la
ubicación del altavoz. Meta un alambre
curvado y dele vueltas para asegurarse
de que no hay obstáculos traseros en la
posición elegida.
2. Corte el agujero para la instalación.
3. Tienda el cable desde el amplicador
hasta el nal. Corte a 304mm más de lo
necesario.
Todas las instalaciones
1. Pele 13 mm del aislante del cable y re-
tuerza el extremo para agrupar los hilos.
El conector del altavoz acepta tanto
alambre de calibre 14.
2. Conecte el cable al altavoz.
3. Introduzca el altavoz en el agujero.
4. Apriete los tornillos de estrella o cruz de
montaje. Los brazos de montaje girarán
hasta su posición y mantendrán el al-
tavoz sujeto a la supercie del montaje.
Importante:
No apriete demasiado los tornillos.
Si quiere pintar los altavoces o las rejillas
deberá hacerlo antes de la instalación
de la rejilla.
Consulte las instrucciones para pintarlos.
Installations améliorées
1. Tracez le contour de l’orice
d’installation en utilisant le gabarit
fourni. Faites un petit trou au centre
de l’endroit où sera placée l’enceinte.
Insérez-y un grand morceau de câble
replié, et faites tourner celui-ci an
de vous assurer qu’il n’existe aucun
obstacle derrière l’endroit choisi.
2. Découpez l’orice d’installation.
3. Amenez le câble de l’ampli à l’orice
que vous venez de découper, en
prévoyant 304mm de câble supplé-
mentaire.
Toutes installations
1. Dénudez 13 mm de câble, et torsadez
les ls souples ensemble. La che de
l’enceinte accepte les câbles dénudés
d’un diamètre maximum de calibre 14.
2. Connectez le câble à l’enceinte.
3. Introduisez l’enceinte dans l’orice
découpé.
4. Revissez les vis de xation. Les sup-
ports de xation pivotent en position
et xent l’enceinte sur la surface de
xation.
Important :
Ne resserrez pas les vis excessivement.
Si vous voulez peindre les enceintes ou les
grilles, faites-le avant l’installation des grilles.
Veuillez consulter les instructions de
peinture qui suivent.
Einbau in eine fertige Fläche
1. Den Umriss des Installationslochs mit
der mitgelieferten Maske anzeichnen.
In der Mitte der auszuschneidenden
Fläche ein kleines Loch erzeugen. Ein
langes Stück gebogenen Drahts in
das Loch einschieben, um zu prüfen,
dass hinter der gewählten Stelle keine
Hindernisse vorhanden sind.
2. Das Montageloch schneiden.
3. Das Kabel vom Verstärker zum eben
erzeugten Ausschnitt verlegen. An der
Ausschnittstelle etwa 304mm extra
Kabellänge vorsehen.
Alle Installationen
1. 13 mm Isolierung vom Kabel entman-
teln, und die Drahtlitzen zusammen-
drehen. Der Lautsprecheranschluss
nimmt entweder blanken Draht bis zu
AWG 14.
2. Kabel an den Lautsprecher anschließen.
3. Den Lautsprecher in den Ausschnitt
schieben.
4. Die Kreuzschlitz-Befestigungs-schrau-
ben festziehen. Die Montagearme
schwenken in die Einbaustellung und
klemmen den Lautsprecher an der
Montageäche fest.
Wichtig:
Die Schrauben nicht zu fest anziehen.
Wenn die Lautsprecher oder Ziergitter
lackiert werden sollen, muss dies vor der
Installation des Ziergitters geschehen
(siehe Anweisungen zum Lackieren).
5. Insert the grille into the slots in the
bae by gently applying pressure
along the edge.
Painting The Speaker Frame
The speakers may be painted before
or after they are installed. They are
already primed.
1. Insert the supplied paint mask into
the frame of the speaker.
2. Paint the frame. If you are using
spray paint, apply two light coats. If
you are applying paint with a brush
or roller, thin the paint and apply
two very light coats. This helps
prevent excessive paint buildup or
“runs” on the frame.
3. After the paint has dried, use the
nger pulls to remove the paint
mask.
5. Inserte la rejilla en las ranuras del bae
presionando ligeramente en los extremos
Todas las instalaciones
Pintura el marco del altavoz
Los altavoces pueden pintarse antes
o después de la instalación. Vienen de
fábrica con can base para pintura o primer.
1. Inserte la plantilla (máscara) para pintar
suministrada en el marco del altavoz.
2. Pinte el marco. Si utiliza pintura en
spray, aplique dos capas ligeras. Si
utiliza pincel o rodillo, diluya la pintura
y aplique dos capas muy delgadas. Esto
evitará el exceso de pintura y el “cor-
rimiento” de la misma.
3. Una vez seca la pintura, tire de los
lugares previstos en la máscara para
retirarla.
.
5. Insérez la grille dans les fentes du
haut-parleur à membrane en appuy-
ant légèrement sur ses bords.
Peinture Corets des enceintes
Les enceintes peuvent être peintes avant
ou après leur installation. Elles ont déjà
reçu une couche de fond.
1. Insérez le masque à peinture fourni
dans le coret de l’enceinte.
2. Peignez le coret. Si vous utilisez de la
peinture au pistolet, appliquez deux
couches légères. Si vous appliquez
la peinture avec un pinceau ou un
rouleau, diluez-la et appliquez deux
couches très légères. Vous éviterez
ainsi une accumulation excessive de
peinture ou des coulées sur le coret.
3. Une fois que la peinture est sèche,
utilisez les languettes pour retirer le
masque de peinture.
5. Fügen Sie das Ziergitter in die Schlitze in
der Schallwand ein, indem Sie entlang der
Kante vorsichtig andrücken.
Lackierung Lautsprecherrahmen
Die Lautsprecher können vor oder nach der
Installation lackiert werden. Sie sind bereits
mit einer Grundierung versehen.
1. Legen Sie die mitgelieferte Lackierungs-
maske in den Lautsprecherrahmen.
2. Lackieren Sie den Rahmen. Wenn Sie den
Lack aufsprühen, müssen zwei dünne
Schichten aufgetragen werden. Wenn
Lack mit einem Pinsel oder einer Walze
aus der Dose aufgetragen wird, verdün-
nen Sie erst den Lack und tragen dann
zwei ganz dünne Schichten auf. Dies
verhindert übermäßig dicke Lackansam-
mlungen oder Lack-„Tränen“ auf dem
Rahmen.
3. Nach dem Trocknen des Lacks ziehen Sie
die Lackierungsmaske an den Fingerl-
aschen ab.