


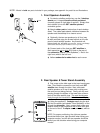

1. Front Speaker Assembly
a
) For desk or shelftop positioning, use the 3 desktop
stands and 1 integrated audio control pod/stand
(normally placed on right side of monitor). Simply slide
each stand's lip into the SST satellite speaker's
underside groove.
b
) Attach rubber pads to bottom tips of each desktop
stand. The rubber pads absorb vibrations between the
speaker and the desktop for a cleaner sound.
c
) Optionally, the two rear speakers (or all four) may
be wall mounted using the formed keyhole on the rear
panel of each satellite speaker. Any standard nail,
picture hook, etc. will work. (Not included. Consult a knowledge-
able installer about the proper hardware to use on your wall.)
d
) Connect each of the front two SST satellites to
their respective red or white RCA jack on the rear of
the subwoofer (labeled "Front Speakers"). Red is the
right front; white is the left front.
e
) Adhere subwoofer's rubber feet to each corner.
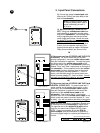
2. Rear Speaker & Tower Stand Assembly
f
) First, snap on the slide caps to the top of each tower
tube. Then feed the connection cord from each SST
satellite down through the tube. Next, slide each
satellite speaker on to top of tower tube, making sure
the cords are not being pinched. Finally, with the cord
passing through the bottom of the tower tube, slide on
each of the three stability legs. The cord should pass
freely through the intersection of the three stablility legs.
g
) Using the supplied 8"
Y
adapter cord, plug the pink
end into the phono jack labeled "Rear Speakers" on the
of back the subwoofer. Next, connect each of the rear
satellite cords to their respective red or white RCA jack
on the end of the 8"
Y
adapter cord; red to red, white to
white.
NOTE: For proper positioning, the right rear speaker
should be behind your right shoulder when facing your
computer monitor, and the left rear speaker should be
behind your left shoulder when facing your computer
monitor.
1
NOTE: Words in bold are parts included in your package; see appendix for parts list and illustrations.
or
wall
a
c
b
Back of subwoofer