


13
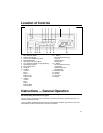
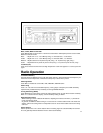
Ignition-Off Clock Recall
Any button press while ignition off displays time for about 8 seconds.
Ignition-On
Unit lights up and clock is displayed.
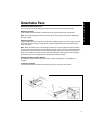
Release for Detachable Faceplate
Push REL to detach face. Already-inserted CD remains in unit. Current settings and source mode
are stored. If power was not switched off before face removed, unit will automatically power-on
when face is reattached.
Power (PWR) On/Off
When ignition on, press PWR or insert a disc to turn unit on. Last-used source becomes active,
unless unit is turned on by inserting disc, in which case CD player becomes active.
Power Off
Press PWR to turn unit off. Unit stores current settings for source, station or track, etc. Antenna/
amplifier trigger wire shuts off voltage. (If faceplate still attached, display switches to clock.)
Setting the Clock
Turn the unit on. Press the CLK Button for four seconds until the clock starts blinking. (The display
will change after two seconds. Ignore this and continue to hold for two more seconds.) Once the
clock starts blinking, Press the /\ to set the hour, and press the V Button to set the minutes. (To
change the minute indicator to the nearest hour (:00), you can press the MUTE Button. Press the
CLK Button again to activate the clock.
Changing the Information Displayed
You can temporarily change the information shown in your unit’s display. You can also select which
information has “display priority” and is shown in the display except for moments when adjustments
are made.
• To change the display priority, press the CLK Button for two seconds. The display priority
changes. The display priority choices are clock or Radio Frequency and Elapsed Play Time /
Track Number.
• To change the display temporarily, press and release the CLK Button to
access the desired
information.* After five seconds, the display changes back to the priority information.
Source (SRC)
Use SRC to select source - AMT, FM1, FM2, FMT or CD (if already inserted), and/or auxiliary input
(even if no input on aux in line).
Audio Operation
Volume Control Buttons (+/–)
Press + and - to increase/decrease volume from 0 to 63, in increments of 1.25 dB/step. Volume
control is accessible from all modes except Bass, Treble, Balance and Fade modes.
Adjustable Maximum Turn-On Volume
First adjust the volume to the (maximum) volume level desired when the unit is turned on. Press
and hold the PWR Button for more than two seconds. The unit turns off and the turn-on volume
level is memorized. When the unit is turned on, the volume will be at the memorized level, even if
the unit was turned off while the volume was at a higher level. However, if the volume is turned off
when the volume level is lower than the stored Turn-On volume level, the volume will be at the
lower level when the unit is turned back on.
Mute
Press Mute to temporarily reduce volume by 20 dB. “MUTE” appears. Mute is terminated by
pressing any button.