


english
17
1.2 Antennae
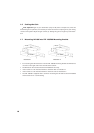
Fully extend the antennae and set them at an angle of 60° between each antenna. The
two antennae are positioned this way to achieve the best pick-up reception.
1.3 Setting up
1. Place the NE 100 diversity receiver in the same room or area as the transmitters. Ensure
that the NE 100 is installed as close as possible to the mixing console or amplifier so that
all indications can be seen at all times.
2. Do not place the NE 100 diversity receiver near digitally controlled equipment.
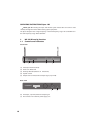
3. Connect the XLR-output (6) to the corresponding input of the mixing console or amplifier.
Using the output level control (5) you can adjust the gain.
4. Make sure the mains voltage shown on the power supply unit corresponds to the local
mains voltage.
5. Connect the power supply unit to the receiver and to AC power. The receiver has no
separate On/Off switch. The power On / Mute LED (2) is illuminated red.
6. To adjust the input gain turn the squelch control (4) to maximum.
7. If the On/Mute LED (2) is illuminated green when there is no transmitter switched on, there
is RF noise present. Turn the squelch control (4) counter clockwise to minimum until the RF
noise is disappeared.
8. As soon as you switch on the transmitter, the On/Mute LED (2) should go out and the
diversity LEDs (3) indicate which antenna input is active.
1.4 Diversity Indication of the Receiving Channel
The NE 100 has two separate receiving circuits for each of the antennae A and B. The
signal with the better S/N ratio is silently switched to the output. The received diversity channel
A or B is shown on the LEDs (3).
1.5 Squelch
Switch off the transmitter before you change the squelch. Now the receiver should be
muted. If it is not, then slowly adjust the squelch (4) until all unwanted signals are muted. As
soon as the receiver has been muted, the On/Mute LED (2) is illuminated red. Setting the level
too high, however, will reduce the range of your system.
Squelch control (4) to the left = minimum range
Squelch control (4) to the right = maximum range - Caution: Interferences can occur!