


PHONO Owner's Manual Page 7
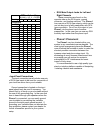
DIP switch setting
BLANK = UP, X = DOWN
Cartridge 50 100 500 1 k 10 k
Load(ohms)
50000
8333
x
980
x
893
x x
495
x
472
x x
331
x x
321
x x x
100
x
99
x x
91
x x
90
x x x
83
x x
77
x x x
76
x x x x
50
x
48
x x
47
x x x
45
x x
43
x x x
33
x x
32
x x x
31
x x x
30
x x x x
• Input Panel Connections
The input connection panel includes one pair
of RCA type inputs to be used for connection of
your tone-arm wires from your turntable.
Ground connection is located on the input
panel should only be used if necessary. You
should first try to hook up your turntable without
the use of this grounding plug. In the case that
hum is heard through your speakers when the
Phono1 is connected, you can easily ground
your turntable by connecting the turntable
ground to the input panel ground terminal. If
grounding your turntable does not alleviate the
hum problems, please contact your dealer for
further information specific to your system
setup.
• RCA Main Output Jacks for Left and
Right Channels
These connectors are found on the
opposite side as the RCA inputs, ground
connector, and loading switches. The Phono1
has one pair of RCA type outputs, which can be
run into any input of any preamplifier with RCA
type connectors. Do not run the output of your
Phono1 into the phono input of another
preamplifier. In this case you can use any RCA
auxiliary input rather than the phono input.
• Phono1 Placement
The Phono1 may be situated within your
system in any convenient manner desired. The
most typical arrangement places the Phono1
near or behind the turntable in order to make the
shortest possible connection between the
tonearm output and phono stage input. By
eliminating as much tonearm interconnect wire
as possible you will reduce the system’s
susceptibility to RF interference and sonic
impact of long wires.
It is recommended to use a high quality type
stand or isolation platform capable of dissipating
/ isolating vibration and resonance.