


2 EUROPOWER EP4000/EP2000 User Manual
Thank you
Thank you for choosing a BEHRINGER EUROPOWER amplier. This piece of
high-end gear was developed for professional use in live applications, and its
many features make it a useful and dependable part of your sound system.
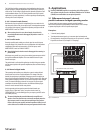
The EUROPOWER amps feature an input lter for each channel, enabling you
to remove the low-frequency portion of the signal, if desired. Additionally,
there is a limiter that protects your loudspeakers. Various operating modes,
such as parallel or mono-bridged mode, open up various possibilities for
eective implementation with the rest of your audio equipment for almost
anyapplication.
This manual rst describes the controls and connection points so that you fully
understand the EUROPOWER amplier and its functions. Then it delves into the
various applications where the EUROPOWER amp can be used, and nishes with
more details on installing and making the connections to the amplier.
Have fun with your new amplier.
Table of Contents
Thank you .......................................................................2
Important Safety Instructions ......................................3
Legal Disclaimer .............................................................3
Limited Warranty ...........................................................3
1. Introduction ............................................................... 5
1.1 Before you get started ...................................................... 5
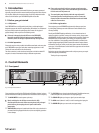
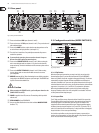
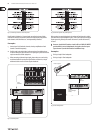
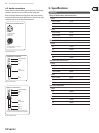
2. Control Elements .......................................................5
2.1 Front panel ............................................................................ 5
2.2 Rear panel ............................................................................. 6
2.3 Conguration switches (MODE SWITCHES) .............. 6
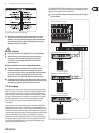
3. Applications ............................................................... 7
3.1 Dierences between 2-channel,
paralleland mono-bridged operating modes ................ 7
3.2 Bi-amping .............................................................................. 9
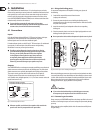
4. Installation ...............................................................10
4.1 Connections ........................................................................10
4.2 Audio connections ........................................................... 11
5. Specications ........................................................... 11