


6 ULTRA-DI PRO DI800 User Manual
1. Introduction
Be it on-stage or in the studio, musicians often look for ways to
connect certain signal sources directly to the mixing console.
Even though this approach has obvious advantages, there are still
some technical hurdles obstructing its implementation. For example,
keyboards seldom feature balanced outputs, and guitars can not be
directly connected to mixing consoles because of the high impedance
of guitar signals.
A DI-box lets you directly tap into a high-impedance, unbalanced
signal—for example, the signal between a guitar and a guitar amp.
From there on, you can feed the signal directly to a mixing console.
There are active and passive DI-boxes. A passive DI-box is more
aordable, but its performance is highly dependent on the
impedance of the equipment to which it is connected. When the
impedance on the mixing console’s end changes, so does the
impedance at the DI-box’s input. A passive DI-box only functions
correctly when the impedance of the connected equipment is exactly
specied (high at the input, low at the output).
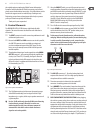
On the other hand, active DI-boxes, such as the DI800, are not bound
by these limitations, since the signal located at the input is “buered”
by an amplier. The input impedance of the DI800 is extremely high.
It does not inuence the sound source and has absolutely no eect on
the signal ow though the DI-box. The output impedance is balanced
and is very low, and the signal is far less susceptible to picking
up noise. The ULTRA-DI PRO always transmits signals optimally,
independent of the impedance of the connected equipment.
In addition to being powered by a mains connection, the ULTRA-DI
PRO DI800 can also run on phantom power provided by your
mixing console.
◊ To avoid damaging your loudspeakers, always first
connect the DI-box and only then open up the respective
channel strip.
1.1 Before you get started
1.1.1 Shipment
Your ULTRA-DI PRO was carefully packed at the assembly plant to
assure secure transport. Should the condition of the cardboard box
suggest that damage may have taken place, please inspect the unit
immediately and look for physical indications of damage.
◊ Damaged units should NEVER be sent directly to us.
Please inform the dealer from whom you acquired the unit
immediately as well as the transportation company from
which you took delivery of the unit. Otherwise, all claims for
replacement/repair may be rendered invalid.
◊ To assure optimal protection of your ULTRA-DI PRO during
use or transport, we recommend utilizing a carrying case.
◊ Please always use the original packaging to avoid damage
due to storage or shipping.
◊ Never let unsupervised children play with the ULTRA-DI PRO
or with its packaging.
◊ Please dispose of all packaging materials in an
environmentally-friendly fashion.
1.1.2 Initial operation
Please make sure the unit is provided with sucient ventilation,
and never place the ULTRA-DI PRO on top of an amplier or in the
vicinity of a heater to avoid the risk of overheating.
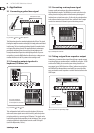
◊ Before plugging the unit into a power socket, please make
sure you have selected the correct voltage:
The fuse compartment near the power plug socket contains three
triangular markings. Two of these triangles are opposite one another.
The voltage indicated adjacent to these markings is the voltage to
which your unit has been set up, and can be altered by rotating the
fuse compartment by 180°. ATTENTION: This does not apply to
export models that were for example manufactured only for
use with 120 V!
◊ If you alter the unit’s voltage, you must change the fuse
accordingly. The correct value of the fuse needed can be
found in the chapter “Specifications”.
◊ Faulty fuses must be replaced with fuses of appropriate
rating without exception! The correct value of the fuses
needed can be found in the chapter “Specifications”.
Power is delivered via the cable enclosed with the unit. All required
safety precautions have been adhered to.
◊ Please make sure that the unit is grounded at all times.
For your own protection, you should never tamper with
the grounding of the cable or the unit itself. The unit
shall always be connected to a mains socket outlet with a
protective earthing connection.
1.1.3 Warranty
Please take a few minutes and send us the completely lled out
warranty card within 14 days of the date of purchase. You may also
register online at behringer.com. The serial number needed for the
registration is located at the top of the unit. Failure to register your
product may void future warranty claims.
1.1.4 Online registration
Please register your new BEHRINGER equipment right after your
purchase by visiting http://behringer.com and read the terms and
conditions of our warranty carefully.
Should your BEHRINGER product malfunction, it is our intention
to have it repaired as quickly as possible. To arrange for warranty
service, please contact the BEHRINGER retailer from whom the
equipment was purchased. Should your BEHRINGER dealer not
be located in your vicinity, you may directly contact one of our
subsidiaries. Corresponding contact information is included in