


Clutch
Position A
Position B
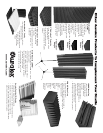
Second. Decide how you want it setup, then follow these
easy steps:
1. Setup the MAX-Wall stand to the desired height. Fully
extended if the top panel is to
be above 5’4”.
2. Remove the foam core from
the hole in the center of each
MAX-Wall panel (photo A).
3. Insert stand into hole in
MAX-Wall panel and push down to
desired height. Use the MAX-Wall
SuperGRIP Spring clamps to secure
the bottom panel (photo B). Con-
tinue adding MAX-Wall panels until
the desired height is achieved.
4. If the desired height is above the clutch, place a
SuperGRIP spring clamp on the smaller part of the
stand using position “b”. If the panels are below the
clutch, then friction will likely hold the panels in posi-
tion. We suggest you place the clamp underneath the
panel (position “a”) to insure no slipping or sagging
over time.
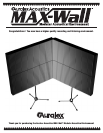
Thank you for purchasing your MAX-Wall™ Modular Acoustical Environment. This modular,
absorptive, expandable acoustical kit is ideal for situations where you cannot permanently place
Studiofoam™ on your room surfaces. It’s also great when you need to be able to quickly and
easily change your recording/listening environment for a variety of situations. The MAX-Wall offers
you a great deal of exibility, is easy to setup, and can be easily expanded. Be sure to check out
the complete line of Auralex products such as Stand-Mounted LENRD bass traps, our complete
line of Studiofoam and family of diffusors, as well as all of our construction-related materials @
www.auralex.com.
Thank you for buying a product that is revolutionizing acoustical treatment in studios across the country!
4'
7' 8"
1'8"
3'4"
figure 1
3 panels = 5'
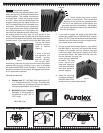
The MAX-Wall Instruction Sheet
First. Decide how you want to layout your new MAX-Wall:
(Keep in mind that there is no specific top, bottom, left or right sides to
these panels. They can be setup any way you choose. Make sure the
wedged surface faces the source of the
sound to be absorbed.)
1. What Width - Number of panels (see figure 1).
a. 1 single panel = 4’
b. 2 interlocked panels = 7’8”
c. 3 interlocked panels = 11’4” (not pictured)
2. How Tall - Number of panels (see figure 1).
a. 1 single panel = 20” (1’8”)
b. 2 stacked panels = 40” (3’4”)
c. 3 stacked panels = 60” (5’) (not pictured)
3. Starting height from the floor?
A
B
Serving Suggestions:
Stand-mounted
LENRD™