


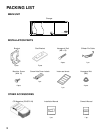
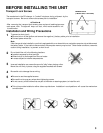
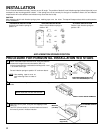
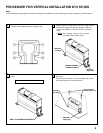

PROCEDURE FOR CHANGER INSTALLATION USING MOUNTING
STUDS
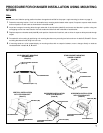
7
HEX BOLT (M6 x 15)
CARPET
SELF-TAPPING SCREWS
(M5 x 12)
STUD BRACKET
CHASSIS
STUD BRACKET
STUD BRACKET
STUD BRACKET
CHANGER MOUNTING
BRACKET
CHANGER MOUNTING
BRACKET
HEX NUT (M6)
HEX NUT (M6)
HEX NUT (M6)
STUD BRACKET
CHANGER MOUNTING
BRACKET
Note:
Make sure the anti-vibration spring position has been changed and verified for the proper angle mounting (as shown on page 4).
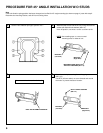
1 Determine mounting location. If unit is to be installed onto mounting studs located under carpet, lift carpet to expose metal chassis
and mark position of each stud as shown below in detail A and B.
2 Insert two hexagonal mounting bolts through underside of each bracket (detail A) and mount stud bracket in position using two
self-tapping screws into metal chassis. Hex bolt heads should be flush with underside of stud bracket.
3 Replace carpet over bracket studs (detail B), mark position of stud end of each bolt, and cut holes in carpet so bolts protrude through
carpet.
4 Proceed with unit mounting by positioning unit mounting brackets over protruding hex bolts as shown in details C, D and E. Secure
mounting brackets to bolts using hex lock nuts.
5 If mounting studs are to be located directly on mounting surface with no carpet in between, mount changer directly on studs as
illustrated below in details A, C, D and E.
STUD BRACKET MOUNTING
ARRANGEMENT
(Detail A)
STUD BRACKET MOUNTING
UNDER A CARPET
(Detail B)
VERTICAL INSTALLATION
WITH STUD BRACKET
(Detail C)
SUSPENDED INSTALLATION
WITH STUD BRACKET
(Detail D)
HORIZONTAL INSTALLATION
WITH STUD BRACKET
(Detail E)