


appears on the display panel. Within 5 seconds of choosing the
Bass mode, press the AUDIO CONTROL
2 button to decrease
the bass response, or the AUDIO CONTROL button to increase
it as desired. The level will be shown on the display panel from a
minimum BAS -12 to a maximum of BAS +12 (BAS 00 indicates
flat response). The display will automatically return to the normal
indication 5 seconds after the last adjustment or when another
function is activated.
NOTE: Base and Treble cannot be adjusted while Equalizer function
cu is in ROCK, CLAS or POP mode.
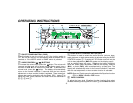
5 TREBLE CONTROL
To adjust the treble level (Equalizer function inactive), first select
the Treble mode by pressing the SEL button
3 so the TRE
indication appears on the display panel. Within 5 seconds of
choosing the Treble mode, press the AUDIO CONTROL button
2 to decrease the treble response or the AUDIO CONTROL
button to increase it as desired. The level will be shown on the
display panel from a minimum TRE -12 to a maximum of TRE +12
(TRE 00 indicates flat response). The display will automatically
return to the normal indication 5 seconds after the last adjustment
or when another function is activated.
6 LEFT/RIGHT BALANCE CONTROL
To adjust the left-right speaker balance, first select the Balance
mode by pressing the SEL button
3 so the BAL indication appears
on the display panel. Within 5 seconds of choosing the Balance
mode, press the AUDIO CONTROL button
2 to adjust the
stereo balance to the left channel speakers or the AUDIO
CONTROL button to adjust it to the right channel speakers. The
balance position will be shown on the display panel from BAL L16
(full left) to BAL R16 (full right). When the volume level between
the left and right speakers is equal, BAL 00 will be shown on the
-4-
display panel. The display will automatically return to the normal
indication 5 seconds after the last adjustment or when another
function is activated.
7 FRONT/REAR FADER CONTROL
To adjust the front-rear speaker balance, first select the Fader mode
by pressing the SEL button
3 so the FAD indication appears on
the display panel. Within 5 seconds of choosing the Fader mode,
press the
AUDIO CONTROL button 2 to adjust the front-rear
speaker balance to the rear speakers or the
AUDIO CONTROL
button to adjust it to the front speakers. The fader position will be
shown on the display panel from FAD R16 (full rear) to FAD F16
(full front). When the level between the front and rear speakers is
equal, FAD 00 will be shown on the display panel. The display will
automatically return to the normal indication 5 seconds after the
last adjustment or when another function is activated.
8 LOUDNESS CONTOUR (LOUD)
When listening to music at low volume levels, this feature will boost
the bass and treble ranges to compensate for the characteristics
of human hearing. Press the button momentarily to activate this
feature; the LOUD indication will appear on the display panel.
Pressing the button again momentarily will deactivate the feature
(the LOUD indication will disappear from the display panel).
9 AUDIO MUTE SELECTOR (MUTE)
Press this button momentarily to mute the volume from the system
(MUTE will appear blinking on the display panel). Pressing the
button again or adjusting the AUDIO CONTROL
2 level will return
to the volume level setting in use before the Mute function was
activated. During disc play, pressing this button will mute disc
audio; however, disc play will continue and not be paused. During
this time, the indication will remain on the display panel to show
that a disc is still loaded in the unit.