


UNPACKING
Due to the shape and the polished finish of the product, care must be taken when handling
your new Apex Series Loudspeaker.
Care must be taken when handling the table top stand/ wall plate. This, the
accessories and the grille should be removed from the packaging before
removing and unpacking the loudspeaker.
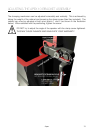
Great care must be exercised at all times to ensure the driver(s) and tweeter are
not damaged during unpacking and when finally siting in the room. Any physical
damaged caused to the drive unit by not complying with this requirement will not
be covered by warranty.
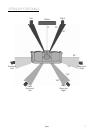
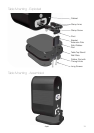
Within the packaging you will find the following:
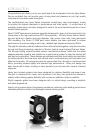
Apex 10
• Cabinet
• Table top stand/ wall mounting plate.
• Grille in separate carton.
• Accessory pack. Inc: Short and long bolts, extension pole, adhesive feet and hex key
• Wall fixing template
Apex 40
• Cabinet (with bracket attached)
• Grille in separate carton.
• Accessory pack. Inc: Grub screws, grub screw covers, adhesive feet, badge and hex key.
• Wall fixing template
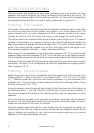
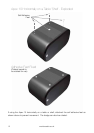
To remove the Apex products from the carton, place some protective material on the floor/
table top and having removed any loose items (Table top stand, accessory pack, grille)
from the top of the packaging, carefully invert the carton. Also see the icons on the carton.
Gradually pull the carton upwards to expose the underside of your Apex product. Remove
fixing tape from the bag(s) and expose the cabinet.
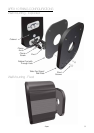
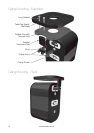
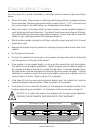
The Apex 10 will arrive with the clamp arms, pivot and clamp screw in situ. Assemble the
other components in accordance with your requirements following the guides on pages 9-12.
This assembly may need to be flipped over depending on the rotation of the speaker.
The Apex 40 will arrive with the wall bracket attached to the cabinet. To secure the Apex
40 to a wall, please refer to pages 14 & 15.
monitoraudio.co.uk
4